
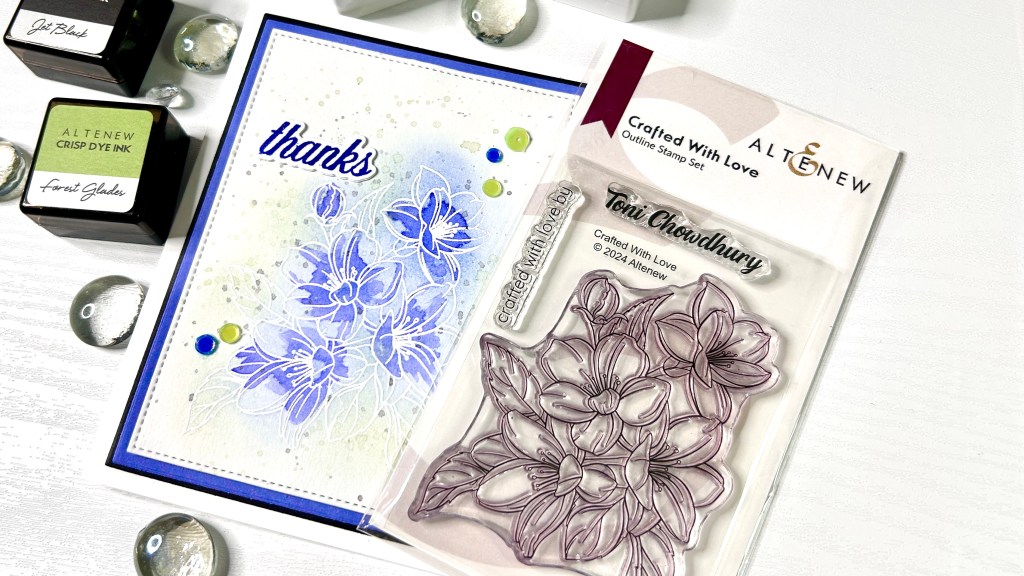

I’m thrilled to share with you a step-by-step tutorial on how to create a stunning thank you card using the Altenew 10th Anniversary stamp set. This set, gifted to me as a token of appreciation for being a loyal client, features a gorgeous floral cluster along with personalized stamps – a delightful gesture from Altenew to celebrate their milestone anniversary.
I thought it would be appropriate to create a thank you card and share it with the world to show my appreciation for the company that helps me stay inspired every single day!
Please note that you don’t need this particular stamp set to create a similar card. Just use what you have – a great idea to dig into your stash and find a pretty floral stamp set or any other favourite or long- forgotten hidden gem.
Let’s get started!
Step 1: Gather Your Materials
Before diving into the creative process, make sure you have all your supplies ready. Here’s what you’ll need:
- Altenew 10th Anniversary stamp set (or other stamp set)
- Mixed media paper (I prefer Canson since it’s better for water colouring)
- Altenew Pure White embossing powder
- Altenew ink pads
- Silver Sage
- Alpine Aster
- Crystal Violet
- Jet Black
- Frayed Leaf
- Sizzix clear embossing ink
- Antistatic powder tool
- Altenew Bougainvillea stamp and coordinating die set
- Embellishments (optional)
- MISTI stamping tool (or an acrylic block that fits your stamp)
- Heat tool
- Bearly Art liquid glue
- Paintbrush
- Dimensional foam tape
- Die cutting machine
Step 2: Stamp and Heat Emboss
- Begin by selecting a piece of mixed media paper that’s sufficiently large for the stamp you’re using and placing it in your MISTI stamping tool.
- Position the stamp onto the paper, ensuring you use the smoother side for stamping.
- Prep the paper with an antistatic powder to remove any grease or static.
- Apply clear embossing ink to the stamp and stamp it onto the paper.
- Cover the stamped image with Altenew Pure White embossing powder and tap off the excess.
- Heat set it until the powder melts and forms a raised, glossy outline.
Step 3: Ink Blending
- Using Altenew detail blending brushes, gently blend Silver Sage ink over the foliage and Alpine Aster ink over the flowers.
- Take your time to ensure thorough coverage, building up the colours gradually for a soft, blended effect.
- Wipe away any excess ink from the embossed outline with a paper towel. This will restore the glossy white of the outline.
Step 4: Add a Watercolour Accent
- Add depth and contrast to the flowers by applying Crystal Violet ink as watercolour accents.
- Smoosh a small amount of ink on your glass mat, spritz it with water, and use a paintbrush to apply the colour to the flower centres and along the petal lines.
Step 5: Create Background and Ink Splatters
For added interest, dilute Jet Black and Frayed Leaf inks with water and splatter them onto the background paper with a paintbrush.
TIP to stretch your supplies: Utilize any leftover ink from your water colouring step to create a complementary background. Spritz the ink with water and apply it to another piece of mixed media paper for later use as a background or for die cutting.
Step 6: Die Cut and Assemble
- Once your main panel is dry, use a rectangular stitch die (optional) to cut it out. You can also use a regular paper trimmer for this step if you don’t have the right kind of cutting die.
- Cut additional panels for layering, adjusting the sizes to create mats for your main panel.
- Adhere the mat to your card base with liquid glue.
- Use foam tape or mounting tape to adhere the layers together, adding dimension to your card.
Step 7: Stamp and Emboss Sentiment
- Select a sentiment stamp from the Altenew Bougainvillea stamp set and stamp it onto white card stock. You can use whatever sentiment you like or even choose not to use one.
- Treat your card stock with antistatic powder if you’d like to heat emboss your sentiment. Otherwise, omit this step.
- Stamp the sentiment with Crystal Violet ink.
- Apply clear embossing powder to the stamped sentiment if using and melt the powder with your heat tool for a beautiful glossy finish.
- Use coordinating dies to cut out the sentiment, layering it for added dimension. Or, use some dimensional foam tape to the back of the sentiment before adhering it to the card base.
Step 8: Embellish (Optional)
If desired, embellish your card with gems, sequins, or other decorative elements. Experiment with different arrangements until you find a design you love. Choosing an odd number of embellishments is ideal as odd numbers create more interest in a design.
Step 9: Final Touches
Carefully adhere the sentiment onto your card, ensuring it complements the overall design. Once everything is in place, step back and admire your beautiful creation!
There you have it – a gorgeous thank you card made with love and gratitude, featuring the exquisite Altenew 10th Anniversary stamp set. Get creative and explore different variations using this versatile stamp set, whether it’s for cards, gift tags, or other papercraft projects. Enjoy crafting and spreading joy with your handmade creations!


Leave a comment