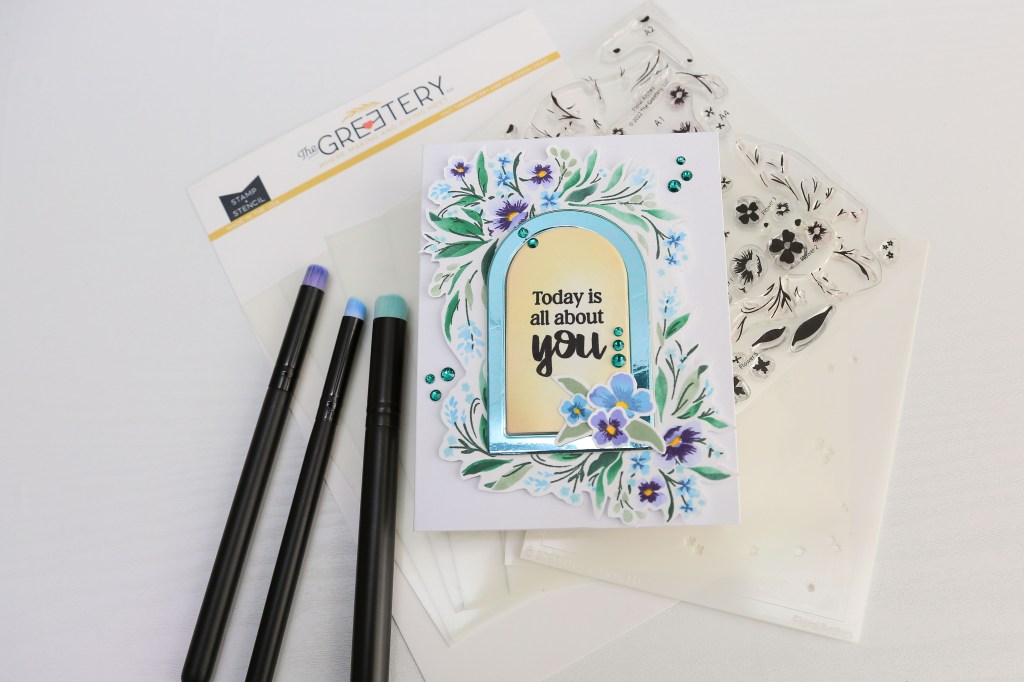
In this blog post, you’ll learn how to use the beautiful Floral Arches stamp and stencils set from The Greetery to add a touch of elegance and sophistication to your card making.
I’ll take you step-by-step through the process of creating a card with a stunning floral arch, a vibrant colour palette, and shimmering foil accents.
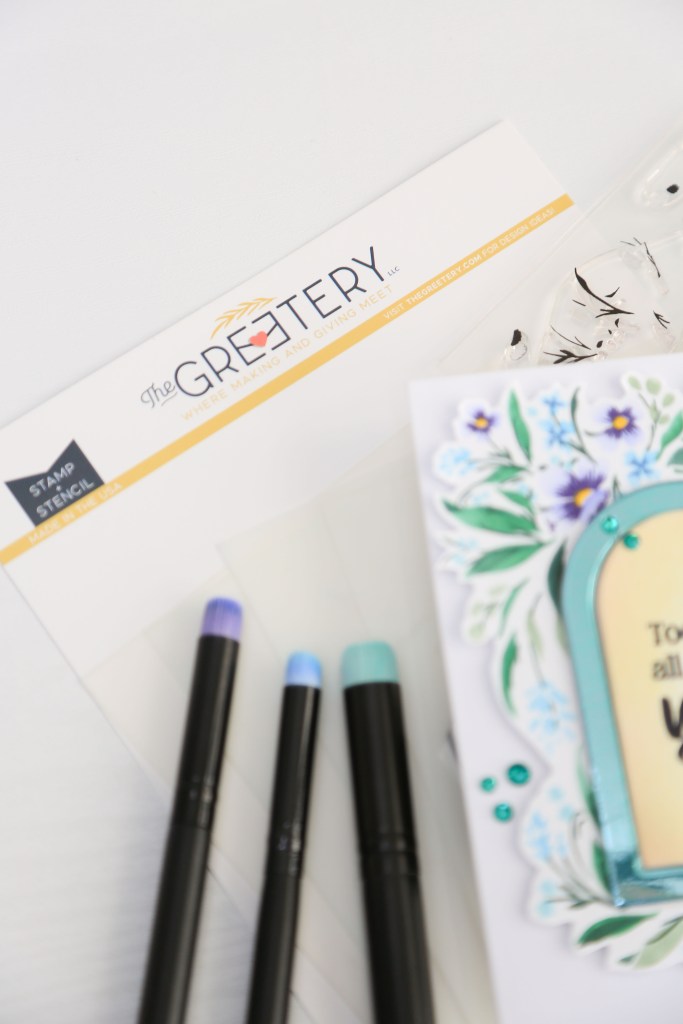
Step 1: Gather Your Materials
Here’s a list of supplies I used for your reference:
Paper
Card base: Ohuhu 110 lbs (8 ½ in. X 5 ½ in. Scored at 4 ¼ in. on the longer side
Card panel: Hammermill smooth white card stock 110 lbs 4 ¼ in. X 5 ½ in.
Floral Arch Stamp and Stencil Set (The Greetery)
Pinkfresh Studio Inks:
- Spruce Tips
- Lush Forest
- Sage
- Hydrangea
- Opulence
- Summer Shower
- Sky Blue
- Ranger Archival Inks – Black
- Gina K Designs Inks:
- Sweet Corn
- Innocent Pink
- Cutting dies – nested arch dies
- Detail scissors for fussy cutting
- MISTI stamping toolLiquid adhesive
- Dimensional foam tape
- Die cutting machine
- Stamp/stencil cleaner (or use baby wipes or plain water)
STEP 2: Prepare
Place the Hammermill card panel on the stick mat if you use one. Align the stencil marked 1 (all the layers are numbered for your convenience) over the card panel and ensure proper alignment using the registration marks on the stencil. Select your ink colours for each stencil layer if you want to use a different colour palette. You can also use the colours outlined in the guide included with the set or choose the ones I used.
STEP 3: Stencilling
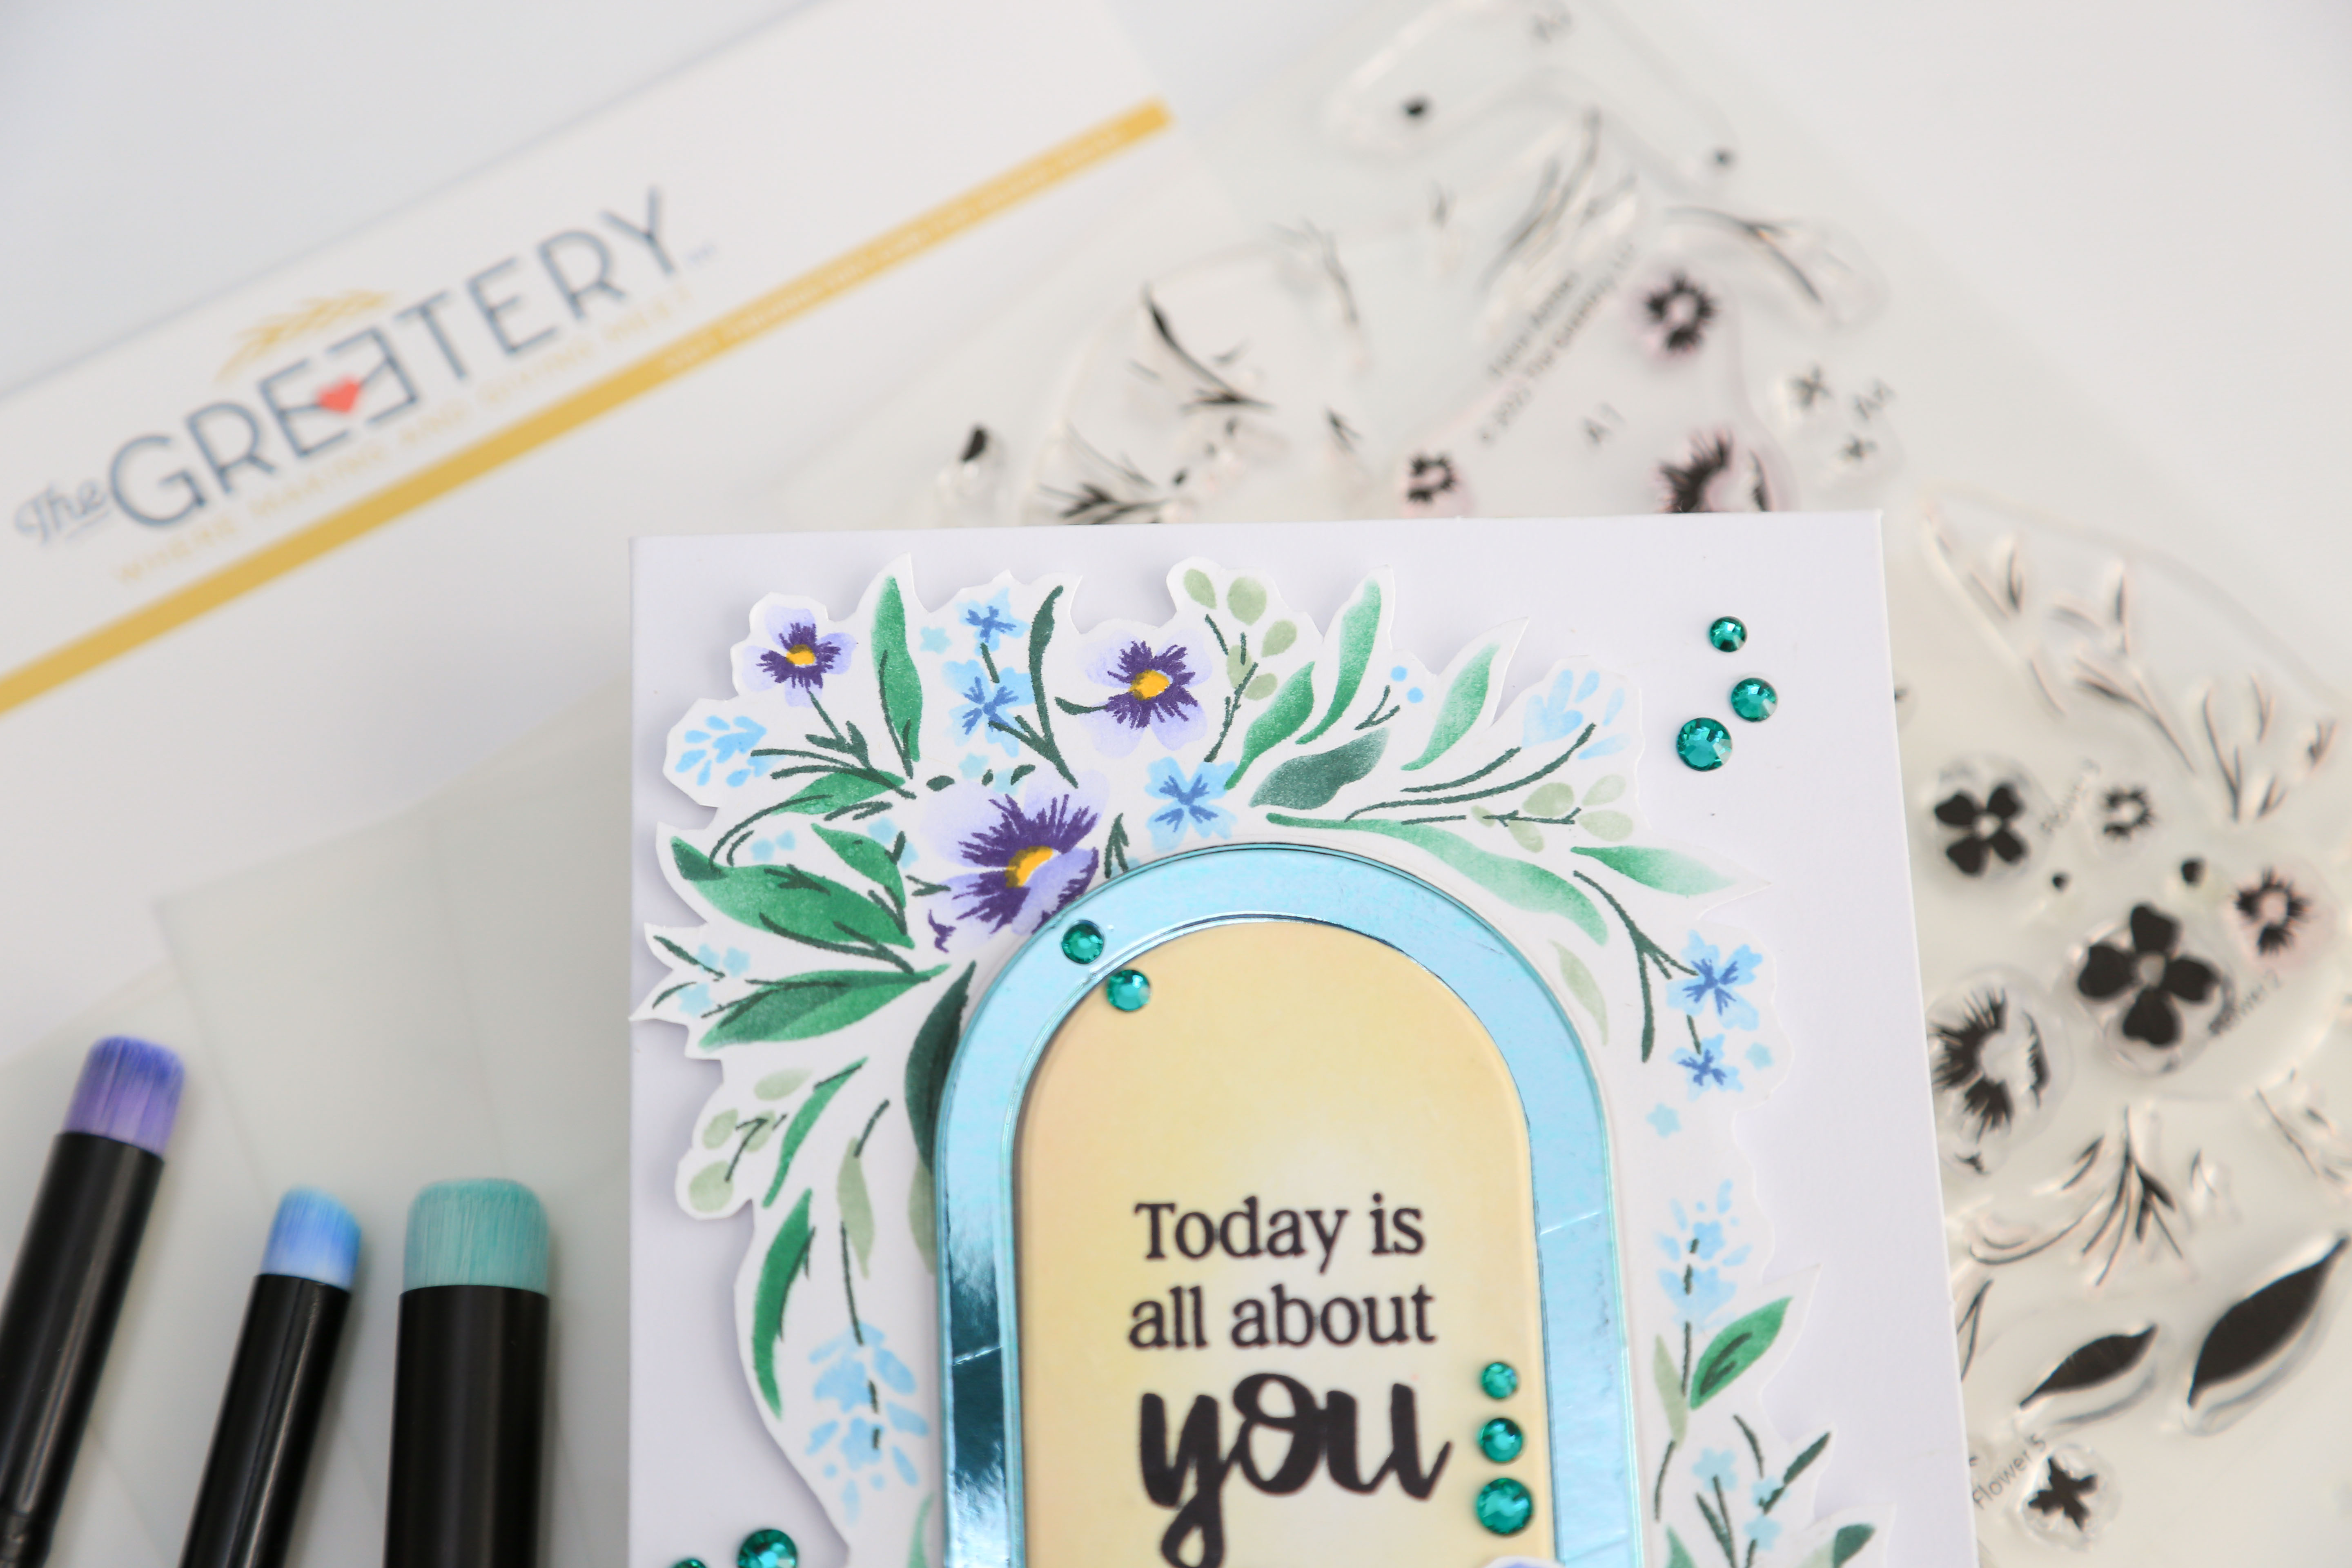
Begin stencilling with the first layer, using a smaller brush for precision. Apply the ink evenly within the stencil openings, following the designated colours for each layer. Repeat this process for all six stencil layers, varying the intensity of the ink as needed.
STEP 4: Adding Detail with Stamps
Once the stencilling is complete, use the stamp positioning tool to align and stamp the intricate details onto the stencilled image. Pay attention to proper positioning and alignment to ensure a flawless impression.
STEP 5: Colouring the Arch
After stamping the details, use the stencil layer with the arch, and blend around the outside edges of the arch with yellow ink for a spotlight effect. Add a further layer of light pink ink to the edges to create the effect of a glow.
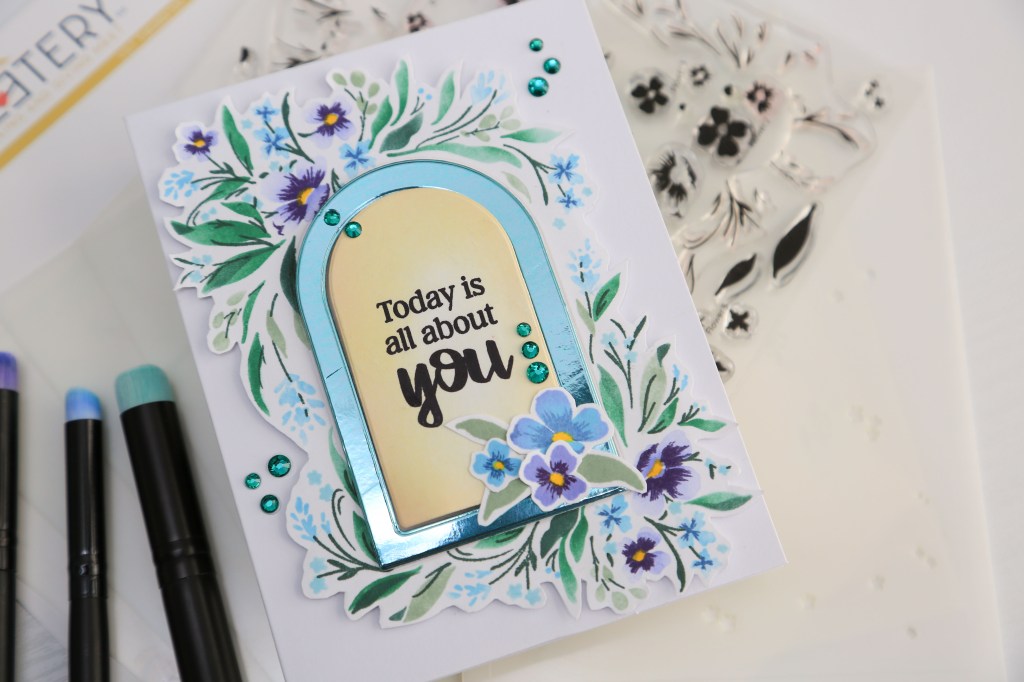
STEP 6: Fussy & Die Cutting
If you don’t have the coordinating Floral Arches die from The Greetery, fussy cut out the arch leaving a thin white border around the image. Next, cut out an arch using two nesting arch dies so you get two pieces – an inside arch and a frame around the arch. I used a blue metallic card stock to cut out the frame arch.
STEP 7: Stamp the Sentiment
Choose your sentiment and position the stamp on the smaller solid arch in your stamp positioning tool. I used the MISTI. Pick up the stamp with the MISTI door and use a black ink to stamp the sentiment.
STEP 8: Stamp the Flower & Leaf Cluster
Place a scrap piece of white card stock in your stamp positioning tool and stamp the layering flowers labeled Flower 1, Flower 2 and Flower 3. Choose a darker shade of ink for the petal details. Creating flowers and leaves in odd numbers will create more interest in the design. Cut out the flowers and foliage in preparation for the final step.
TIP: If you want to add flower details with the detail stamp, start by stamping the detail layer first before proceeding with the base layer. This helps with aligning the stamped images a lot better.
STEP 9: Adhere the Arches
Place dimensional foam tape behind the floral arch die cut and adhere it to the card centre. Next, add a thin strip of foam tape behind the metallic arch and adhere it to the inside of the floral arch. If you want the metallic arch to be slightly higher than the floral arch, you can layer your foam tape for more dimension.
Adhere foam tape behind the solid arch that you ink blended and stamped sentiment. Layer up the foam tapes behind the arch according to the height you’d like to have on this element.
STEP 10: Add the Floral Cluster
Adhere the flower and leaves cluster on the metallic arch. To make it easy to determine the positioning of the cluster, you can arrange the tiny die cuts on your work surface and then use a piece of Press’n Seal paper to lift up the arrangement and place it on the card. Make sure you add some liquid glue behind the floral die cuts before adhering it to the card.
STEP 11: Embellish
You can add some jewels or sequins to the card front to complete the design. Adding glittery embellishments will balance out the sheen on the metallic arch on the card.
Enjoy the crafty process and make sure you use whatever supplies you have to create your own unique handmade card.
If you’d like to watch me create the card, please watch this card tutorial on YouTube.


Leave a comment