Learn how to create a stunning personalized Butterfly Card using Spellbinders products with this step-by-step tutorial. This beautiful card with a floating butterfly is perfect for any special occasion.
Step 1: Gather Your Materials
Here’s a list of supplies I used for your reference:
- Paper
- Card base: Neenah Astrobrights Colours card stock – Peach 80 lbs (6 ½ in. X 5 ½ in. Scored at 1 in. on the longer side
- Simon Says Stamp Heat Resistant Acetate (5 ½ in. X 5 ½ in.)
- Peach card stock strip – 1 in. X 5 ½ in.
- Note card panel: Hammermill smooth white card stock 110 lb 5 ¼ in. X 5 ¼ in.
- Coloured scraps for florals & foliage
- White glitter card stock scrap for butterfly body
- Dies used:
- Spellbinders Butterfly Card Creator Etched Dies
- Spellbinders So Many Butterflies Etched Dies
- Spellbinders Lyrical Layered Stamp & Die Set (optional) (currently unavailable)
- Background stencil of your choice
- Pinkfresh Studio Inks
- Mimosa
- Eucalyptus
- Sage
- Altenew Jet Black Ink
- Altenew Stampwheel Ultra Sticky Grid Mat
- Small alphabet stamps
- Small round die to fit alphabet stamp
- Komorebi Metallic Watercolour Paints
- Paper trimmer (optional)
- MISTI stamping tool (optional)
- Bearly Art Liquid adhesive
- Dimensional foam squares (small)
- Gemini Junior die cutting machine + plates
- Stamp/stencil cleaner (use baby wipes or plain water)
Step 2: Prepare Card Base
First, trim your peach card base to measure 5.5″ x 6.5″. Score at 1″ along the long edge to create the front panel where the acetate will be adhered. Fold the card base at the score line. Cut your acetate sheet to 5 ¼ in. x 5 ¼ in.. Adhere it behind the card strip on the front panel using liquid glue, ensuring it’s well-aligned. The acetate needs to be kept slightly away from the fold line to ensure the card closes all the way. Set it aside to dry.
Step 3: Die Cut
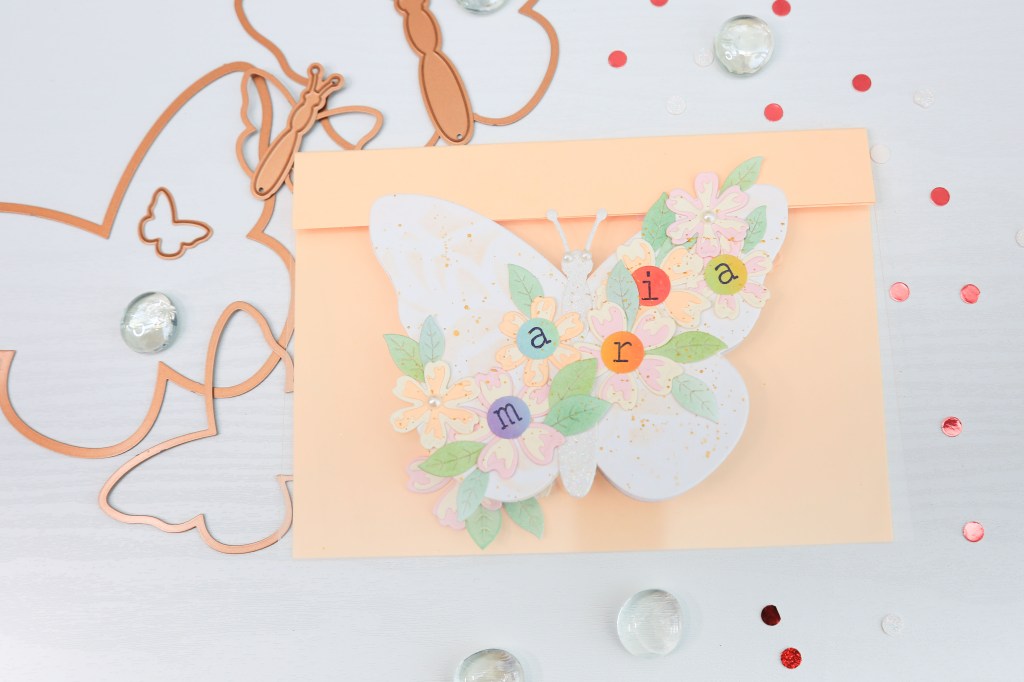
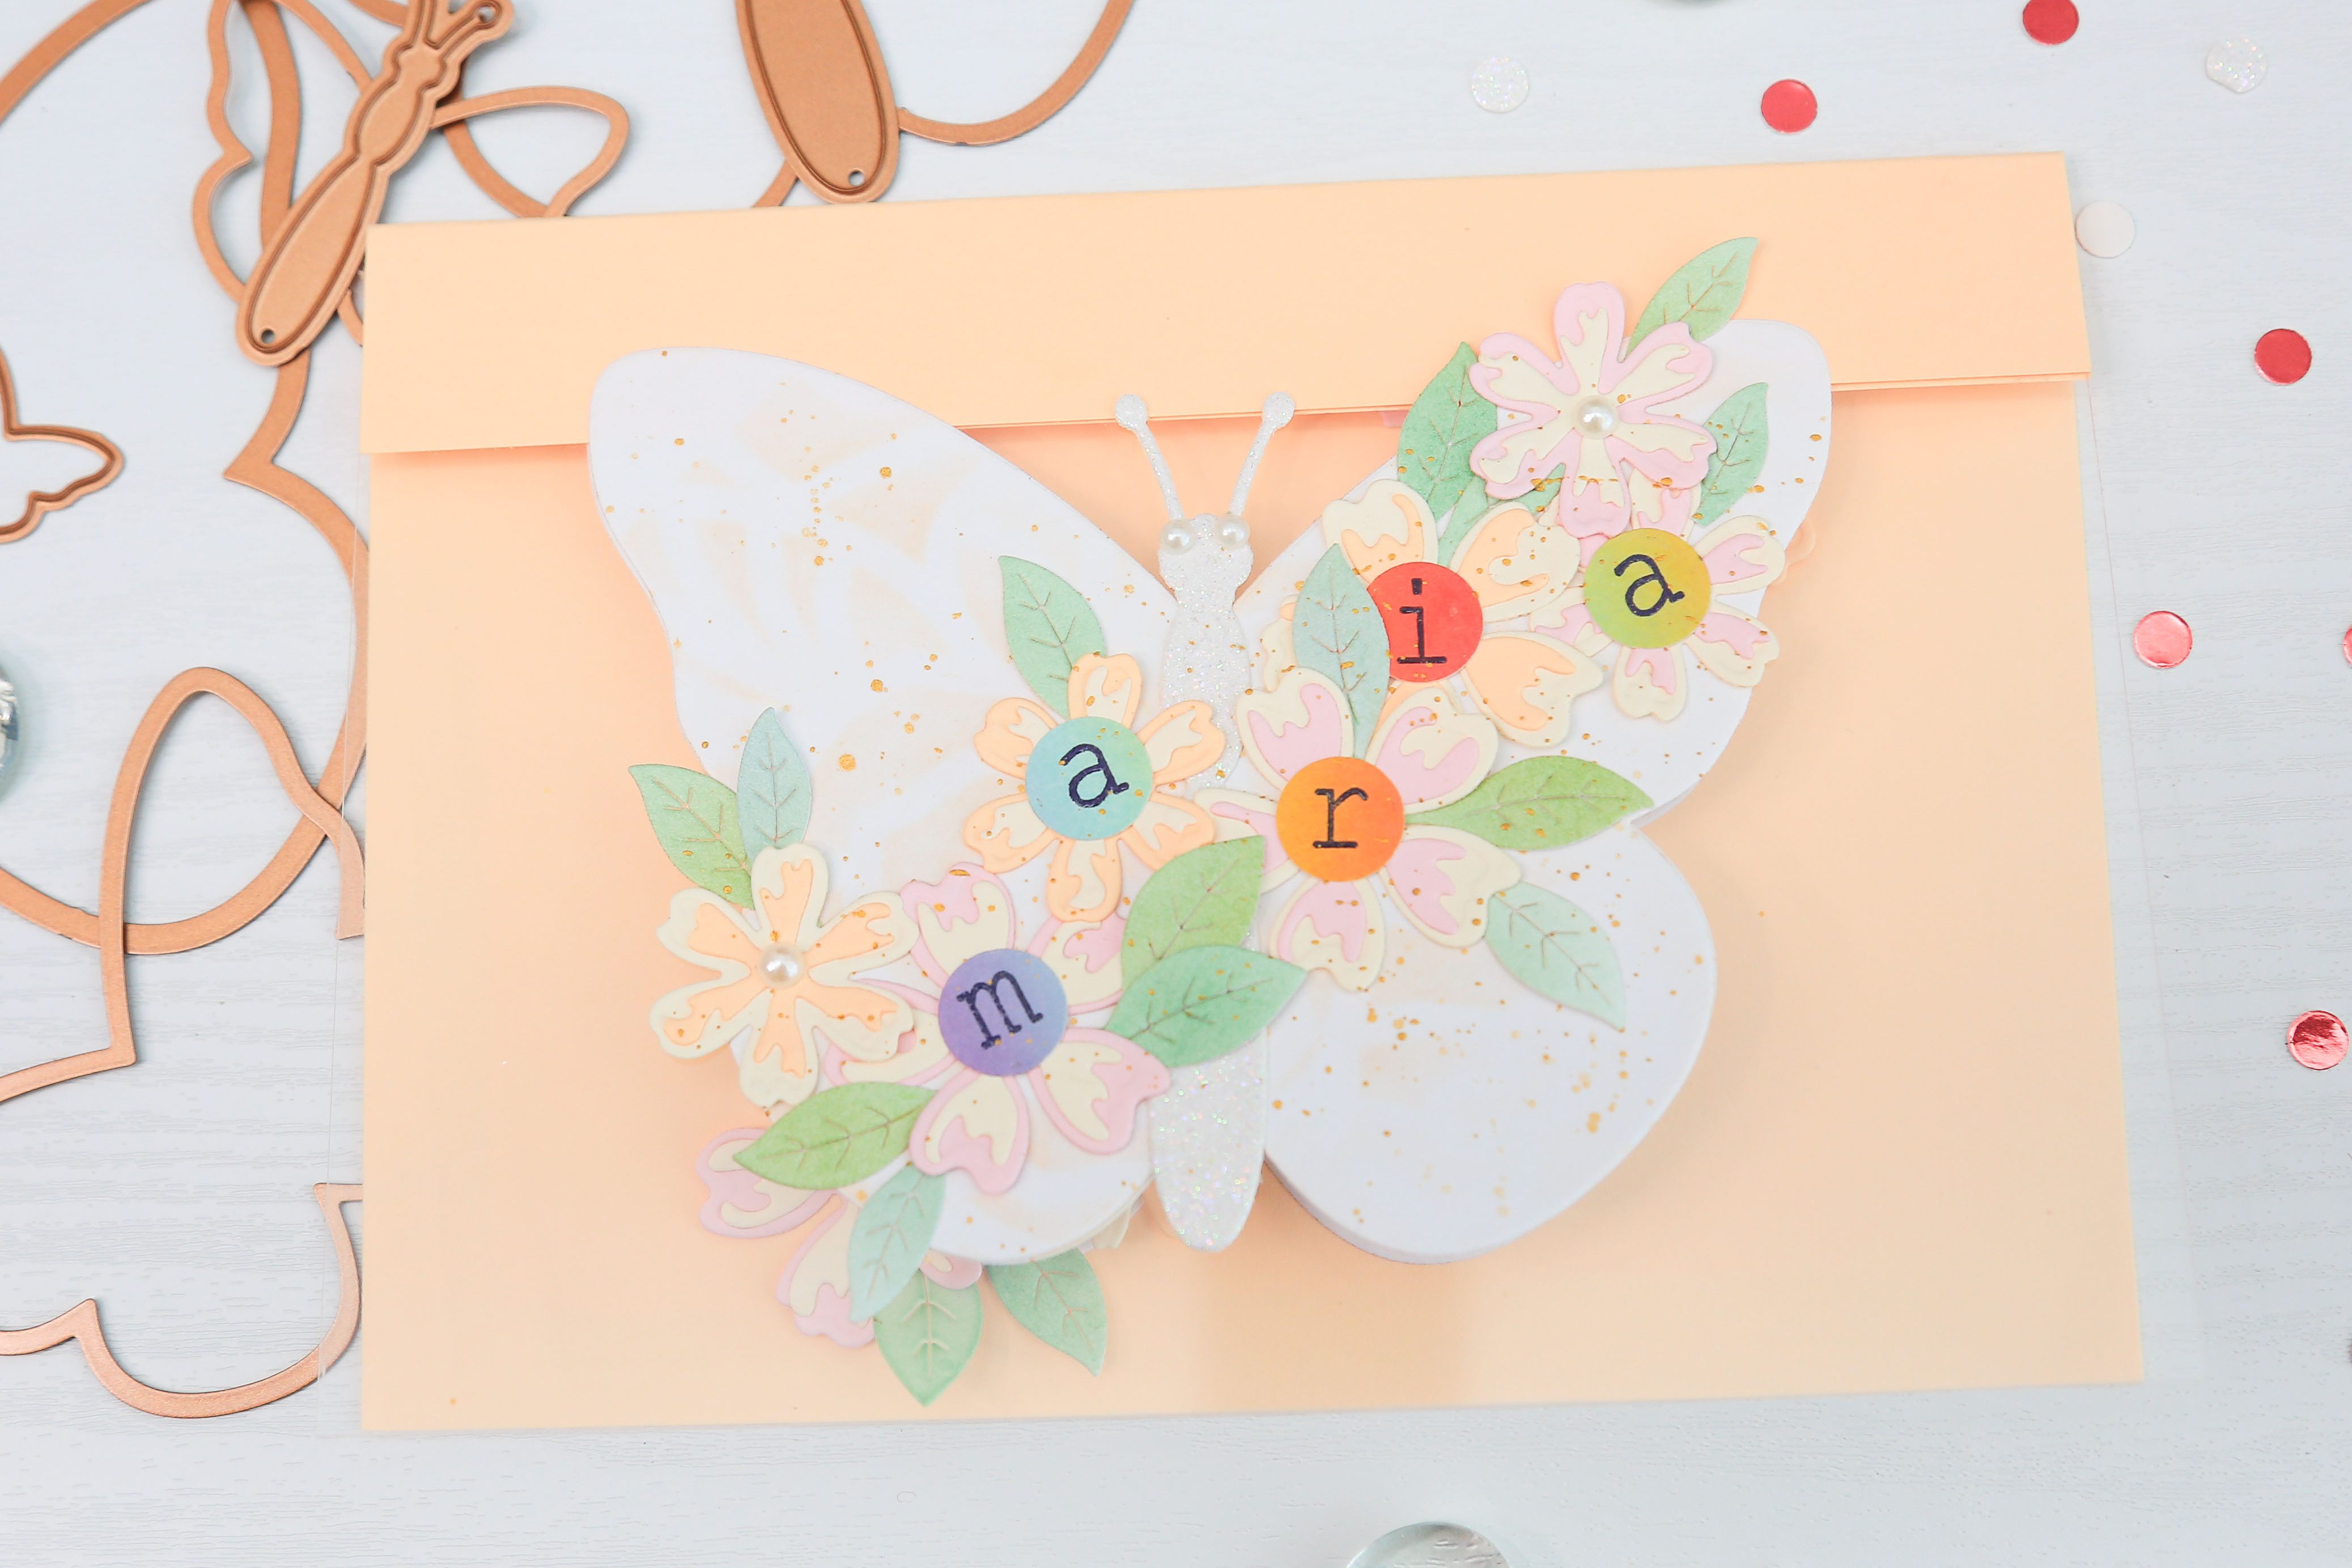
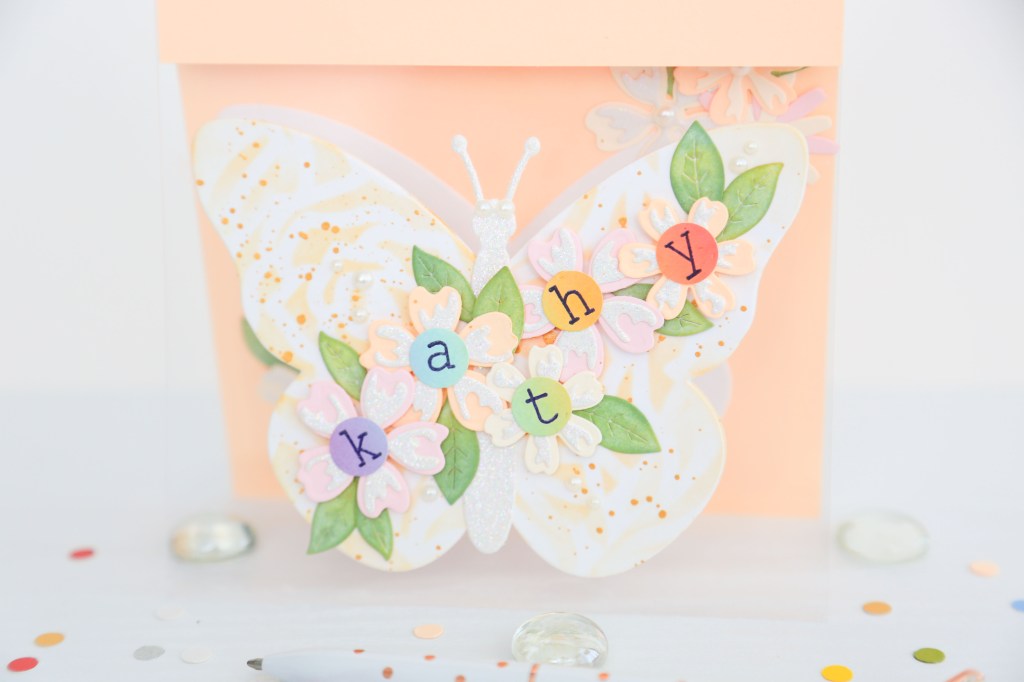
Using the Spellbinders So Many Butterflies Etched Dies, and the Spellbinders Butterfly Card Creator Etched Dies, cut out the butterflies, flowers, and foliage from the designated card stocks.

Cut out three butterfly wings from the white Hammermill card stock and the butterfly body from white glitter paper. You can cut out the detail layer of the flowers from either a lighter or darker card stock within the same colour family. Apply a little bit of liquid glue to the detail layer of the flowers and stick them down on the flower base layers. Make sure you have a minimum of as many flowers as letters in the name of the recipient.
Step 4: Stencil the Background
Use the Pinkfresh Studio Mimosa ink and a stencil of your choice to add some colour and texture to the butterfly wings. This creates some interest on the butterfly wings and eliminates the starkness of the white background. Apply very light-handed blending to any open spots. Apply a few splatters of gold paint with a paint brush to create more interest. Let dry before handling.
Step 5: Stamp & Die Cut the Name
You can use a scrap piece of contrasting coloured card stock or ink blend rainbow colours on to a scrap piece of watermark. Make sure your ink-blended paper is completely dry before stamping. Stamp the recipient’s name using alphabet stamps and the Altenew Jet Black Ink ink or any other black ink on the ink-blended paper. Heat emboss with clear embossing powder for a glossy finish. Die-cut each letter individually.
Step 6: Arrange the Flower & Leaf Clusters to the Butterfly Wing
Arrange the die-cut flowers, ensuring the larger flowers are placed towards the centre for the personalized name.
Use a piece of press and seal paper to lift off the flower arrangement. Add foam squares behind the flowers, and adhere the butterfly body to the wing base before placing the flower arrangement on it. Add the leaves to fill gaps in the floral arrangement as well as around it. Adhere the die-cut letters as flower centres on the arrangement.
Step 7: Add the Butterfly to the Card Front
Clean the acetate front with a couple of spritzes of rubbing alcohol and a stamp shammy to remove and grease or fingerprints. Adhere the butterfly to the front of the acetate.
Step 8: Add the Final Bits
Next, take the 1” x 5 ½” strip of peach card stock and carefully adhere it behind the narrow panel on the front of the card making sure that it’s not visible from the card front. You can really do this at any point. If you watch my video, you’ll find me doing it in an earlier step because it doesn’t matter.
ßTake the second butterfly and adhere it right behind the butterfly on the card front. This is optional, in case the butterfly has traces of glue, etc. showing through the card stock.
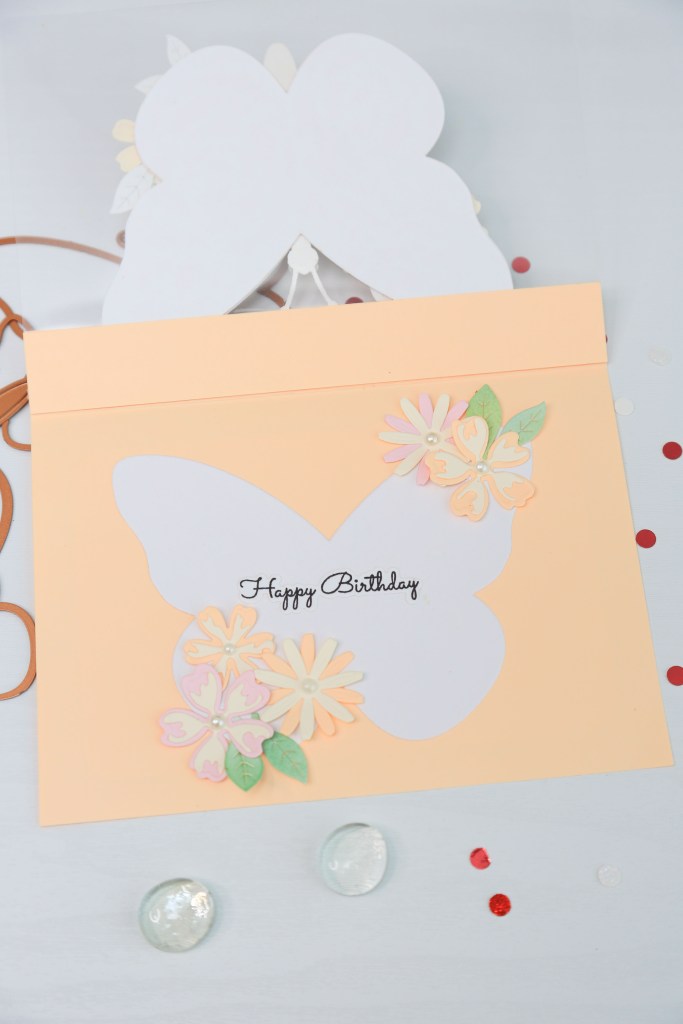
Step 9: Add the Sentiment
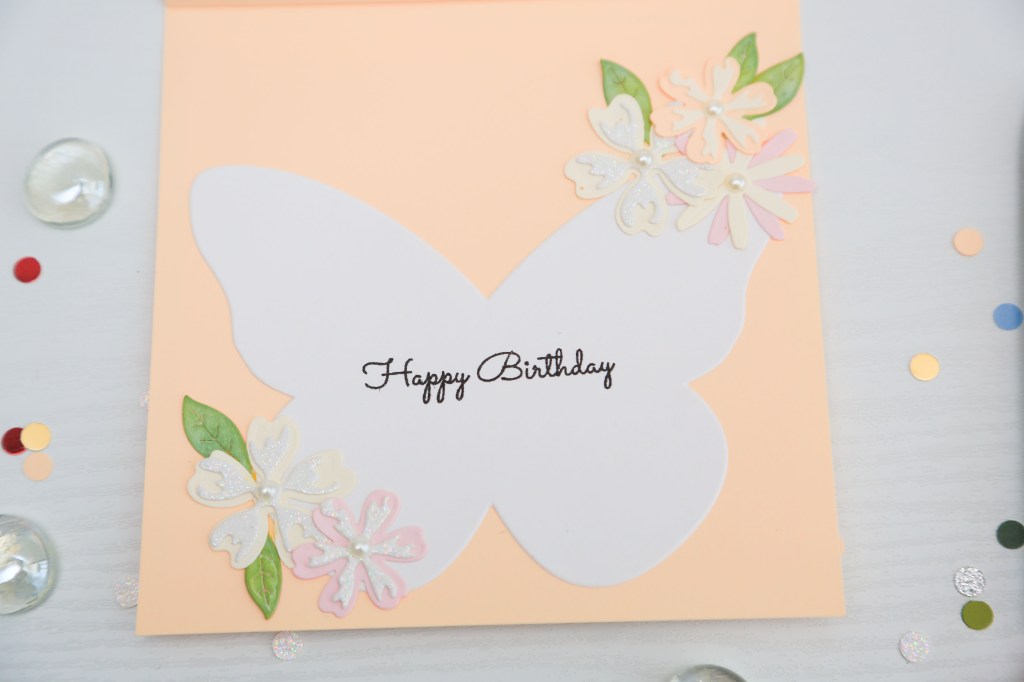
Use the MISTI or an acrylic block to stamp or heat emboss the sentiment on the third die-cut butterfly and adhere the butterfly to the inside of the card, directly behind the butterfly on the card front.
Step 10: Add a note card to the back
This step is optional although it would help stabilize the card when it’s stood up.
You can add a 5 ¼ in. X 5 ¼ in. Note card to the back to allow for more space to include a message from the sender.
TIP: To ensure accurate positioning, use some liquid adhesive behind the die cut butterfly and place it face down on the first butterfly. Holding the third butterfly in place, carefullyclose thecard on to the butterfly, and hold it down for a few seconds to set.
Step 11: Embellish
Add a few die-cut flowers and leaves to the inside of the card around the butterfly. Also add some pearls or other gems to the butterfly head on the card front to represent its eyes. Scatter a few more pearls or jewels around the card front or add them to the flower centres that don’t have the personalization.
Review your card for any final adjustments. Ensure all elements are securely adhered and the design is balanced. Your handmade birthday card is now ready to delight the recipient!
Enjoy the crafty process and make sure you use whatever supplies you have to create your own unique handmade card. If you have any questions, please feel free to leave them in the comments and I’ll be sure to respond.
If you’d like to watch me create the card, please watch this card tutorial on YouTube.
Disclosure: Some supplies listed in this blog post may contain affiliate links which means if you make a purchase I receive a small commission at no extra cost to you. Additionally, as an Amazon Associate, I earn from qualifying purchases. Thank you so much for your support!
Deals posted in this blog may or may not be available at the time of reading. Please check the Spellbinders website for the most current promotions.


Leave a comment