I made four cute cards using the House Mouse Collection cling rubber stamps by Spellbinders. I’ll walk you through two of those cards but you can see all four of them in action in my YouTube video.
These cards highlights a mix of die-cutting, heat embossing, and water colouring with distress oxide to create polished and unique designs. All the supplies I used are listed below.
Now, let’s get started!
Card 1
Supplies Needed
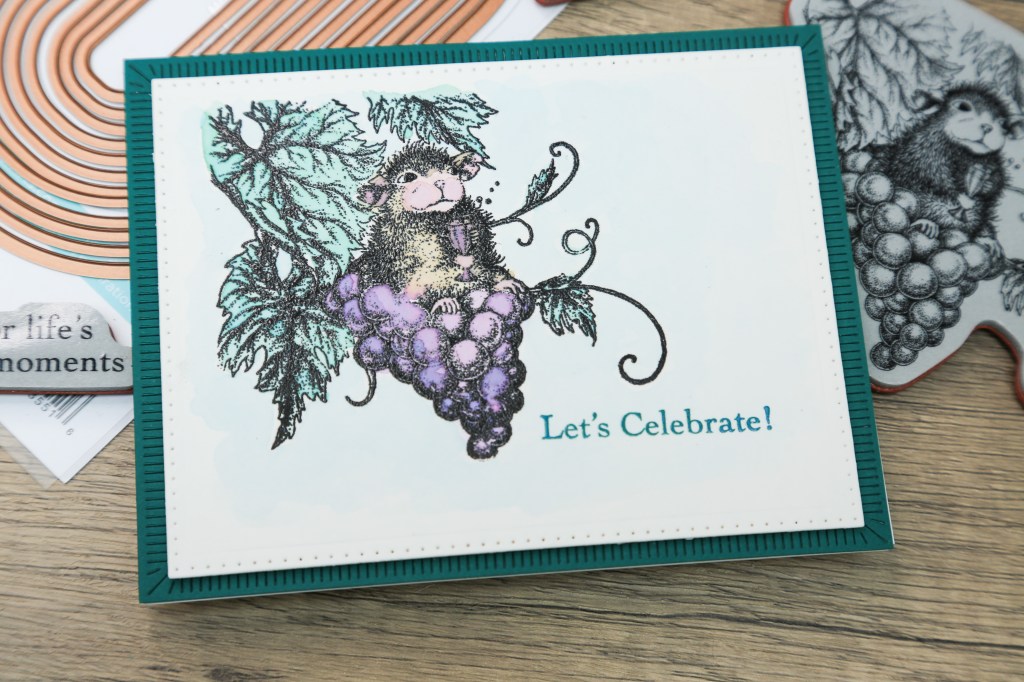
- Spellbinders House Mouse Sweet Moments Collection – Cheers – (sentiment: “Let’s Celebrate”)
- Brustro – 300 GSM Cold-Pressed Watercolour Paper (25% cotton)
- A2 Card Base – I used Neenah Solar White (110 lb)
- Spellbinders Scored And Pierced Rectangles Die Set
- Spellbinders Fluted Classics Rectangle Etched Die Set
- Versafine Onyx Black Ink
- Clear Embossing Powder – I used WOW
- Distress Oxides in various colours – Tumbled Glass, Victorian Velvet, Dusty Concord. Frayed Burlap, Pine Needles
- Bearly Art Liquid Glue
- Black Sharpie
- Stamping Platform (Optional)
Step 1: Prepare Your Background Layer
- Cut your 300 GSM hot-pressed watercolour paper to A2 size using the Scored And Pierced Rectangles Die Set.
- Run the die through your machine, ensuring the edges are clean and the die doesn’t slip.
Step 2: Die-Cut Inner Layers
- Use a secondary die from the set to cut out shapes for the inner layers. Save any leftover die-cuts for future projects.
- Layer the pieces to test the fit and ensure the composition is balanced.
Step 3: Stamp the Sentiment
- Adjust your stamping platform for the height of the red rubber cling stamp.
- Position the “Let’s Celebrate” sentiment in the centre of your background layer.
- Stamp using Versafine Onyx Black ink and apply clear embossing powder over it.
Step 4: Heat Emboss the Sentiment
- Use a heat tool to melt the embossing powder, creating a raised, water-resistant sentiment.
- Allow the panel to cool completely before proceeding to the next step.
Step 5: Watercolour the Background
- Lightly load your brush with water and apply Distress Oxides to create a loose, artistic watercolour effect.
- Work in sections, starting with lighter shades and layering darker tones for depth.
- Heat-set each layer with your heat tool to prevent buckling.
Step 6: Add Dimension and Layering
- Adhere the watercoloured background to a card base using liquid glue, being careful to avoid the pierced edges to prevent glue from oozing.
- Add foam tape to create dimension between layers. For areas where the foam tape might show through, colour the tape with a black Sharpie.
Step 7: Finish and Assemble
- Attach the sentiment layer to the card base. Ensure it is aligned and properly secured.
- If needed, add extra foam tape behind raised sections to ensure stability.
- Gently erase any visible anti-static powder from the panel using a regular or precision eraser.
The “Let’s Celebrate” card is complete! This design is perfect for celebrating friendships, milestones, or simply savouring life’s sweet moments. Plus, you’ve learned some handy tips along the way, like maximizing die-cuts and using basic tools like a Sharpie to elevate your design.
Here are the supplies I used for all four cards:
 https://linkdeli.com/widget.js?id=f5e8378456858c916708
Card 2
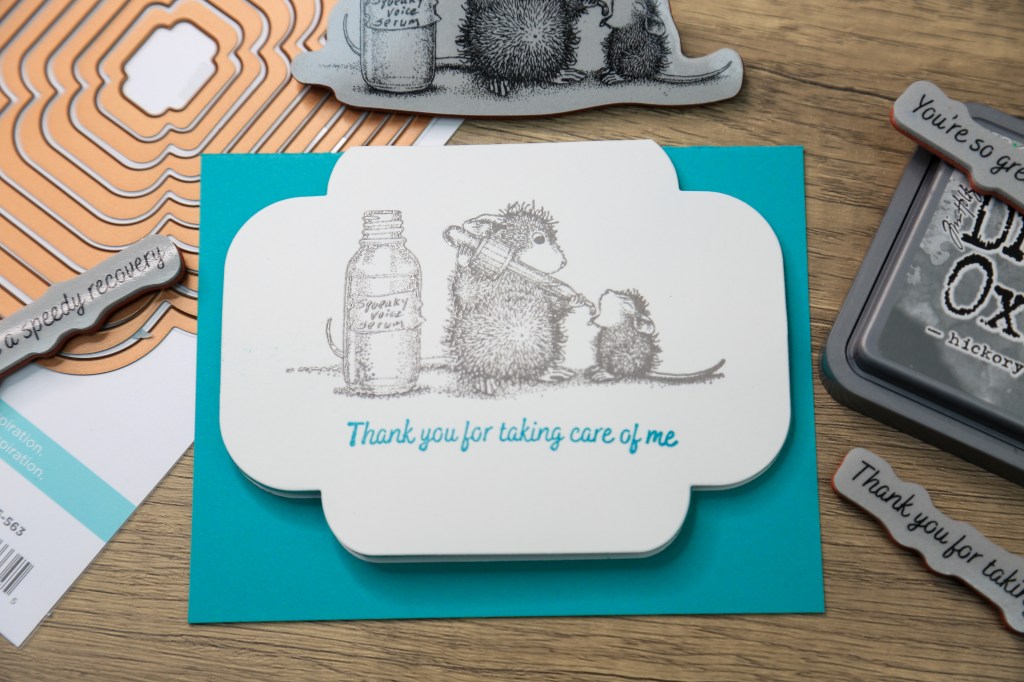
I’m switching things up today by creating a bright, shaped card using the Squeaky Voice stamp set and the Essential Four Petal Labels Etched Dies from Spellbinders. This project includes a few fun techniques, like crafting a hinged card base and heat embossing, to make a unique card design with space for a note inside.
- Supplies Needed
- Spellbinders Essential Four Petal Labels Etched Dies
- Squeaky Voice Stamp Set
- Spellbinders Teal Topaz Card Stock
- Hammermill White Card Stock
- Hickory Smoke Distress Oxide
- Peacock Feathers Distress Oxide
- Clear Embossing Ink
- AntiStatic Powder
- Spellbinders Non-Stick Shears
- Foam Tape
- Bearly Art Liquid Glue
- Craft Knife
- Sanding Block
- Misti Stamping Tool (optional)
- Reverse Tweezers (optional)
- Heat Tool
- Craft Mat and Ruler
Step 1: Create the Shaped Card Base
- To begin, cut two pieces of white card stock using the second largest die from the Essential Four Petal Labels Etched Dies. These will form the front and inside panels of the card.
- To craft the shaped card base, lay the card base flat and align the top of the shaped die to lie slightly above the fold line on the card stock. This will allow you to create a hinge.
- Carefully position the cutting plate of your die cutting machine along the fold line of the card base. Tape down the cutting plate to the base platform if you must to ensure the die doesn’t cut through the fold.
- Run the card base through the die cutting machine.
- This will cut out a shaped card base with the edges attached.
- Trim away any extra bits with a craft knife.
- Smooth the edges using a sanding block or scissors for a clean finish.
Step 2: Add the Inside Panel
- Align the shaped inside panel over the outer shaped panel and use a pencil to mark off the strip that’s overhanging the card fold.
- Trim the overhanging strip on the inside white panel.
- Apply liquid glue to the back of the inside white piece.
- Lay the card base flat with the inside facing up.
- Align the inside panel with the front panel with the glue facing up.
- Fold the back of the card over the glued panel. This ensures the inside panel is perfectly positioned.
Step 3: Prepare and Stamp the Front Panel
- I used my Misti Stamping Tool for precise placement of the image and sentiment.
- Stamp the image with Hickory Smoke Distress Oxide.
- Clean the stamp, and re-ink it with clear embossing ink to keep the stamped image sticky for heat embossing.
- Position the sentiment and stamp it with Peacock Feathers Distress Oxide.
- Apply clear embossing powder over both the image and sentiment.
- After ensuring the image is evenly coated with the powder, use your heat tool to melt the embossing powder, creating a glossy, raised design.
Step 4: Assemble the Card
- Once the front panel is ready, adhere it to the card base using foam tape for added dimension.
- Apply a bit of liquid glue over the foam tape to be able to adjust the panel for perfect alignment.
- Clean up the overhanging edge of the front panel.
This brightly coloured, shaped card is ready to send! The clean lines and vibrant design offer a cheerful twist, with space inside for a heartfelt note. While there were a few bumps along the way, the result is worth it—a lovely handmade card to brighten someone’s day!
Here’s a list of all my favourite tools:


Leave a comment