If you love vellum but struggle to use it in your card making, you must try out the cards I’ve created. They’re easy and mostly quick and create great opportunities to use your leftovers in your stash.
You can watch the video tutorial here or just follow the step-by-step instructions provided in this blog post. The list of supplies for each card is at the end of each card technique.
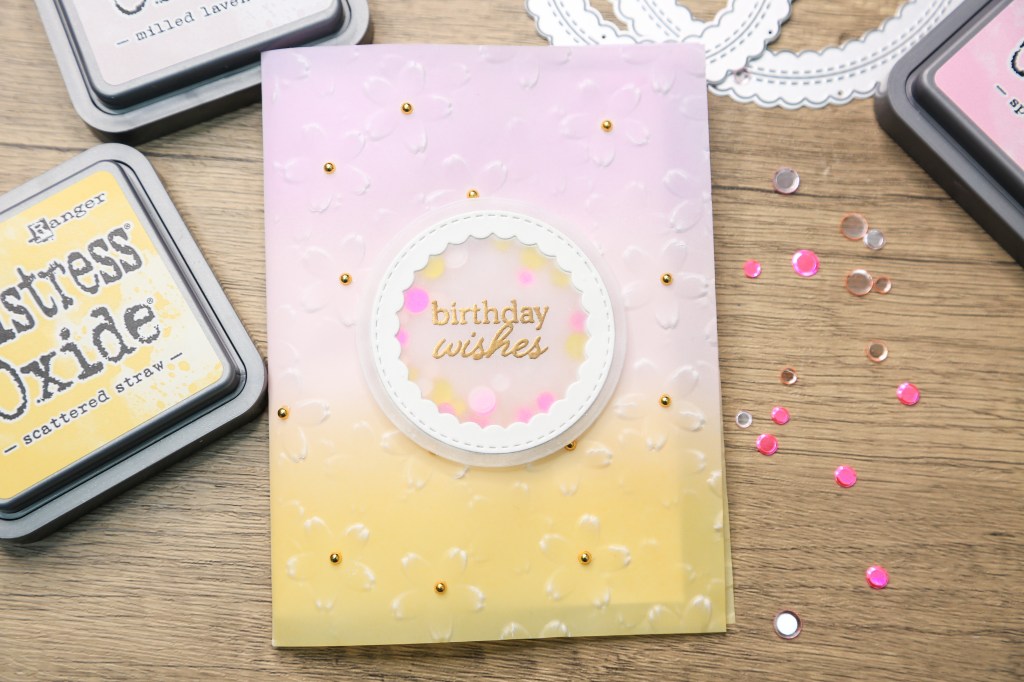
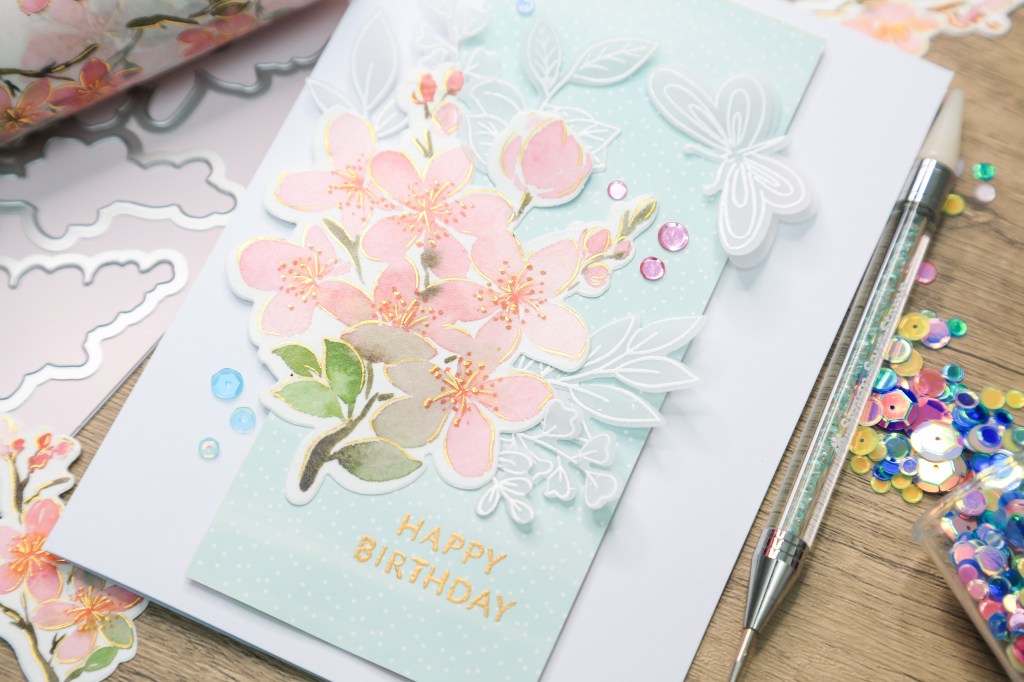
Card 1: How to Create a Coloured Vellum Card
In this project, we’ll explore how to create a stunning translucent card using customized ink-blended vellum, embossing, and a delicate shaker window. The combination of soft textures and vibrant colours adds a personalized, elegant touch to your card-making projects.
Supplies Needed
- Simon Says Stamp Heavyweight Vellum – 8 ½ in. x 5 ½ in.
- Hammermill White Card Stock – 7 ½ in. x 5 in. long side scored at 3 ¾ in.
- Simon Says Stamp Cherry Blossom Embossing Folder
- Distress Oxide Inks:
- Scattered Straw
- Spun Sugar
- Milled Lavender
- Altenew Double-Sided Adhesive Sheet
- Papertrey Ink Stamp
- Pink Fresh Studio Stitched Scallop Dies
- Simon Says Stamp Be Mine Shaker Mix
- AliExpress Thin Foam Tape
- Gold Pearls
- Bearly Art Liquid Glue
Step 1: Cut and Prepare the Vellum
Cut a heavyweight vellum sheet to 8 ½ x 5 ½ inches for an A2 card. Do not score the vellum yet to avoid ink puddling along the score line.
Step 2: Ink Blend the Vellum
- Start with Scattered Straw Distress Oxide ink and gently blend it onto the vellum. Be careful as the vellum may slip or crumple.
- Switch to Spun Sugar for the second colour and blend it from the opposite side of the vellum to avoid contaminating the pink ink pad with yellow. Work patiently, layering colours for a smooth transition.
- To blend Spun Sugar and Scattered Straw together, smoosh some pink ink onto a glass mat and pick it up with a blending tool to create a beautiful peachy orange hue and a smooth transition.
- Finally, apply Milled Lavender, blending it upwards from the bottom edge of the vellum into the Spun Sugar ensuring a smooth transition.
- Allow the vellum to air dry completely.
Step 3: Score and Emboss the Vellum
- Once the vellum is dry, score it gently at 4 ¼ inches to create the card fold.
- Place the vellum inside the Cherry Blossom embossing folder, aligning the score line with the folder’s edge.
- Add an A2-sized piece of lightweight card stock panel behind the vellum as a cushion to prevent cracking.
- Run the embossing folder through a die-cutting machine, adjusting the plate combination as needed for a smooth pass.
- If embossing both sides, repeat 2-4 carefully ensuring proper alignment.
Step 4: Create and Attach the Inner Notecard
- Prepare a white notecard measuring 3 ¾ x 5 inches.
- Cut an Altenew double-sided adhesive sheet to fit and use it to adhere the notecard to the inside of the vellum card. To ensure precise placement, expose only a small section of the adhesive first and lay it down on the card stock.
Step 5: Create a Sentiment
- Heat emboss a sentiment on vellum using your favourite stamp set.
- Die-cut the sentiment using a circle die.
- Cut out a frame from Hammermill white card stock scraps with Pink Fresh Studio’s Stitched Scallop Dies for added detail.
- Adhere the heat embossed vellum behind the frame.
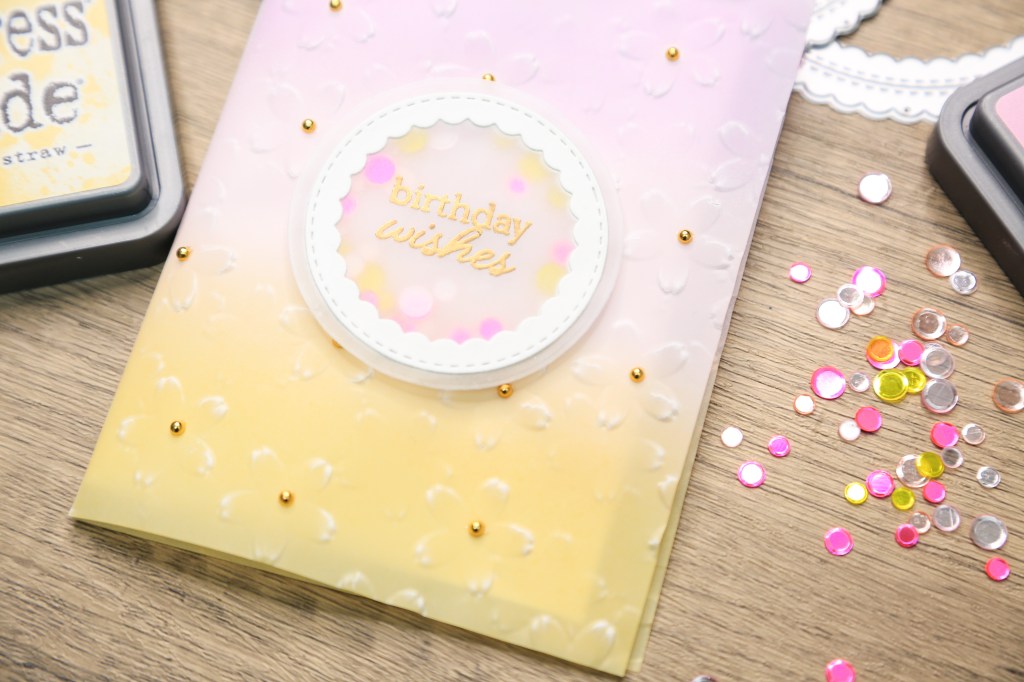
Step 6: Assemble the Mini Shaker Window
- Create a mini shaker window by layering thin foam tape behind the vellum following the the outline of the sentiment frame making sure the foam tape isn’t visible through the vellum at the top. You can remove the backing paper on the foam tape to make it more pliable and easy to use around curves.
- Dust anti-static powder along the sticky edges of the foam tape to prevent sequins from sticking to it.
- Choose bright, flat shaker bits like Simon Says Stamp Be Mine Shaker Mix for visibility through the vellum.
- Place sequins in the centre of where you want to position the shaker window.
- Apply some Bearly Art liquid glue to the foam tape and adhere it with a piece of vellum or acetate.
Step 7: Final Touches
- Burnish the card fold and check the alignment of all elements.
- Add more embellishments to the card front, if you so desire. I added some tiny gold pearls to some of the flower centres.
This translucent card design is perfect for birthdays, anniversaries, or any occasion where a unique, elegant touch is appreciated.
https://linkdeli.com/widget.js?id=f5e8378456858c916708
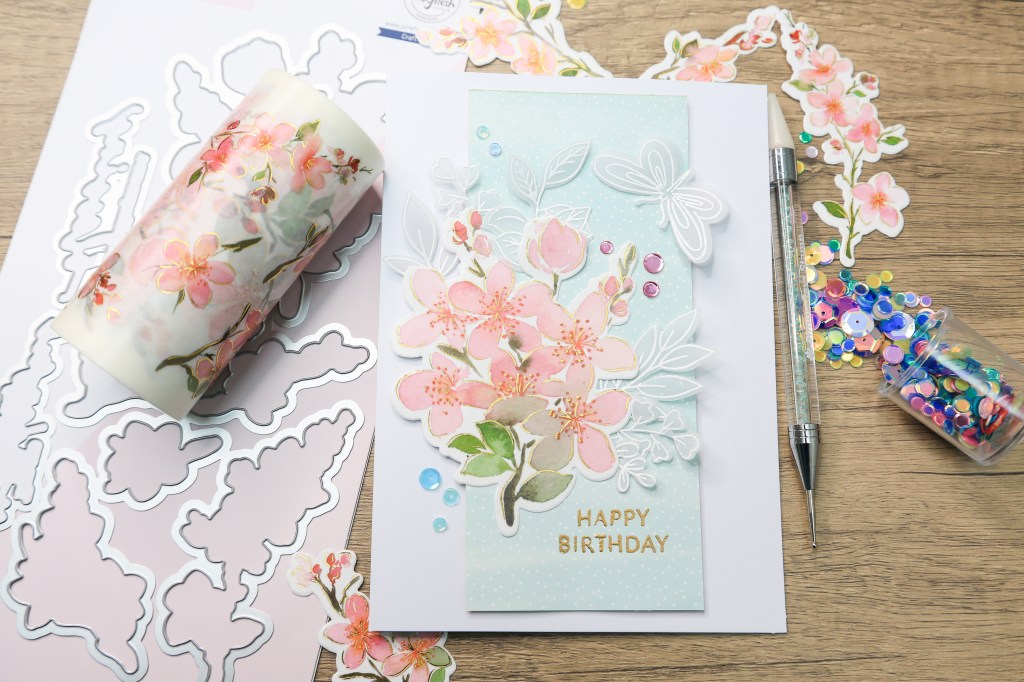
Card 2: Vellum Embellishments that Transform a Card
Adding vellum embellishments to a card is a simple yet effective way to create a soft and elegant look. In this tutorial, we’ll use vellum foliage and butterflies to elevate a basic 5×7 card into something truly stunning.
Supplies Needed
- Simon Says Stamp Heavyweight Vellum – small piece for heat embossing
- Altenew Zero Waste Flowery Pattern Stamp and Coordinating Dies
- Pink Fresh Studio Sakura Washi Tape & Coordinating Die
- Pink Fresh Studio Fluttering Butterflies Stamp Set & Coordinating Die
- Pre-scored 5×7 Card
- Hero Arts Unicorn White Pigment Ink
- Altenew Pure White Embossing Powder
- Altenew Gold Embossing Powder
- Antistatic Powder
- Simon Says Stamp Pretty Pastels Sequins Mix
- MISTI Stamping Tool
- Press N Seal Paper
- Foam Tape
Step 1: Prepare and Heat Emboss Vellum
Start by placing a 6×6 piece of heavyweight vellum in your MISTI. Apply antistatic powder to prevent stray embossing powder from sticking to the background. Ink the Altenew Zero Waste Flowery Pattern stamp with Unicorn White pigment ink and press it onto the vellum. Use a pressure tool for even ink transfer.
Sprinkle Pure White embossing powder over the stamped image, tap off the excess, and heat set with a pre-warmed heat gun. Handle the vellum carefully to prevent curling.
Step 2: Die Cut the Embossed Vellum
Align the coordinating die over the embossed vellum and secure it with washi tape. Run it through your die-cutting machine. Use a pokey tool or a die brush, like the Spellbinders Tool N’ One, to remove the delicate die cuts from the dies without damaging them.
Step 3: Assemble the Card Design
Decide on the arrangement for your card by layering foliage and floral die cuts. Include a vellum butterfly for added elegance. Use Press N Seal paper to pick up the arrangement intact so you can apply adhesive without disturbing the layout.
Attach the vellum pieces by strategically applying glue behind solid elements, such as flowers, to hide the adhesive. Place the design on the card base and carefully peel away the Press N Seal paper.
Step 4: Add Dimension and Details
Support any overhanging elements with small pieces of foam tape. For the butterfly, layer a heat-embossed vellum top with a plain vellum shadow layer. Snip off the shadow layer’s antenna and tail for a clean look. Adhere the layers together and gently lift the wings for a touch of movement.
Step 5: Heat Emboss the Sentiment
Heat emboss the “Happy Birthday” sentiment directly onto the card background. Use an antistatic powder tool, embossing ink, and Pure White embossing powder to match the vellum embellishments.
Step 6: Final Touches
Complete the card by adding sequins and confetti from the Pretty Pastels mix. Arrange them around the focal point to add sparkle and visual balance.
This simple yet elegant card is a great way to use leftover materials and vellum die cuts. The soft texture of the vellum combined with delicate heat embossing creates a sophisticated design that’s perfect for any occasion.
https://linkdeli.com/widget.js?id=f5e8378456858c916708
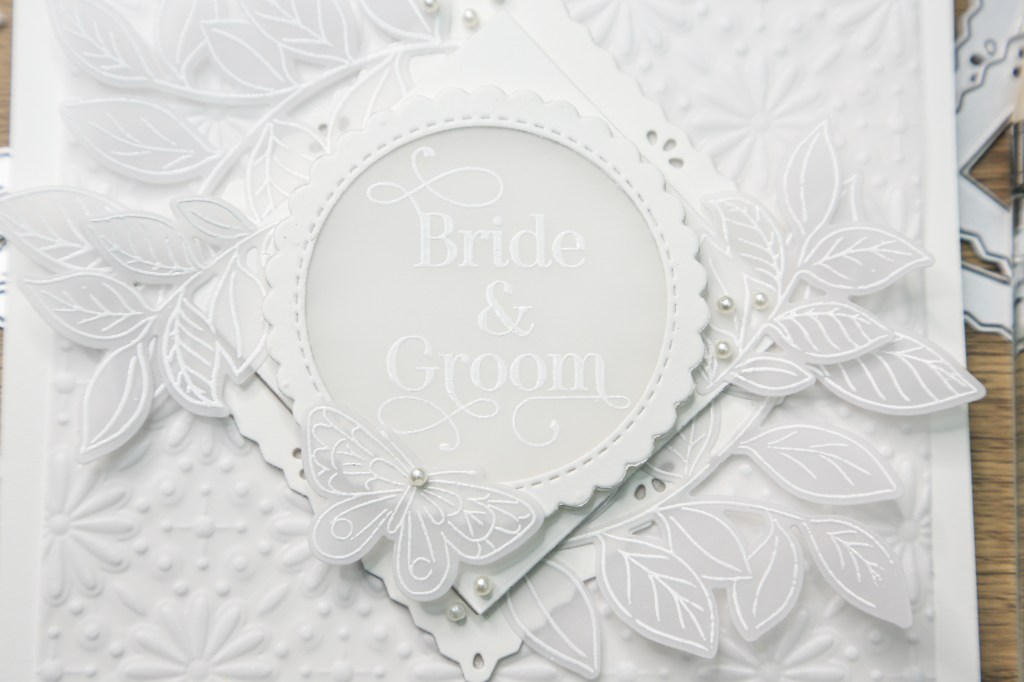
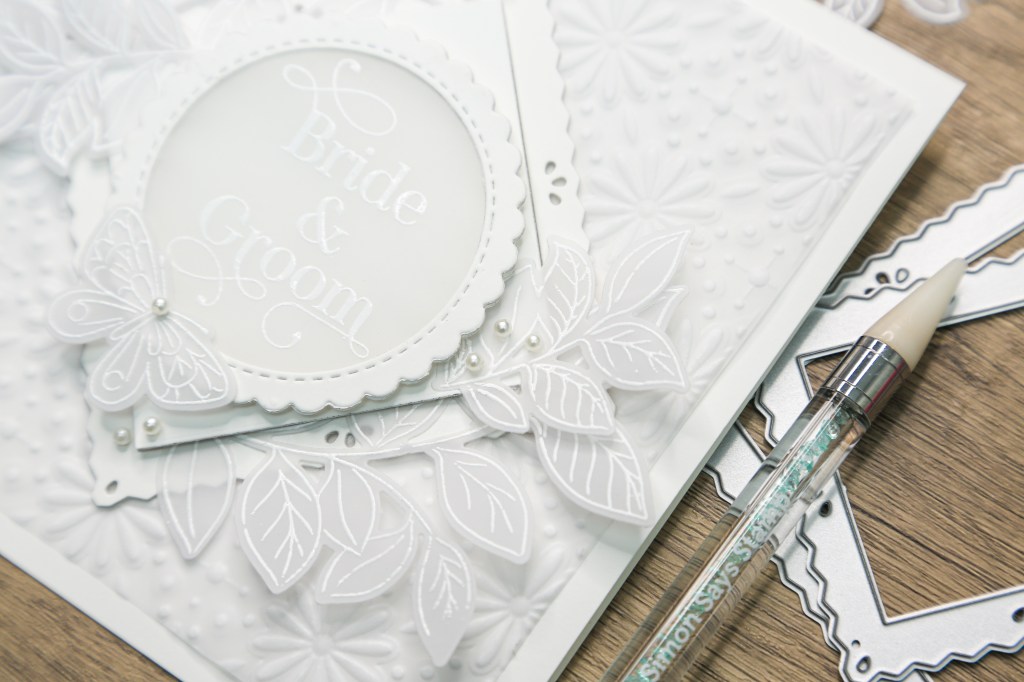
Card 3: Elegant White-On-White Wedding Card with Vellum
Creating a white-on-white card is an excellent way to achieve an elegant and timeless look. This project highlights intricate details and adds layers of depth, making it ideal for occasions like weddings or sympathy cards. Today, I’m crafting a wedding card with multiple layers and embossed textures for a beautiful finish.

Supplies Needed
- Simon Says Stamp Heavyweight Vellum (6 x 6)
- Hammermill Card Stock (110 lb)
- Spellbinders Embossing Folder – Criss Cross Motif
- Pinkfresh Studio Stitched Scalloped Die
- Waffle Flower Pinking Square Die
- The Greetery Arched Sentiments Stamp Set
- Pinkfresh Studio Fluttering Butterflies Stamp And Die Set
- Altenew Pure White Embossing Powder
- White Unicorn Pigment Ink
- Nesting Circle Die
- Foam Tape
- Simon Says Stamp Craft Glue Stick
- Bearly Art Liquid Glue
- MISTI Stamping Tool
- Anti-Static Powder Pouch
Step 1: Prepare and Emboss the Background
I started by embossing a 6 x 6 piece of heavyweight vellum using the Spellbinders embossing folder. After embossing, I trimmed the vellum down to 5 ½ x 5 ½ inches to fit the card base. This creates a stunning textured background that will serve as the foundation of the design.
Step 2: Die-Cut Frames and Sentiment Elements
Using the Waffle Flower Pinking Square Die, I cut frames from Hammermill card stock. The largest die creates a detailed frame perfect for layering.
For the sentiment, I die-cut a circle from lightweight vellum using a nesting circle die. I also used the Pinkfresh Studio Stitched Scalloped Die to create an elegant frame for the sentiment.
Step 3: Stamp and Heat Emboss the Sentiment
I used the Misti stamping tool to stamp the sentiment from The Greetery Arched Sentiments Stamp Set onto the vellum circle. To prevent smudges, I applied anti-static powder first.
I stamped the sentiment with White Unicorn pigment ink and heat-embossed it using Altenew Pure White Embossing Powder. Heating the vellum carefully ensured minimal warping.
Step 4: Add Butterfly and Foliage Embellishments
The Pinkfresh Studio Fluttering Butterflies set was used to stamp and emboss additional embellishments. I stamped the large butterfly image onto heavyweight vellum, applied embossing powder, and heat-embossed it.
After cutting out the butterflies and foliage using the coordinating dies, I repeated the process to create a few extra pieces for layering.
Step 5: Assemble the Frames
I layered the die-cut square frames with liquid glue, creating a sturdy, chipboard-like frame three layers thick. For the circular frame, I sandwiched the vellum sentiment circle between three layers of frames for added stability.
Using an acrylic block, I weighted the frames down to ensure the adhesive bonded well.
Step 6: Assemble the Card
I adhered the square frame to the embossed vellum background with a generous amount of glue, ensuring a strong hold on the textured surface. I raised the sentiment circle on foam tape and centred it within the square frame for added dimension.
Step 7: Add Final Embellishments
I adhered the vellum foliage and a couple of butterflies, applying small dots of glue to their centres for a clean look. To finish, I placed tiny pearls around the card to enhance its elegance.
This elegant white-on-white wedding card is complete. The embossed textures, layered frames, and delicate embellishments come together beautifully for a timeless design. The addition of pearls adds just the right amount of sophistication. This project showcases the versatility of a white palette for creating stunning, heartfelt cards.Aa quicker alternative is to use foam tape directly to create the shaker compartments. Happy crafting!
Here’s a list of my favourite tried and trusted tools that I work with on a daily basis:


Leave a comment