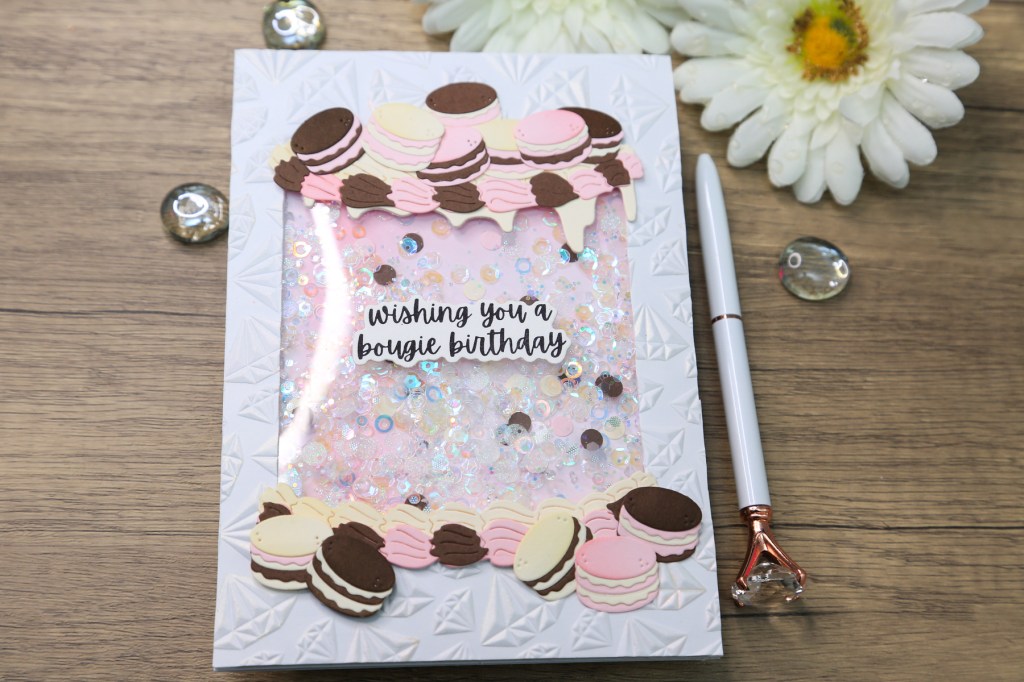
Want to create a card as sweet and stunning as your favourite dessert? Today, I’ll walk you through how to craft a show-stopping 3D card featuring a cake dripping with ganache and topped with macarons, meringues, and frosting! This card also has an interactive twist—a sparkly shaker window to wow your recipient. Along the way, I’ll share tips for stretching your supplies to create new designs with this concept. Let’s dive in!
If you’d like to jump straight to the video tutorial, you can watch it here:
Supplies Needed
- Ganache Gateau Die Set from Spellbinders
- Card Panel Measuring 5 ½ by 7 ½ Inches for a 5×7 Card
- Born to Sparkle 3D Embossing Folder with Coordinating Stencil by Spellbinders
- Scrap Card Stock in Cream, Pale Pink, and Brown
- Acetate Sheet – 4 ¼ in. x 4 ½ in.
- Solar Pastes in Golden Hour and Cross My Heart
- Sequins, Gems, and Paper Confetti for the Shaker Bits
- Foam Tape Strips
- Bearly Art Liquid Glue
- Distress Oxides – I used Spun Sugar and Worn Lipstick
- Buttercream Ink by Altenew
- Mocha Ink by Simon Says Stamp
- Craft Storage Boxes – I’m using Craft Stax by Spellbinders
Step-By-Step Instructions
1. Prepare the Card Panel and Background
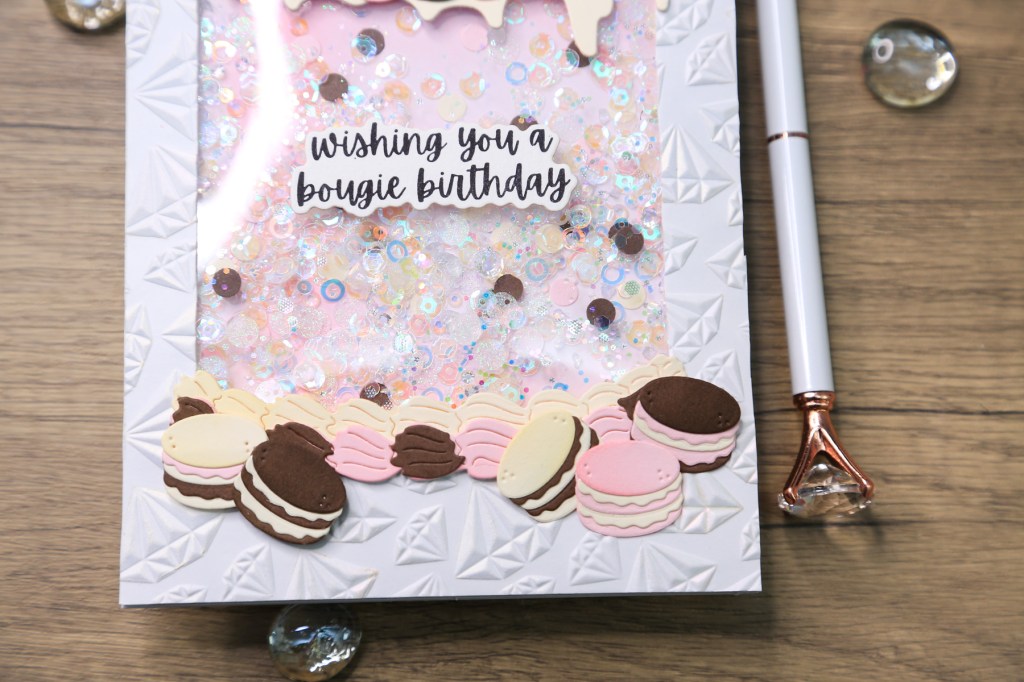
Spritz your card panel with water to soften the fibres. Use a die to cut a window in the centre of the panel, securing it with washi tape to prevent tearing. Emboss the panel using your embossing folder and adaptors. Cutting before embossing ensures the details remain crisp.
2. Die-Cut and Assemble the Decorative Elements
Die-cut the cake pieces, frosting, macarons, and meringues. Use scrap cardstock for colour variation. Stack the smaller die-cut elements to add dimension. Use a dome foam blender to ink blend shades like Buttercream, Mocha, and Spun Sugar onto the frosting and macarons. Store completed pieces in craft boxes to stay organized.
3. Add Subtle Shine to the Background
Apply Solar Pastes with a foam blender or fingers to selected sections of the embossed background. These pastes add a sheen without overpowering the design. Clean tools immediately after use.
4. Create the Shaker Window
Cut acetate to fit the window opening, leaving a small margin for adhesion. Remove protective films and glue the acetate to the back of the panel. Use foam tape to create a raised border around the window, ensuring no gaps for shaker bits to escape. Apply anti-static powder to prevent sequins from sticking.

5. Assemble the Shaker Component
Mix sequins, gems, and paper confetti in coordinating colours. Pour the mix into the shaker pocket. Carefully adhere the panel to the card base, ensuring the shaker bits can move freely.
6. Build and Adhere the Cake Elements
Layer and glue the die-cut macarons, meringues, and frosting pieces onto the cake base. Use press-and-seal to transfer and adhere complex arrangements without disturbing the design.
7. Add Finishing Touches
Attach the cake assembly to the shaker panel, using foam tape for additional support. Position the sentiment in the centre of the shaker window. Trim any overhanging edges for a neat finish.
Additional Design Inspiration
- Create a full cake with all the accessories, including a banner topper.
- Design a masculine card with a plaid background and simplified cake layers.
- Make a cake-shaped card for a 3D effect by decorating both the front and back with the macarons, meringues and frosting.
Here’s the list of all the supplies I used on this card:
https://linkdeli.com/widget.js?id=f5e8378456858c916708
Here’s a list of my favourite tried and trusted tools that I work with on a daily basis:


Leave a comment