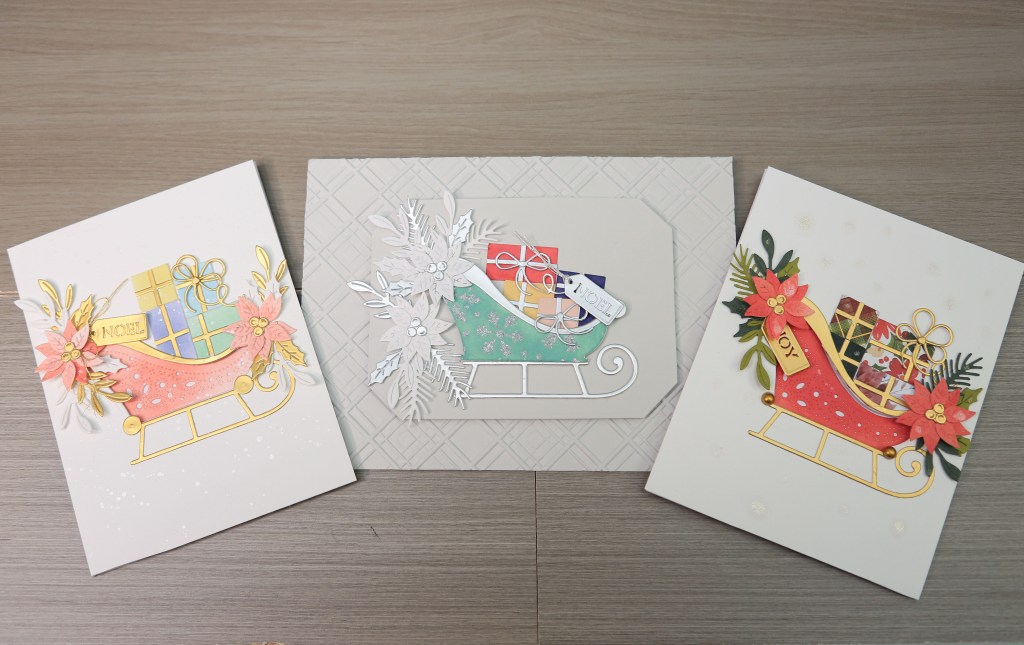
If you’re ready to create holiday cards that capture the magic of the season, you’re in the right place. In this tutorial, we’ll be crafting beautiful designs using the Spellbinders Delivering Joy Etched Dies, featuring a vintage sleigh loaded with gifts and elegant flowers and foliage.
Step 1: Gather Your Materials
- Spellbinders Delivering Joy Etched Dies
- Cardstock:
- Holiday pattern paper
- Foam tape
- Barn Door Distress Oxide Ink
- Bearly Art liquid glue
- Scissors
- Paper trimmer
- Magnetic glass mat
- Embellishments like beads or pearls (optional)
Step 2: Prepare Your Die-Cut Pieces
Here’s a breakdown of what you’ll need to die cut:
- Sleigh:
- Use the outline die of the sleigh on an A2-sized white panel cut from Hammermill smooth white card stock 110 lb to create the front panel.
- Next, on some scrap white paper, do some ink blending with Barn Door Distress Oxide Ink for the sleigh and poinsettias.
- Use the the sleigh outline and pattern pieces together to cut out the sleigh.
- Use the S-piece on Spellbinders Brushed Gold card stock to cut out the top rail of the sleigh.
- Cut out the main runner/frame also with the Spellbinders Brushed Gold card stock.
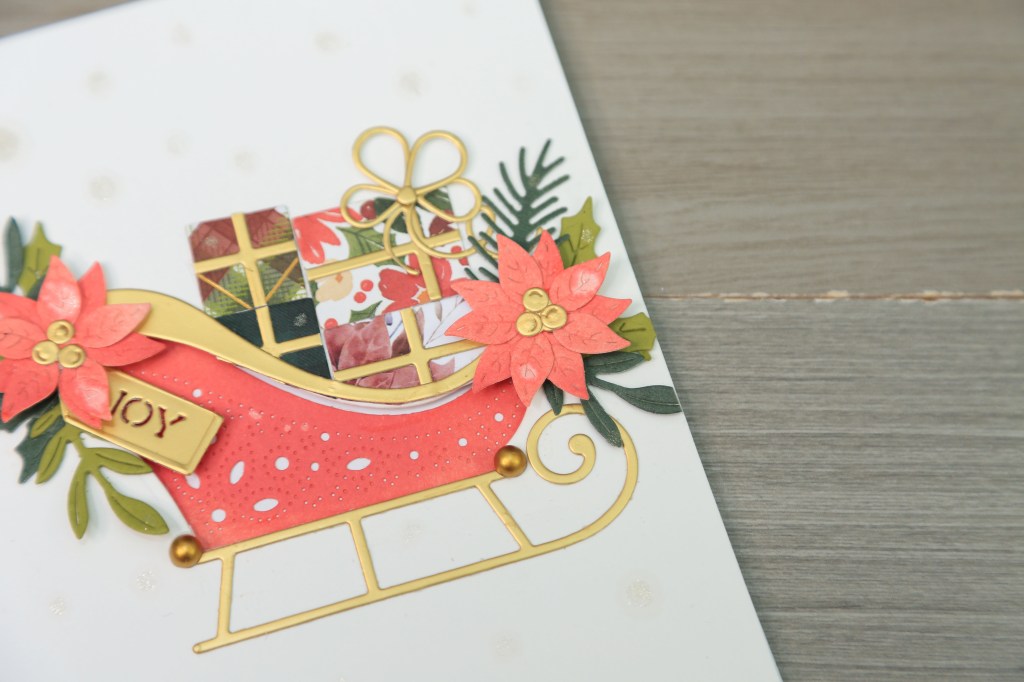
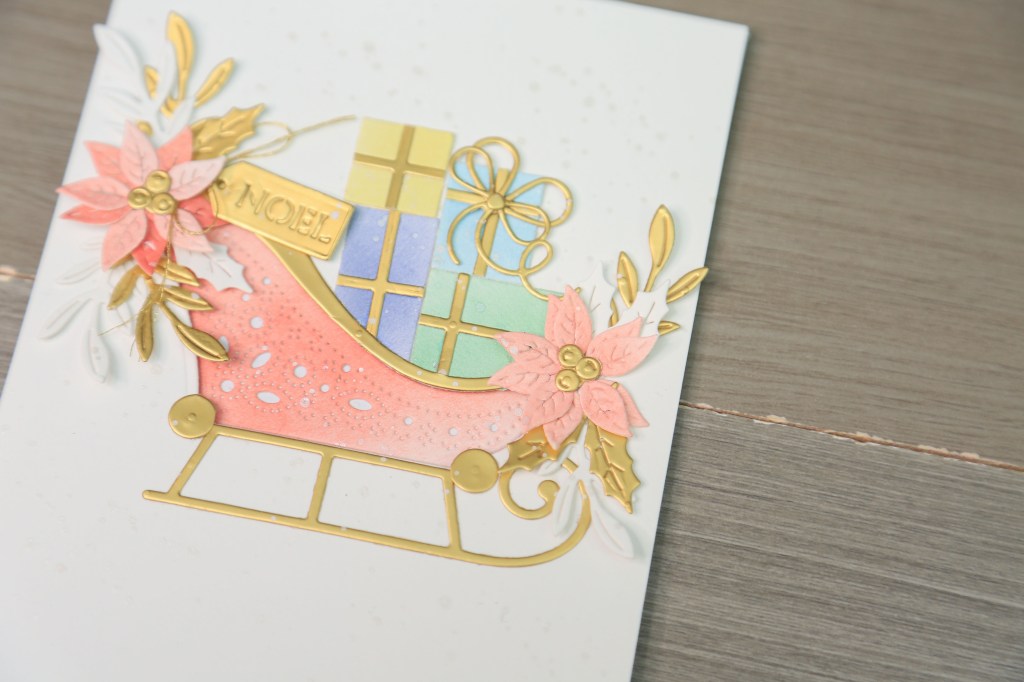
- Flowers: Cut out four poinsettia flowers with the flower die using the ink blended paper and the flower centres using Spellbinders Brushed Gold. You can also use pearls and gems for the centres.
- Leaves and Foliage: You can use coloured card stock or ink blended paper to create your leaf die cuts. Use the included dies to cut out all the leaves and pine needles. You can cut out multiple pieces for layering.
- Small Tags: The set includes tags with the words “Joy” and “Noel.” You can cut these out from gold card stock or any other colour of your choice. You can use the tag outline die to cut out a plain tag and use a small stamp to add a sentiment or image on it. Otherwise, you’ll need to use both the outline as well as the inside word die to create the tag.
- Gifts: The die cuts out four different sizes of gifts. Use pattern, or plain paper for variety. I used both types of paper in my different cards. The included “cross” die cuts out the ribbons that should be adhered along the score lines created on the die cuts. Adhere the ribbons to the gift pieces.
Step 3: Assemble the Sleigh
- Position the front panel on the card base (I used Neenah Solar White Card Stock).
- Apply glue to the patterned part of the sleigh and inlay it into the cut out so the sleigh is adhered to the card base.
- Remove the card front to make sure it doesn’t get inadvertently stuck down before you’ve had a chance to create the dimension.
- Apply strips of foam tape on the reverse side of the card front. This will be recessed on your card front to add dimension. Reinforce the area around the cut out so the card front doesn’t sag.
- Position and place the card front on the card base.
Step 4: Assemble the Flowers
- Layer one flower piece over another and offset the petals to give the flower more volume.
- Gently curl the petals to give the flowers dimension.
- Add the flower centres with liquid glue.
Step 5: Assemble the Gifts
- Stack the gift die cuts in an arrangement that fits the sleigh. I used small pieces of clear tape to hold them together.
- Position and glue down the top rail of the sleigh over the stack of gifts. The objective is to have the gifts look like they’re placed inside the sleigh and not floating above.
- Cut away the pieces of the gifts that are sticking out from under the top rail.
- Adhere the entire arrangement onto the sleigh with Bearly Art liquid glue.
Step 6: Assembling the Final Pieces
- Apply Bearly Art liquid glue behind the sleigh runner die cut.
- Use a scrap piece of paper to wipe away any excess glue on the intricate die cut to avoid glue marks on the card front.
- Arrange the two poinsettia flowers on the front and rear ends of the sleigh.
- Arrange the foliage around the flowers.
- Adhere the tag around the floral arrangement.
- Add a couple of large pearls around the openings where the sleigh runner is adhered.
For the card below, I used the following Distress Oxide inks to create the sleigh, flowers and gifts:
I also added some paint splatters with white pearl paint from the Komorebi Metallic Watercolour Paints. I created the foliage in gold and white to keep the attention on the colourful gifts and the sleigh.
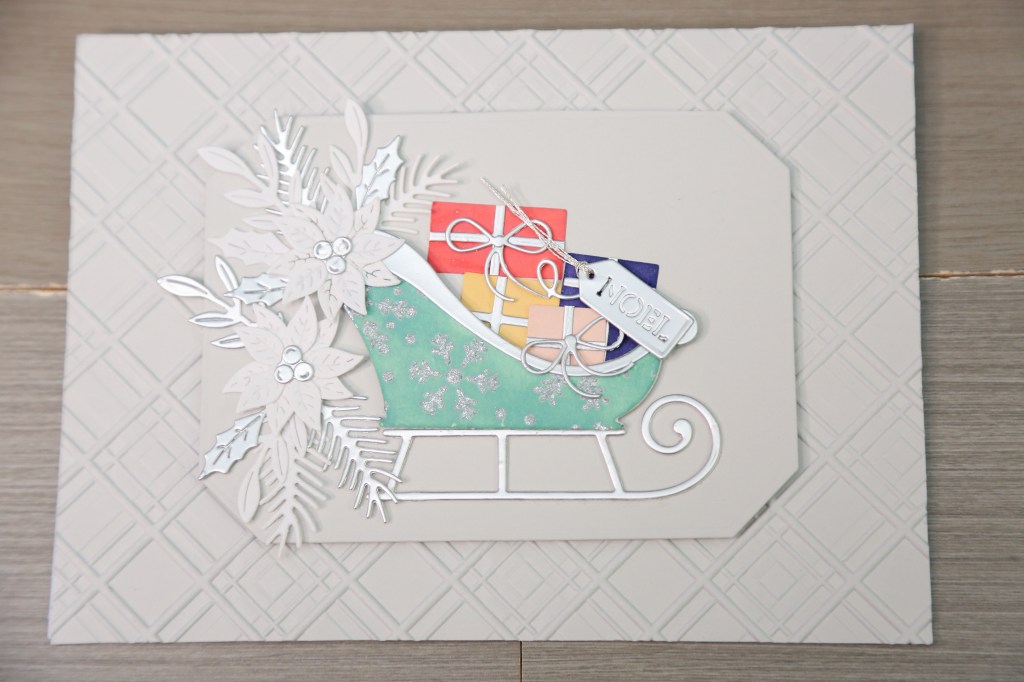
For the next card, I used Spellbinders Fog Color Essentials Card Stock to create the card base. I added the texture on the card base using the Argyle Plaid 3D embossing folder. I used the Emerald Cut Labels and Etched Dies to create a “landing” for the sleigh. I applied Ranger Lunar Paste Silver Lining by Simon Hurley Create through a stencil to achieve the texture on the sleigh. I created the gifts by blending Distress Oxide inks and finished the foliage with Fog and Brushed Silver card stock.
Enjoy the crafty process and make sure you use whatever supplies you have to create your own unique handmade card. If you have any questions, please feel free to leave them in the comments and I’ll be sure to respond.
Disclosure: Some supplies listed below may contain affiliate links which means if you make a purchase I receive a small commission at no extra cost to you. Thank you so much for your support!
If you’d like to see how I created the card, please watch this video tutorial on YouTube.


Leave a comment