In this blog post, I’ll show you the five vellum techniques you must try that will transform your card making forever. The methods are easy and fun and don’t require much time. I’ve shared a list of supplies for each card, but feel free to use whatever you have in your stash. Spending big bucks on card supplies shouldn’t be in your way of creativity and relaxation.
The Supplies Needed list includes a few affiliate links to Amazon items. However, I’ve also included a visual list of supplies from Spellbinders, Altenew, Simon Says Stamp, and A Colorful Life Designs. The tools I use for my card making are attached at the end of this blog post.
You can watch the full video tutorial of how I made the cards here:
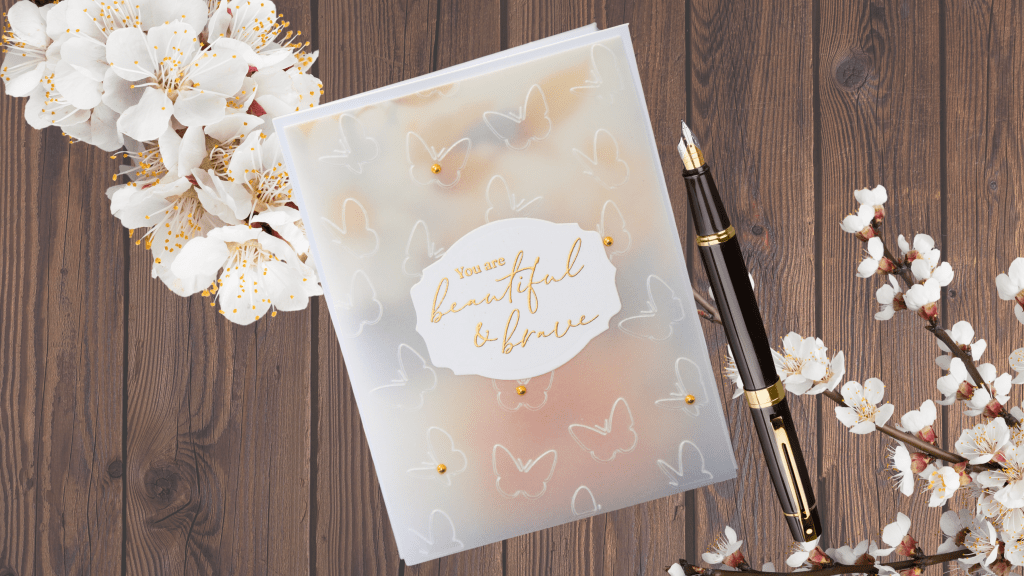
CARD 1
Vellum Overlay on Patterned Paper
Create a beautiful handmade card with delicate butterfly embossing and elegant details using this easy step-by-step guide. Follow along with the supply list and detailed instructions to add stunning 3D elements to your cards.
Supplies Needed:
- Patterned Paper Pad (from Amazon) – Look for designs that complement embossing.
- Pre-Cut and Pre-Scored Card Bases with Envelopes (A2 size from Amazon)
- Butterfly Embossing Folder
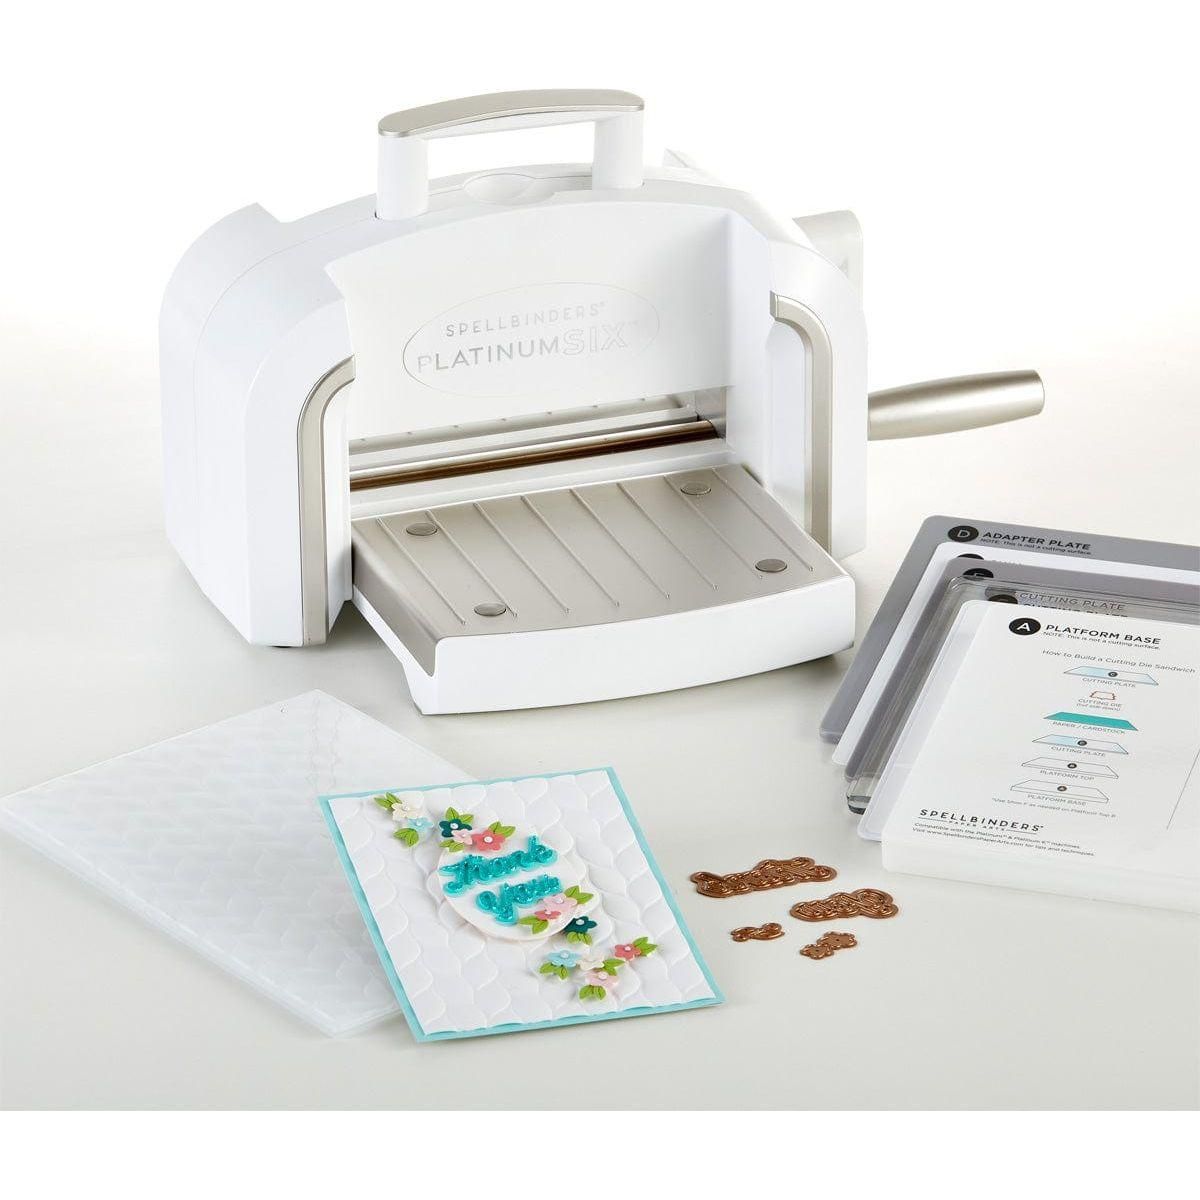
- Spellbinders Platinum 6 Embossing Machine – (or any compatible embossing machine)
- Vellum Paper – Heavyweight recommended for durability.
- Scoring Board
- Paper Trimmer
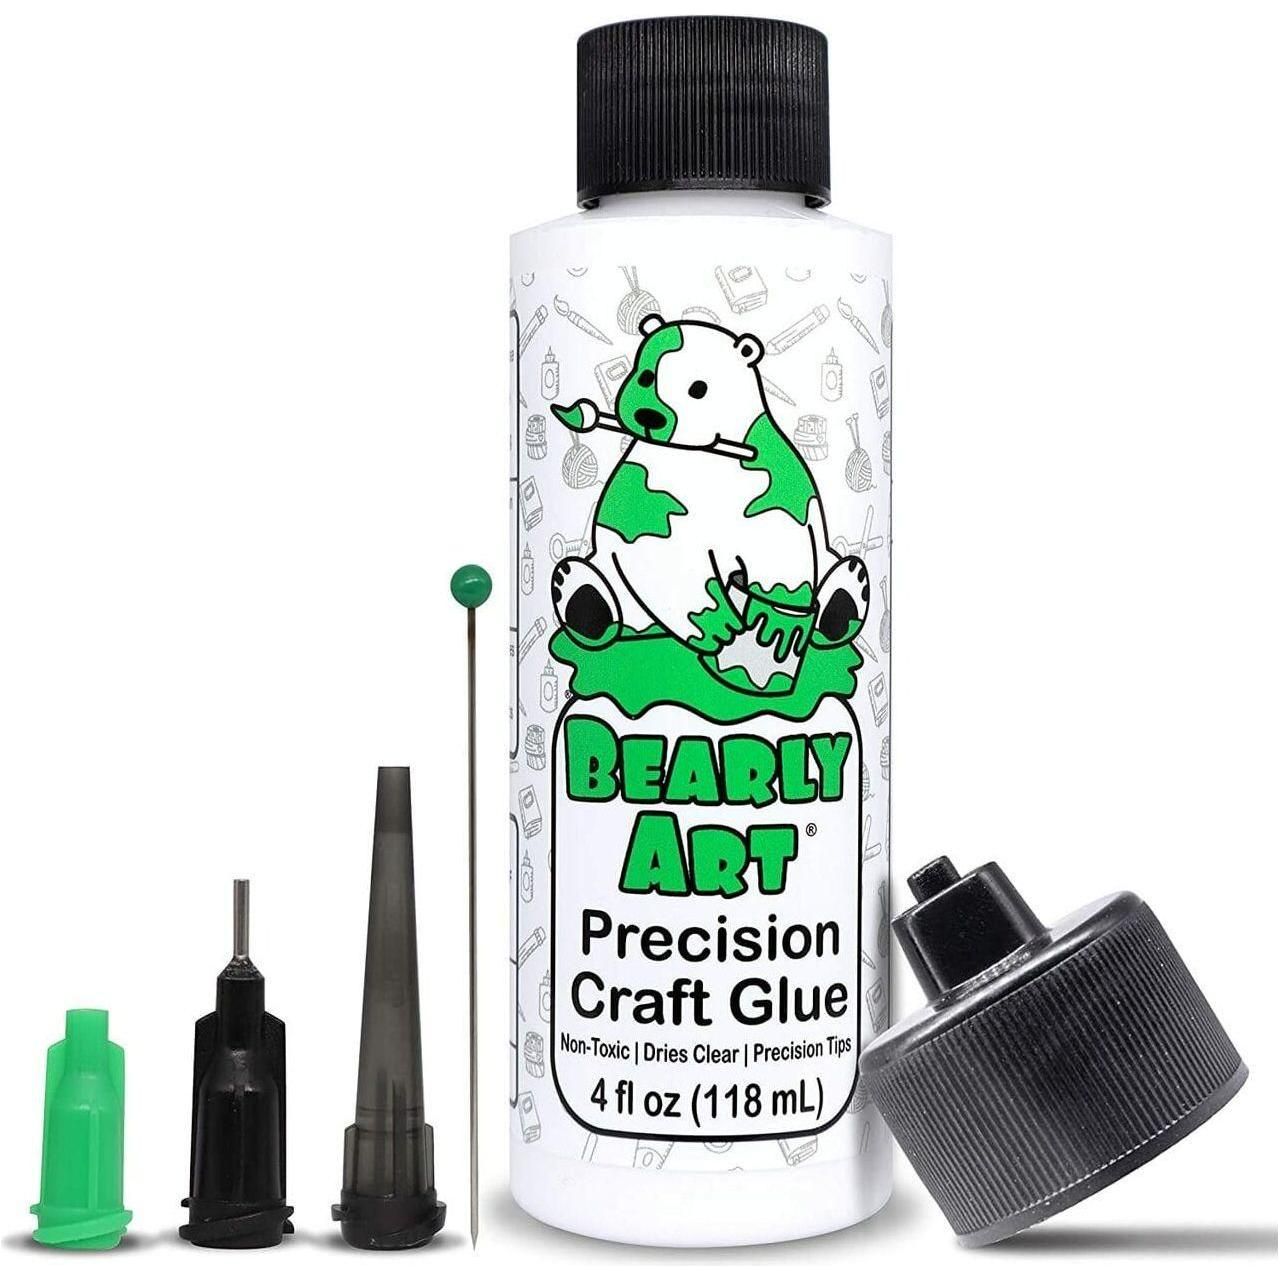
- Liquid Glue – Heavy-duty, suitable for vellum.
- Tape Runner – For thin paper to avoid warping
- Sentiment Stamp Set (Pinkfresh Studio “Fluttering Butterflies”)
- Spellbinders Labels Die Set
- Altenew Embossing Powder
- Heat Tool – For embossing
- Sizzix Sidekick Die-Cutting Machine
- Gold Pearl Stickers (Dollar Store finds work great!)
Step-by-Step Instructions
Step 1: Select Your Paper
Start by selecting patterned paper from your paper pad that fits your card’s theme. I chose a bold floral design with a soft colour palette to complement the butterfly embossing.
Step 2: Prepare the Card Panel
- Prepare a 4 ¼ x 5 ½ in. card base or use a premade one in A2 size (A2 size (4 ¼ x 5 ½ inches)
- If you’d like to have a border around the card panel, use a paper trimmer to cut the patterned paper down to 4 x 5 ¼ inches. Otherwise, cut out an A2-sized piece.
Step 3: Emboss the Vellum
- Place a piece of vellum measuring 4 x 5 ¾ inches into an embossing folder of your choice.
- Prepare the embossing “sandwich” for the Spellbinders Platinum 6: Stack plate A, plate B, the embossing folder with vellum inside, and the grey adapter plate.
- Tip: Check the manufacturer’s instructions for your machine and folder if you’re using a different setup.
- Run it through your machine, revealing a beautiful, raised butterfly pattern on the vellum.
Step 4: Attach the Vellum to the Patterned Paper
- Gently score the vellum ¼ inches from the top edge using a scoring board. Then, gently fold over and press the vellum to form a neat crease.
- Align the patterned paper along the scored line on the vellum. Using liquid glue, secure the vellum flap to the back of the patterned paper, ensuring careful alignment for a neat and professional finish.
Step 5: Secure the Panel to the Card Base
- Apply tape runner adhesive around the edges of the patterned paper, and centre the panel on your card base, leaving a narrow white border around all edges for an elegant finish.
- Add dimensional foam tape behind the card panel and stick it down on the base.
Step 6: Add a Sentiment Label
- Choose a sentiment you’d like to use. I chose the “You are beautiful and brave” stamp from the Pinkfresh Studio “Fluttering Butterflies” stamp set.
- Stamp the sentiment onto a piece of card stock with embossing ink, and apply Altenew embossing powder.
- Heat set the embossing powder to add a shiny, raised effect.
- Use the Spellbinders Labels die to cut out the sentiment label.
- Apply liquid glue or foam squares behind the sentiment label to adhere to the card front.
Step 7: Embellish with Gold Pearl Stickers
Add gold pearl stickers around the design to enhance the elegant look. Position them evenly across the card to avoid overcrowding.
Here are the supplies I used for this card:
https://linkdeli.com/widget.js?id=f5e8378456858c916708
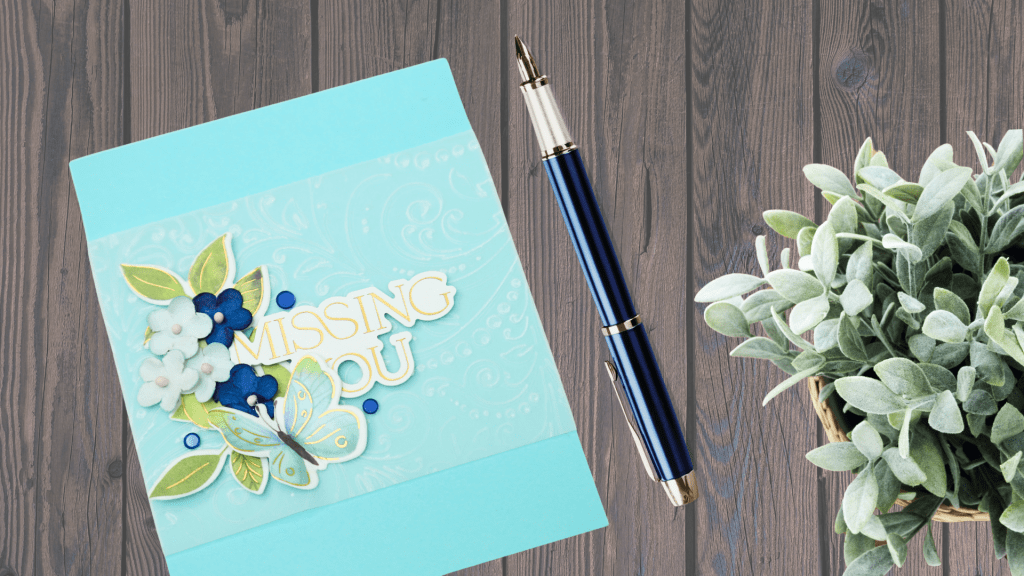
CARD 2
Elegant Card Using Embossed Vellum Belly Band
Supplies Needed:
- Sea Glass Card stock cut to 4 ¼ x 5 ½ inches – for the main card panel
- Vellum – 5 ¼ x 2 ½ inches
- Pre-Cut and Pre-Scored Card Bases with Envelopes (A2 size from Amazon)
- Pinkfresh Studio Fluttering Butterflies dies cuts made with the coordinating Washi & Dies set
- Paper flowers – Michaels
- Premade sentiment from Pinkfresh Studio
- Foam tape or photo mounting tape – for 3D effects (I use dollar store mounting tape)
- Matte gel adhesive – for tougher applications
- Confetti or embellishment – like the Satin Matte Navy Card Bling embellishments
Step-by-Step Instructions
Step 1: Prepare Your Card Panel and Embellishments
- Begin with a base card panel made from your leftover card stock.
- Select embellishments, die cuts and a premade sentiment from Pinkfresh Studio.
Step 2: Add the Vellum Band
- If you don’t have some in your stash, use an embossing folder with a non-directional design and emboss a piece of vellum 5 ¼ x 2 ½ inches.
- Wrap the embossed vellum band around the centre of the card as a belly band. Fold it over and secure it behind the card panel with the Altenew tape runner.
Step 3: Secure the Card Panel to the Card Base
- Reinforce the card panel using foam tape (optional) in strips behind it. This step is optional but highly recommended for added security. Position the card panel on the card base, peel off the backing paper and press it onto it.
- Carefully remove the rest of the backing paper as you stick it down, ensuring it’s flush with the edge of the card and well-adhered.
Step 4: Adhere the Sentiment
Attach foam tape behind your premade sentiment to keep it raised and prevent buckling. Set the sentiment aside, ready to attach once the rest of the design is laid out.
Step 5: Arrange and Adhere Die Cuts
- Lay out your chosen die cuts – I used my leftover stash of Pinkfresh Studio Fluttering Butterflies washi tape die cuts.
- Use Bearly Art liquid glue to secure the leaves first, then adhere the sentiment on top for a layered look.
Step 6: Attach Flowers with Matte Gel Adhesive
Apply a small amount of matte gel medium to the back of each flower. The adhesive is quite thick, so allow time for it to dry completely.
Step 6: Add the Butterfly
Attach a single butterfly for a bit of whimsy, adding thin strips of foam tape under the wings to create a subtle lift.
Step 7: Final Touches with Confetti
Place small confetti pieces around your flower cluster. For simplicity, keep the number of confetti pieces minimal—I used three around the arrangement for balance.
Here are the supplies I used for this card:
https://linkdeli.com/widget.js?id=f5e8378456858c916708
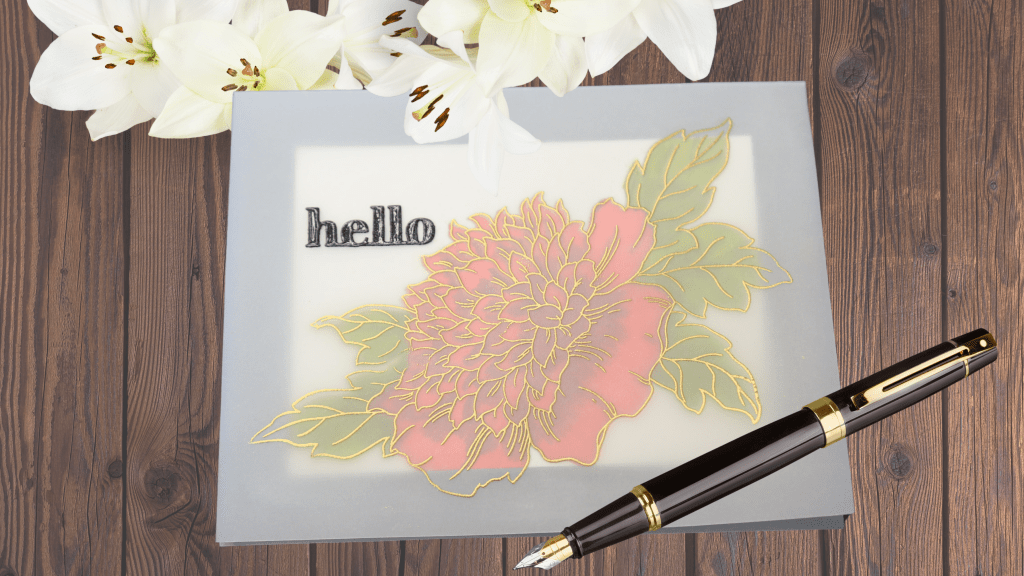
CARD 3
Vellum Overlay Card with a Shadow Image
In this project, we’re taking inspiration from Jennifer McGuire’s vellum overlay technique to create a beautiful “shadow image” effect. By using vellum as an overlay and embossing it, we’ll achieve a unique layered look with gold accents. Let’s get started!
Supplies Needed:
- Heavy weight vellum – 7 inches x 11 inches, long side scored at 5 ½ inches
- Note card: Hammermill 110 lb card stock – 5 ½ x 8 inches, long side scored at 4 inches
- Stamp – Altenew Sunshine Flower stamp set
- Embossing supplies: Anti-static powder, embossing ink, Altenew Antique Gold embossing powder, heat tool
- Adhesives: Washi tape, Barely Art glue.
- Tombow Mono sand eraser
- Alcohol markers – Ohuhu (R2 and R8 for flowers, GY5 and GY8 for leaves, colourless for touch up)
- MISTI Sticky Mats Mini Grid
Step-by-Step Instructions
Step 1: Prepare the Vellum Card
- Cut heavyweight vellum to 7 x 11 inches and score the long side at 5 ½ inches. We’ll use this as the main card front.
- Use white card stock to prepare a note card measuring 5 ½ x 4 inches. This will be adhered to fit inside the vellum card.
Step 3: Position the Stamp Using MISTI
- Use a sticky mat inside the stamp positioner and secure it with magnets so it doesn’t move during the stamping process.
- Place the notecard onto the MISTI sticky mat and centre the vellum card over it. Secure it down to the MISTI mat for precise alignment.
- Use a small piece of rolled-up washi tape between the vellum sheet to keep it shut.
- Align the stamp on the vellum, ensuring parts of the image hang over the edges of the inner note card.
Step 4: Stamp and Heat Emboss
- Close the MISTI door to pick up the stamp, apply anti-static powder, and ink it with embossing ink.
- Use a pressure tool to ensure even stamping.
Step 5: Stamp the Image on to the White Note Card
- Carefully lift the vellum from the sticky mat by curling the mat back.
- Stamp the white note card with the same image, creating the shadow effect.
- Apply Altenew Antique Gold gold embossing powder to the note and vellum cards.
- Wipe off any stray embossing powder with a Swiffer cloth.
- For best results, start heat setting the regular card first to warm up the heat tool, which will reduce warping when moving to the vellum.
Step 6: Clean and Embellish
- Clean up any extra embossing on the gold outlines using the Tombow sand eraser.
- Position the inner note card behind the vellum to check the alignment.
Step 7: Color the Design
- Using alcohol markers, colour the flowers and leaves of the heat-embossed image on the white note card. Apply darker shades first for depth.
- Use a colourless marker to clean up any excess on the gold outlines and restore shine.
Step 8: Adhere the Vellum Overlay
- To adhere the inner note card, apply a tiny bit of glue to the back of the notecard instead of the vellum with a paper applicator. This minimizes the appearance of glue spots.
- Once the designs are aligned, flip the card over and apply light amounts of glue to the white note card so it’s well secured to the vellum.
- Ensure there are no globs of glue on the note card, as that makes the card look messy.
Step 9: Add a Sentiment
- Let the glue dry completely before adding a sentiment to the card front. I added Glossy Accents over the die-cut sentiment to create a puffy look.
- Embellish with jewels or pearls if you like.
Here are the supplies I used for this card:
 https://linkdeli.com/widget.js?id=f5e8378456858c916708
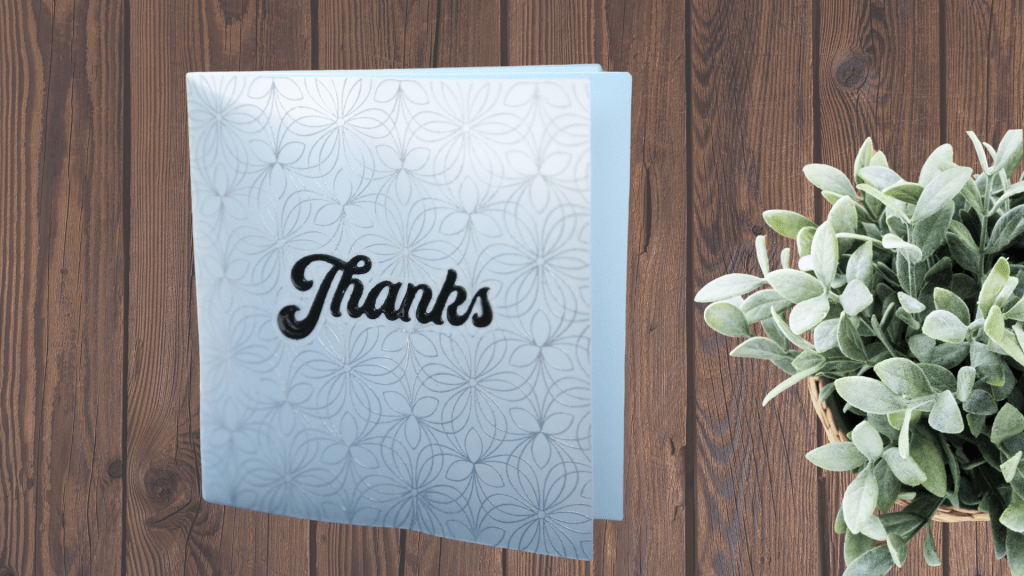
CARD 4
Vellum Overlay with a Hidden Message
Adding shine and dimension to your cards has never been easier! Here’s a step-by-step guide on creating a simple but stunning vellum overlay card, complete with a hidden message. For this project, we’ll use heat embossing and vellum overlay techniques to create an elegant effect that’s sure to wow.
Supplies Needed:
- Heavy weight vellum – 5 ½ x 6 inches
- Lightweight vellum for sentiment shadow
- Background stamp
- Versafine ink – Onyx Black
- Heat embossing powder: Gina K Designs Fine Detail Silver
- Heat tool
- Blue card stock (or colour of your choice for the background)
- 5 ½ x 5 ½ inches card panel
- 5 ½ x 11 inches – scored at 5 ½ inches
- Cutting die – Thanks
- Sub-sentiment stamp (the Papertrey Ink stamp in the video is currently unavailable)
- Brushed Black card stock
- Glossy Accents
- Acrylic stamping block (optional: stamp positioner)
Step-by-Step Instructions
Step 1: Create the Vellum Overlay Panel
- Position the stamp on the 5 ½ x 6-inch piece of vellum.
- Apply embossing powder and heat-set the design. Note that heat embossing on vellum requires some caution to avoid warping, so apply heat evenly and keep the heat tool moving.
Step 2: Assemble the Card Base
- Score the long edge of the overlay panel at ½ inch.
- Gently crease the vellum along the score line to create a flap to wrap over the card panel.
- Adhere the folded vellum to the card panel with liquid glue.
- Adhere the card panel with the vellum overlay to the card base. You can optionally use foam tape to add dimension to the card panel.
Step 3: Add the Main Sentiment
- Die-cut the “Thanks” sentiment from the Brushed Black card stock and the shadow layer from lightweight vellum.
- Adhere the sentiment die-cut to the vellum shadow using liquid glue.
- Now, adhere the assembled sentiment to the heat-embossed vellum front.
- Carefully apply Glossy Accents to the black Thanks sentiment making sure it stays on the die cut and doesn’t spill over to the vellum background. The glossy finish will add dimension and shine, giving the card a polished look.
Step 4: Create the Hidden Message
- To add an interactive element, position the “Grateful for You” sentiment stamp on the inside of the card, hiding it behind the vellum overlay.
- You can position the stamp behind the “Thanks” sentiment on the reverse side of the vellum overlay and close the overlay to the card front.
- Hold the stamp in place on the card front and lift the vellum.
- Mark the edges of the stamp very lightly with a pencil.
- Stamp the sentiment with Onyx Black ink, making sure to stay within the markings.
- Erase the pencil marks once the ink has dried thoroughly to avoid smudging and smearing the ink.
Here are the supplies I used for this card:
 https://linkdeli.com/widget.js?id=f5e8378456858c916708
CARD 5
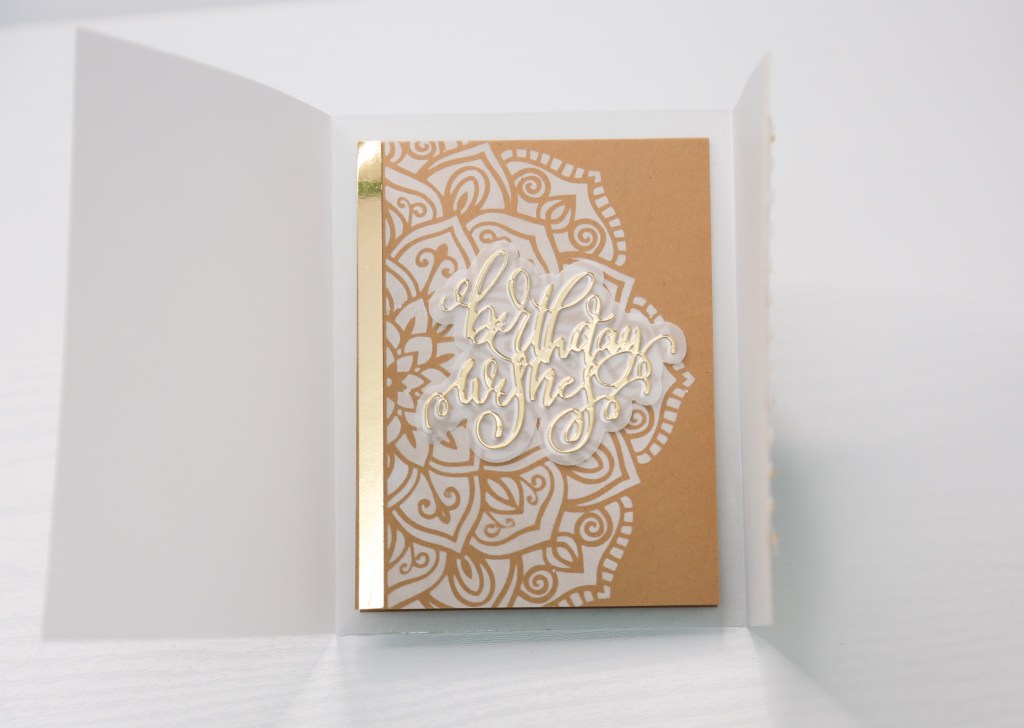
Vellum Gatefold Card with Metallic Accents
Adding vellum as a gatefold to a card brings a soft, elegant twist to your designs. This tutorial is inspired by a technique I watched Jennifer McGuire create, and I’ll guide you through crafting a gatefold wrap using vellum rather than card stock.

Supplies Needed:
- Heavy weight vellum sheet – 8 ¼ x 11 inch
- Craft card stock – 3 ¾ x 10 inch, long edge scored at 5 inches
- Double-sided adhesive –
- 4 ¼ x 5 ½ inches
- 3 ½ x 4 ¾ inches
- Mirror Gold card stock –
- 2 strips, each measuring ¼ inch x 5 ½ inches
- Small piece for die cut sentiment
- White card stock for die cutting sentiments
- Stencil (the stencil used in the video is no longer available)
- White pigment ink (for background design)
- Sentiment & shadow die
- Border die (the die used in the video is no longer available)
Step-by-Step Instructions
Step 1: Create the Vellum Gatefold
- Cut the full sheet of vellum on the long edge at 5 ½ inches. Score both pieces gently at 4 ¼ inches to avoid cracking.
- Remove the release paper on one side of the double-sided adhesive sheet measuring 4 ¼ x 5 ½ inches.
- Carefully apply the adhesive sheet to the back of one of the vellum card bases.
- Remove the second release paper on the adhesive sheet partially and position the vellum card with the exposed adhesive on the inside of the second card base.
- Line up the edge just a hair away from the inside fold of the second card base. Ensure you don’t stick down the top card before properly aligning the two bases.
- Once aligned, remove the remaining backing paper and stick down the top card base.
- Trim 2 ½ inches of the top flap with a paper trimmer to create a peek-a-boo effect, showing a hint of the inside design.
Step 2: Add Design to the Card Base
- Use the stencil with the Hero Arts Unicorn pigment ink to create the design on the craft card base and let it dry. Pigment ink takes longer to dry, so set the card aside until the ink dries or use a heat tool to dry the ink.
- Add one of the Mirror Gold card stock strips to the left edge of the craft note card to enhance the design for a subtle yet striking detail.
Step 3: Layered Sentiment
- Cut out the sentiment using the Mirror Gold card stock.
- Cut out two more sentiments with the white card stock.
- Use vellum to cut out the shadow layer. This will diffuse the design beneath it.
- Use Micro Dot adhesive sheets to the white sentiments to stack two or more die-cut sentiments together.
- Carefully apply glue to the front of the white stacked sentiment and adhere to the vellum shadow, ensuring the white stacked die cuts are either completely hidden behind the gold sentiment on top or offset the white sentiments to be barely visible from behind the gold, something like a shadow.
Step 4: Adhere the Note Card
- Add the smaller double-sided adhesive to the back of the craft note card.
- Remove the backing paper, centre the note card on the vellum card base, and press down firmly to adhere.
- Place the sentiment with the shadow onto the craft note card by only applying a little glue behind the stacked sentiment. This will hide the glue and make it invisible through the vellum.
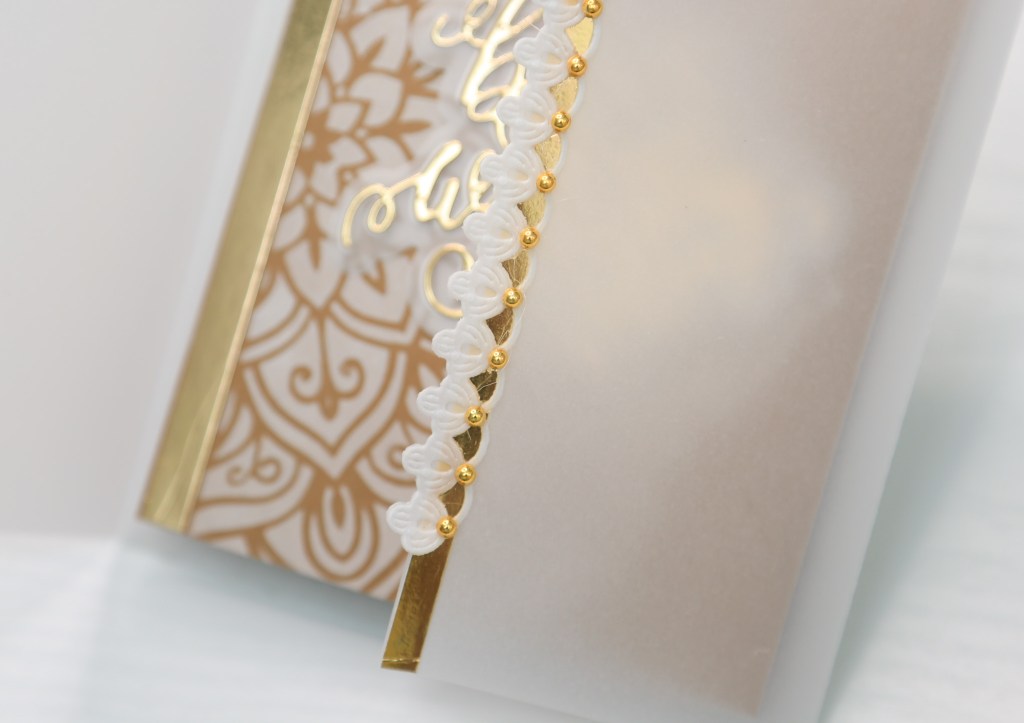
Step 5: Create the Decorative Border
- Take the narrow strip of double-sided adhesive left behind from the larger sheet and apply to the second ¼ inch Mirror Gold strip.
- Remove the backing and adhere the Mirror Gold strip to the edge of the front (narrow) vellum panel.
- Use a border die to create an elegant decorative border with the piece of vellum you trimmed away from the front of the card in Step 1.
- Use a foam daubber or a paper scrap to dab glue on the vellum and adhere the to the gold-stripped edge of the front flap.
- Decorate the border with embellishments (optional).
Here are the supplies I used for this card:
 https://linkdeli.com/widget.js?id=f5e8378456858c916708
If you’d like to see what basic tools I use for for card making, here’s the list:
|


Leave a comment