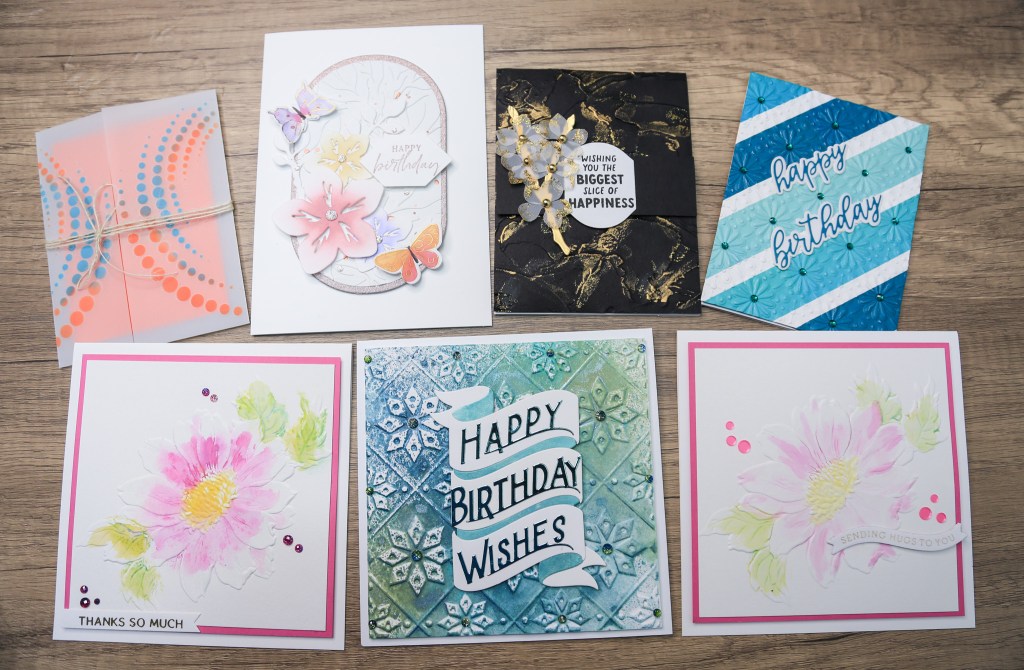
In this blog post, I’m going to show you five ways to use embossing folders in your card making, plus one bonus, and little-known technique to quickly add dimension and texture to your projects with very little time and effort.
You can use whatever supplies you have on hand. I’ve listed and linked to the ones I’ve used, just to give you an idea in case you’re looking for inspiration.
If you’d like to dive straight into the video tutorial, here’s the link:
Technique #1:
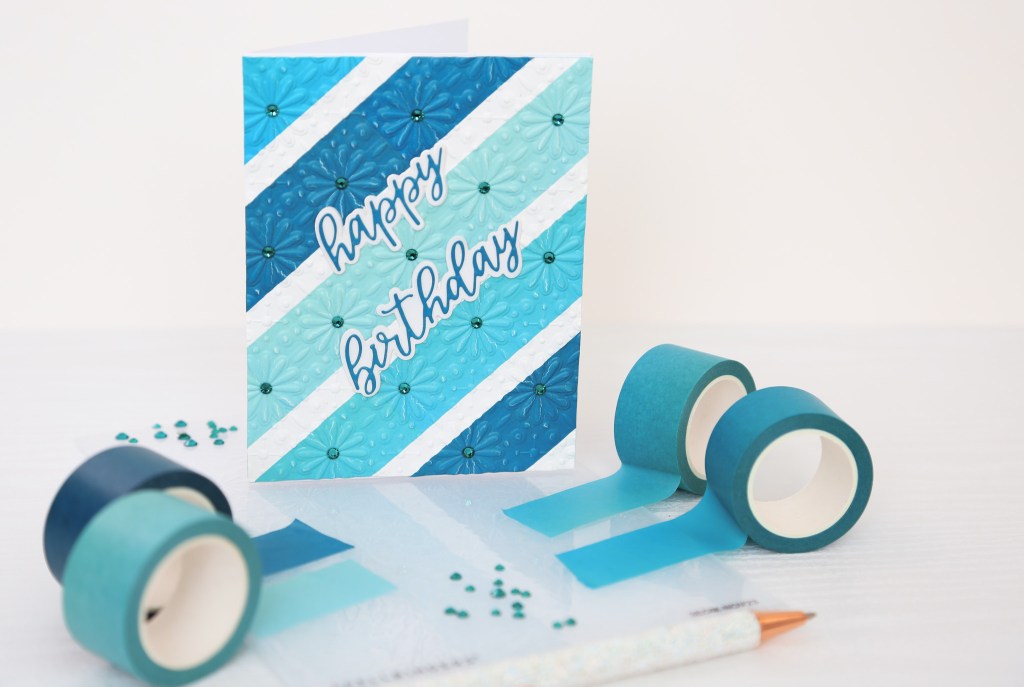
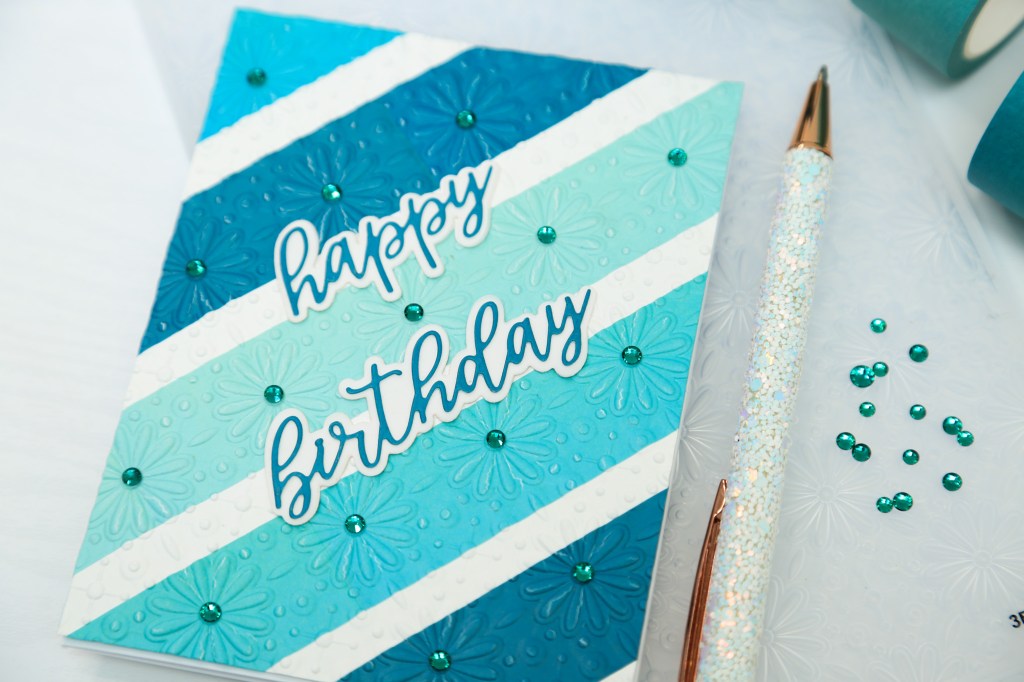
Embossing with Washi Tape Strips
Discover the art of creating a stunning embossed card with delightful strips of washi tape! This technique not only infuses your project with vibrant colour but also adds beautiful texture and dimension. Don’t miss out on the chance to impress your friends with this stylish card!
Supplies Needed:
- A2-size Card Panel – Any smooth, sturdy cardstock in A2 size (4.25” x 5.5”).
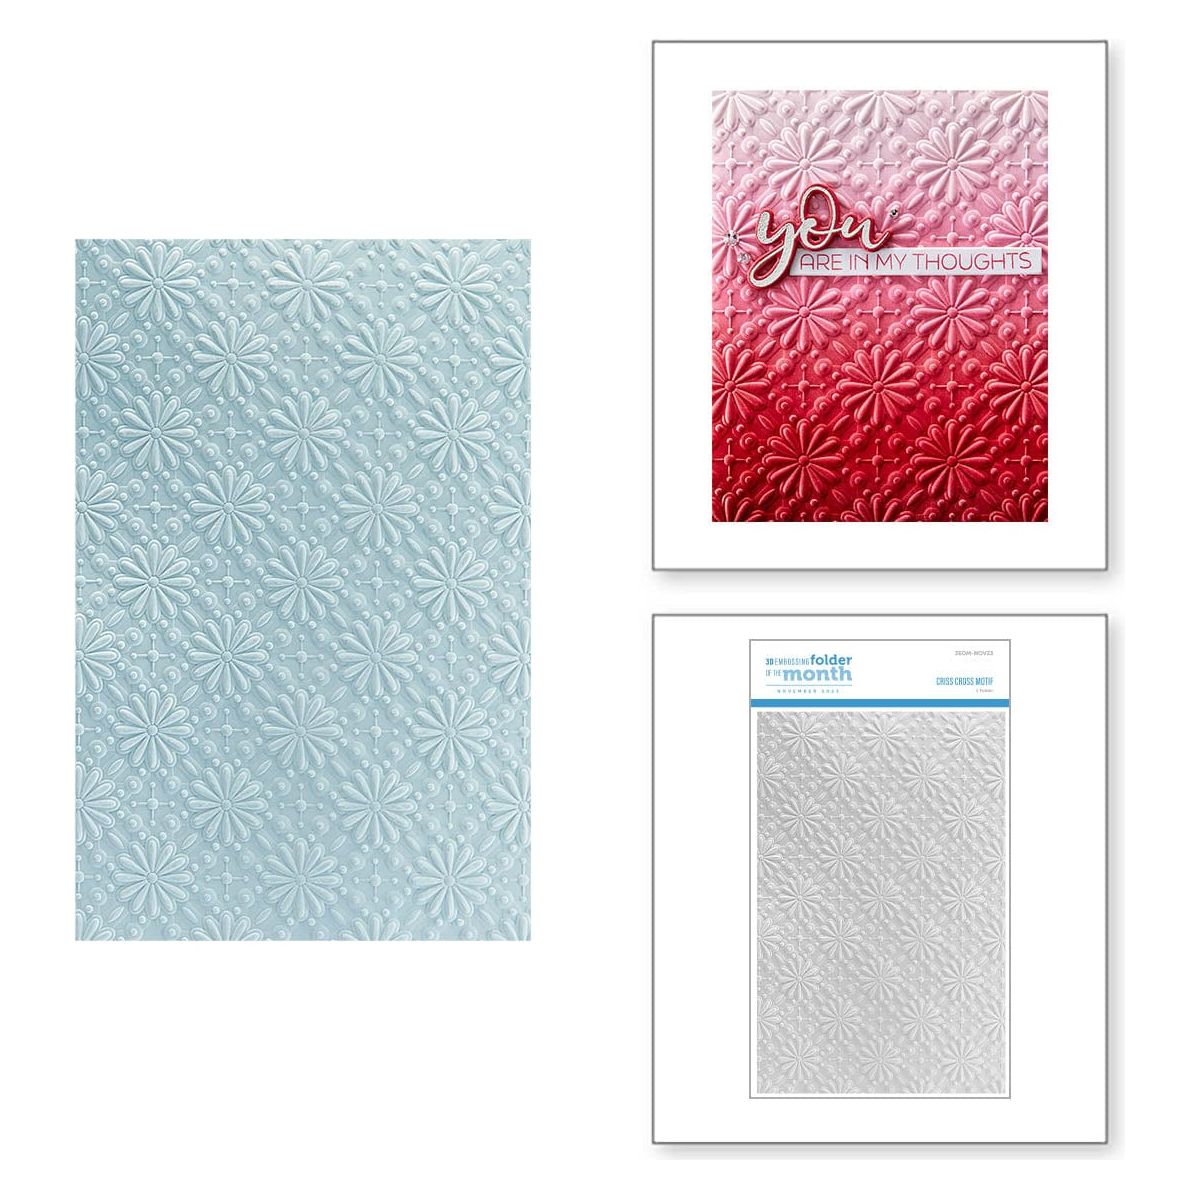
- Embossing Folder – I used the Criss Cross Motif embossing folder from Spellbinders for this project.
- Washi Tape – Select a set of washi tapes in coordinating colours to create stripes.
- Pre-made Card Base – I used a pre-made card base (available on Amazon).
- Foam Tape – I recommend using foam tape to add dimension to your design.
- Magnetic Glass Mat (Optional) – Helpful for ensuring stability and precision while working.
- Sentiment die / stamp – I used one from Spellbinders.
Step-by-Step Instructions
Step 1: Prepare the Card Panel
- Cut an A2-sized panel of cardstock. This will be the base of your design.
- Apply strips of washi tape at a diagonal across the panel. Space them evenly or as desired for a unique look, and secure the tape on the back of the panel with adhesive to prevent any shifting.
Step 2: Position the Embossing Folder
- Place the panel inside the embossing folder, ensuring that the floral design aligns along the washi tape stripes.
- Centre the main floral element along the middle of the panel for a symmetrical look. It doesn’t have to be perfect, but aligning the flowers with the stripes adds a cohesive look.
- Tape the embossing folder shut to keep the card panel in place during embossing.
Step 3: Emboss the Panel
Check the embossing sandwich required and run the folder through your embossing machine. The pressure will create a raised, textured design on the panel, adding dimension and detail to your washi tape stripes.
Step 4: Attach the Panel to the Card Base
- Use foam tape on the back of the embossed panel to lift it slightly, enhancing the dimensional effect.
- Partially peel the backing paper from the foam tape, leaving half of it in place. This “spring” effect helps you adjust the panel alignment on the card base, allowing you to position it precisely before sticking it down fully.
Step 5: Add the Sentiment
Stamp or die cut your chosen sentiment and adhere it onto the card panel. Position it in a way that complements the embossed design.
Tip: A simple, small sentiment works best to keep the focus on the embossing and washi tape stripes.
Your embossed card with washi tape stripes is complete. The combination of texture, colour, and dimension makes this card a true standout.
Here are the supplies I used for this card:
|


https://linkdeli.com/widget.js?id=f5e8378456858c916708
Technique #2:
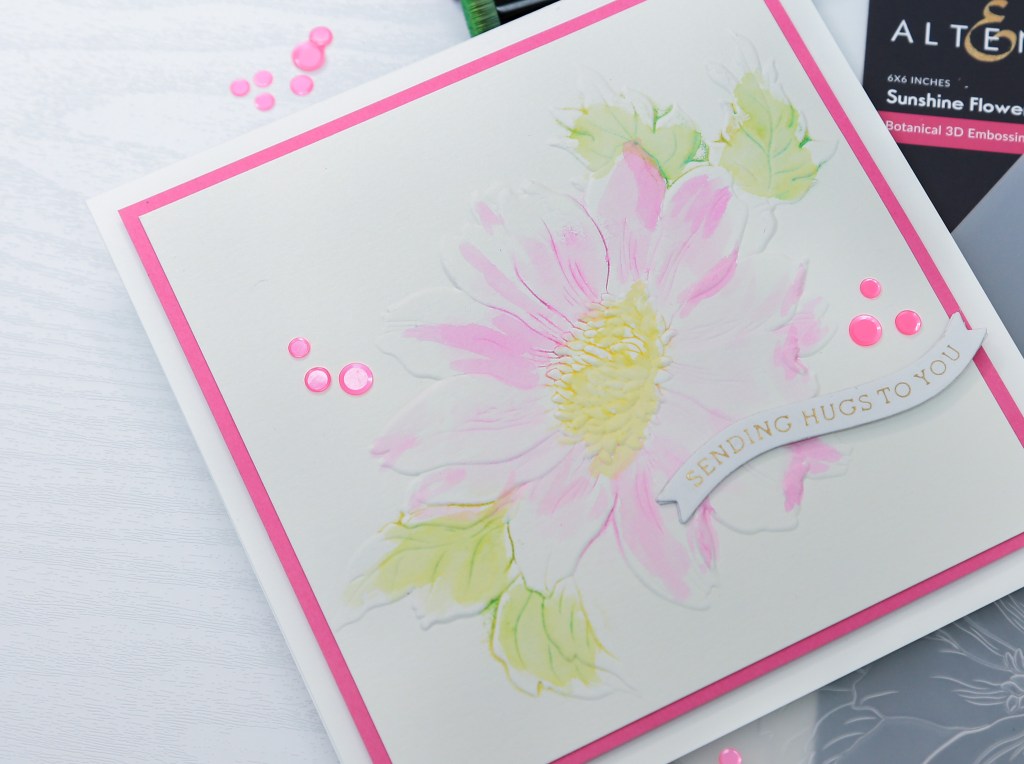
Embossed Water Colouring
I’m excited to show you how to create vibrant, watercolour-inspired cards using an inked embossing folder. It’s super simple and allows you to add a beautiful pop of colour and lovely texture to your cards.
Supplies Needed:
- 3D Embossing Folder – I used the “Sunshine Flowers” 3D embossing folder by Altenew (not sold individually)
- Top-Folding 6×6 Card Bases – I used 12×12 inches Hamilco heavy weight card stock
- Coloured card stock for matting – 5 ½ x 5 ½ inches; I used Doll Pink by Simon Says Stamp
- 6×6 Watercolour Paper – I used Canson watercolour paper cut down to 6 x 6 inches.
- Distress Oxide Inks – I used:
- Mustard Seed – for bright yellow petals.
- Seedless Preserves – a rich pink/purple colour.
- Crushed Olive – for a subtle, earthy green.
- Lucky Clover – a deeper green to accent the leaves.
- Ink Blending Brushes – I uses a set of small Altenew brushes for precise application of different ink colours.
- Water Brush – Helpful for blending the ink after embossing to achieve a watercolour effect.
- Embossing & Die Cutting Machine with Plates – I used Spellbinders Platinum 6
- Bearly Art Glue
Step-by-Step Instructions
Step 1: Prepare the Embossing Folder and Ink Colours
- Select the smoother side of your watercolour paper for a clean and even ink transfer.
- Ink the embossing folder, starting with Mustard Seed Distress Oxide on the flower centre, then add Seedless Preserves to the petal areas.
- Apply Crushed Olive to the leaves, and add a hint of Lucky Clover for depth and contrast. Use small blending brushes to apply ink precisely, avoiding overlap onto the petals.
Step 2: Position and Emboss the Paper
- Open the embossing folder and lay it flat.
- Carefully position the watercolour paper (smoother side up) onto the non-inked door of the embossing folder. Try to centre as best as you can, although you can make adjustments later.
- Tape the folder shut so the panel doesn’t shift during embossing.
- Assemble your embossing machine sandwich: I used Plate A, the embossing folder, an adapter plate, and a shim (Plate F) in my Spellbinders Platinum 6.
- Run it through the machine and gently remove the panel. The ink should have transferred beautifully to the embossed areas.
Step 3: Add Watercolour Effect with a Water Brush
- Use a water brush or a regular paint brush to blend and soften the ink on the paper. A gentle touch will help the colours merge subtly, creating a lovely watercolour effect.
- For added depth, allow some of the pinks and yellows to blend around the flower centre and add a few darker swipes of pink near the centre. The two green inks also help to add contrast to the leaves.
- Let this first piece dry completely while you prepare the second card.
Step 4: Create a Softer Second Version
- Without re-inking the embossing folder, lightly spritz the inked side of the embossing folder with water.
- Place the watercolour panel on the non-inked side of the folder before closing it.
- Tape the folder shut so the panel doesn’t shift during embossing.
- Run the folder through the embossing machine again. This will create a bolder, more intense version of the design due to the activation of the ink with the water mist.
Step 5: Finish the Second Embossed Panel
- Like the first panel, blend the colours with a water brush.
- Set aside to dry.
Step 6: Trim and Mat the Panels
- Trim each panel down to 5 x 5 inches to create a border for matting on a 6×6 card base.
- Create two card mats measuring 5 ¼ x 5 ¼ inches.
- Cut a section out of the back of the mat for another project (stretching supplies is key!).
Step 7: Assemble the card
- Apply glue around the edges of the panels and secure them to the card base.
- Add sentiments and embellishments to complete the cards.
And there you have it! Two unique embossed cards with a beautiful watercolour effect. I love how each card has a distinct style, from bold and bright to soft and subtle.
Here are the supplies I used for this card:
 https://linkdeli.com/widget.js?id=f5e8378456858c916708
Technique #3
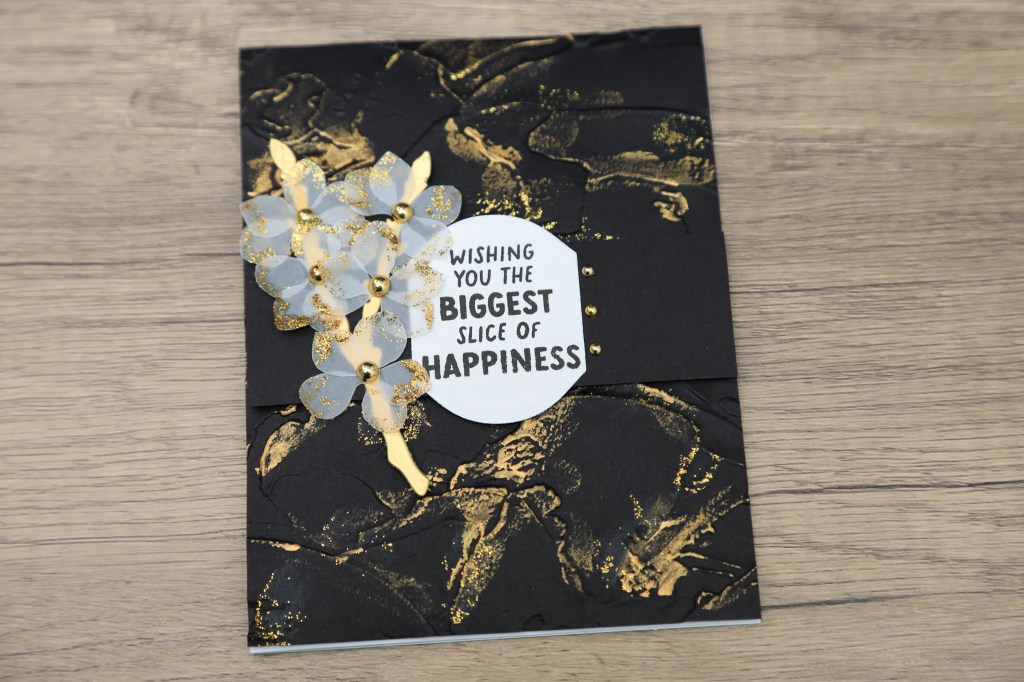
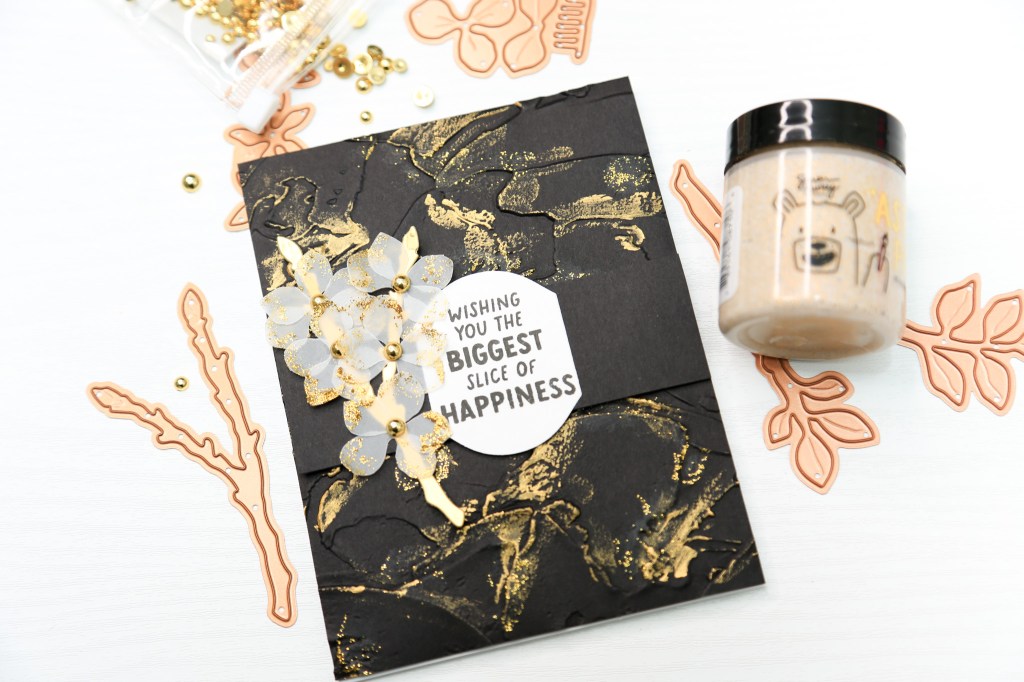
Embossed Background
In this tutorial, I’m going to show you how to create a beautiful, textured, and glittery card using an embossing folder along with Lunar and Astro pastes. This easy technique brings out the embossed details with a stunning shimmer effect that doesn’t shed glitter. Let’s jump into the supplies and steps!
Supplies Needed:
- Pre-made Card Base – I used a pre-made card base (available on Amazon).
- Black A2 Card Panel (4.25” x 5.5”) – I used Black heavy weight card stock from Simon Says Stamp
- Black card stock measuring 4 ¼ x 1 ¼ inches
- Brushed Gold card stock
- Scrap piece of vellum
- Embossing Folder – I used Plaster by Spellbinders
- Lunar Paste – Adds a soft metallic shimmer to the embossed lines
- Astro Paste – Provides a glittery effect without shedding
- Spray Bottle with Water – To lightly mist the back of the panel before embossing
- Embossing Machine and Plates – I used Spellbinders Platinum 6
- Baby Wipes – For clean up
- Heat Tool (Optional) – Helps speed up the drying process
- Gold embellishments – I used gold metallic pearls
- Foam Tape – Adds dimension when attaching the embossed panel to the card base
Vellum Flowers and Branch Die-Cuts:
- Forsythia Die (Spellbinders) – For creating delicate branch details.
- Flowering Quince (Spellbinders) – To cut out vellum flowers.
Step-by-Step Instructions
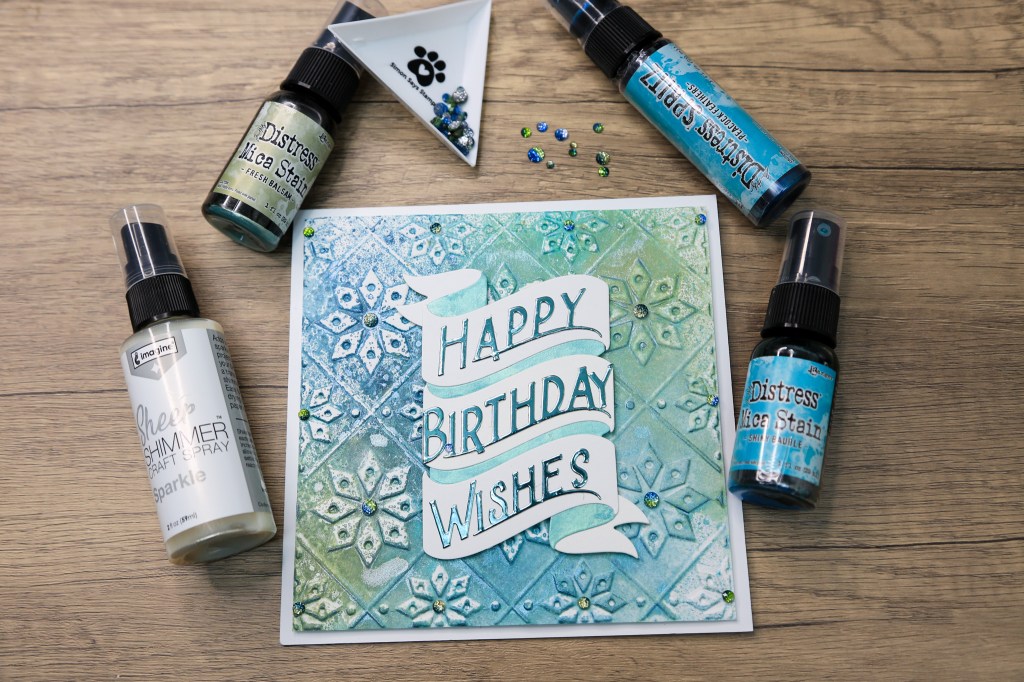
Step 1: Emboss the Black Card Panel
- Lightly spray the back of your black A2 card panel with water. This helps prevent cracking when embossing and allows the paper to pick up details better.
- Place the panel in the embossing folder, and run it through your embossing machine with Plate A and any necessary adapters. The result will be a deeply textured panel.
Step 2: Apply Lunar Paste to Highlight Embossed Areas
- Take a small amount of Lunar Paste on your finger and gently rub it over the raised parts of the embossed design. Applying it lightly helps prevent lumps and gives a subtle metallic sheen to the texture.
- Use a baby wipe to clean your finger when done, ensuring no leftover paste interferes with the next step.
Step 3: Add Astro Paste for a Glittery Finish
- Using a clean finger, apply Astro Paste sparingly along the embossed areas. This paste adds a beautiful glitter effect that adheres well without shedding.
- Once applied, use a baby wipe again to clean off any excess paste.
Step 4: Dry the Panel
Allow the paste to air dry completely. You can speed up the process by using a heat tool if needed.
Step 5: Prepare Vellum Flower and Branch Die-Cuts
- Using the Forsythia die, cut out a delicate branch with Brushed Gold card stock to add an organic element to your design.
- Cut out small flowers from vellum using the Flowering Quince die, then apply a thin layer of Astro Paste around the edges of the petals to give them a subtle sparkle.
- Adhere the flowers to the branch with a bit of glue and set it aside.
Step 6: Assemble the Card
- Once the embossed panel is dry, attach foam tape to the back. This will lift the panel, adding dimension and allowing the texture and glitter to catch the light.
- Centre the panel on the premade card base and press down gently to adhere it.
- Adhere the Black card stock measuring 4 ¼ x 1 ¼ inches across the centre of the embossed panel.
- Place the gold branch and vellum flowers on the embossed panel, over the black band. Position them so they complement the design without covering too much of the texture.
Step 7: Add the Sentiment
- Stamp out the sentiment on a piece of white spare card stock and cut it out with the Mirrored Arch label dies.
- Add the gold metallic pearls to the flower centres to complete the design.
This glittery, textured card is complete and has a gorgeous, elegant finish. The combination of Lunar and Astro Paste enhances the embossing beautifully, while the vellum flowers add a delicate touch.
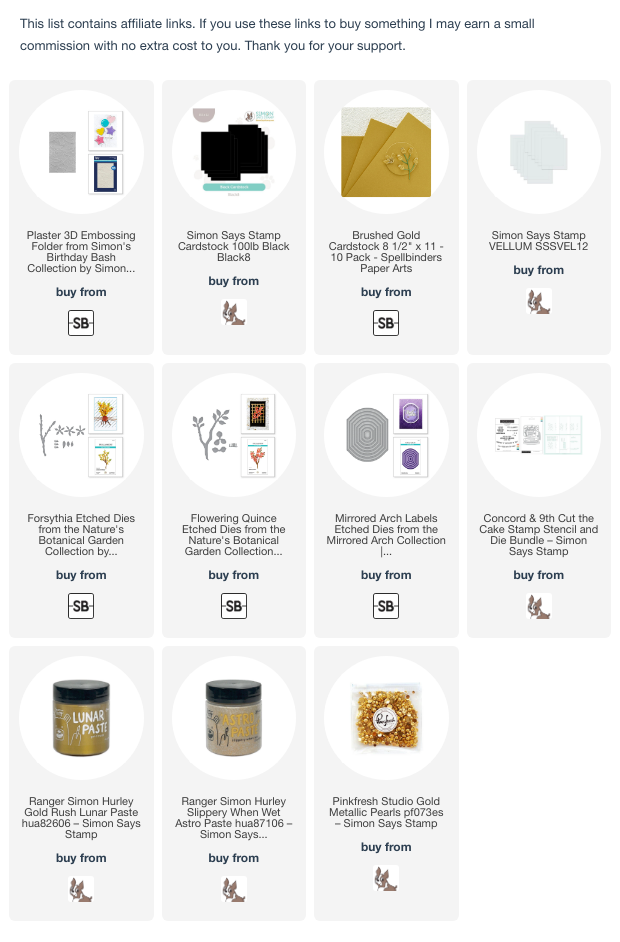
Here are the supplies I used for this card:
https://linkdeli.com/widget.js?id=f5e8378456858c916708
Technique #4
Distress Oxide Sprayed Embossing
In today’s tutorial, I’ll walk you through a fun and shimmery embossing technique that’s both easy and perfect for any occasion. We’ll use a mix of distress sprays and mica stains to create a beautifully textured background. Plus, I’ll show you how to add a bold sentiment with metallic paper and Solar Paste. Let’s get started!
Supplies Needed:
- Top-Folding 6×6 Card Bases – I used 12×12 inches Hamilco heavy weight card stock
- 6 x 6 mixed media paper – I used Canson
- Metallic blue card stock – I used a sheet from a dollar store paper pad
- Altenew Embossing Folder (Snowy Stars) – Adds a stunning, dimensional design.
- Distress Sprays and Mica Stains – Choose colours you love; I used a variety for a colourful, shimmery look.
- Shimmer Sprays:
- Sheer Shimmer Spray – Adds an extra touch of sparkle.
- Peacock Feathers – Distress Oxide Spray
- Fresh Balsam – Distress Mica Stain
- Shiny Bauble – Distress Mica Stain
- Heat Tool – Optional but helps speed up drying time.
- Spellbinders Die Set – For a sentiment like “Happy Birthday Wishes.”
- Simon Says Stamp Dye Ink in Dew – For creating a custom ink-blended background.
- Simon Hurley Solar Paste (Crocodile Tears) – Adds a green shine when applied over ink.
- Embossing Machine and Plates – I used Spellbinders Platinum 6
- Bearly Arts Liquid Glue
- Tweezers – Essential for aligning small die-cut pieces.
Step-by-Step Instructions
Step 1: Prep and Spray the Card Panel
- Begin by placing your 6×6 mixed media card panel in a spray box to contain any mess. I use an old cardboard box.
- Shake your distress sprays and mica stains to ensure the pigments are well-mixed. Lightly spray the panel with your chosen colours, focusing on creating a mix of shades for a dimensional look.
- For added shimmer, spray a bit of sheer shimmer spray over the top.
- Allow the panel to dry naturally, or use a heat tool to speed up the drying process.
Step 2: Emboss the Panel
- Once the sprays are dry, place the panel into the Snowy Stars embossing folder from Altenew, aligning it as desired.
- Run the panel through your embossing machine to create a raised, textured design. The sprayed colours will look even more vibrant once embossed.
Step 3: Clean and Add More Shimmer (Optional)
- If you notice any spots lacking shimmer, you can apply another light mist of the shimmer spray.
- Allow the panel to dry fully before moving on. Clean your embossing folder with a baby wipe to remove any residual spray.

Step 4: Trim and Mat the Embossed Panel
- To add a white border around your design, trim the edges of your sprayed and embossed panel slightly—about ¼ inch on each side.
- This will leave a slim frame that makes the colourful embossing stand out when mounted on the card base.
Step 5: Ink-Blend and Add Solar Paste to Sentiment (Optional)
- Cut out the banner die pieces. If you’d like a colourful, shiny effect, ink-blend the background pieces of the sentiment die-cuts with Simon Says Stamp Dew dye ink.
- Then, apply Simon Hurley Solar Paste in Crocodile Tears over the ink. This paste gives the die cuts a beautiful teal shine, especially when tilted in the light.
- For a bold sentiment, use the Spellbinders Die Set to cut out “Happy Birthday Wishes” from a teal or other coordinating metallic card stock.
Step 7: Assemble the Card
- Once your panel is fully dry, use Bearly Art liquid glue to attach each die-cut word to the card front. Tweezers are helpful for precise placement, especially for smaller letters. Ensure each word is well-aligned and spaced evenly.
- Add some foam tape behind the banner sentiment and adhere to the card panel.
- Mount the finished embossed panel onto a 6×6 card base using glue or foam tape for extra dimension.
- Add any additional embellishments if desired, (I used Pinkfresh Studio) glitter drops in Enchanted Forest to keep it simple and let the shimmery embossed background and sentiment stand out.
You’ve created a stunning 6×6 card with a shimmering, textured background and a bold, colourful sentiment. The combination of sprays, embossing, and Solar Paste gives this card a unique look that’s perfect for birthdays or any celebration.
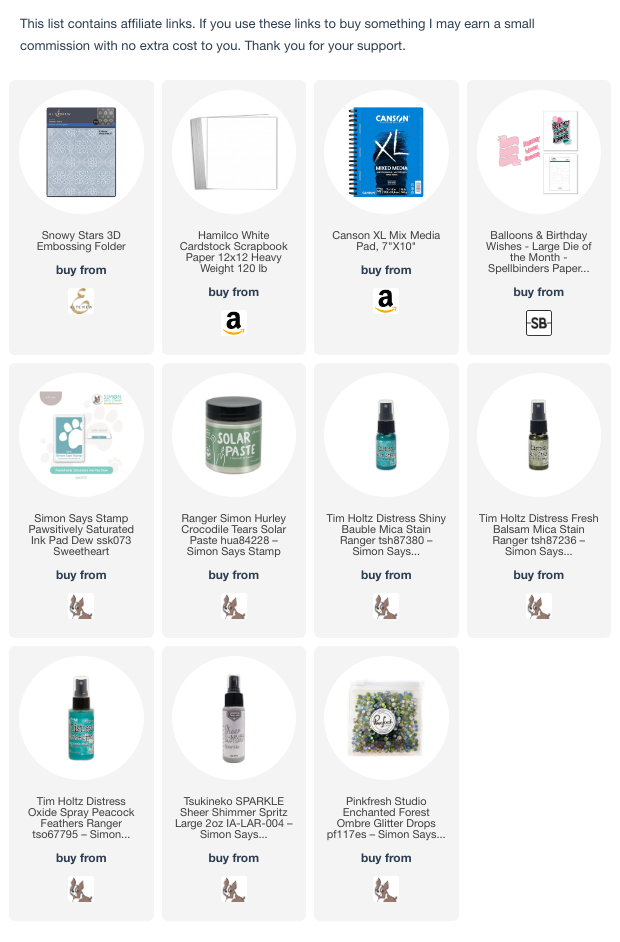
Here are the supplies I used for this card:
 https://linkdeli.com/widget.js?id=f5e8378456858c916708
Technique #5
Embossed Centrepiece
If you love layering textures and creating intricate frames, this technique is perfect! Today, we’ll create a framed card with a beautiful embossed oval and glitter accents. This project is all about using your materials wisely to create a rich, dimensional look without wasting any supplies.
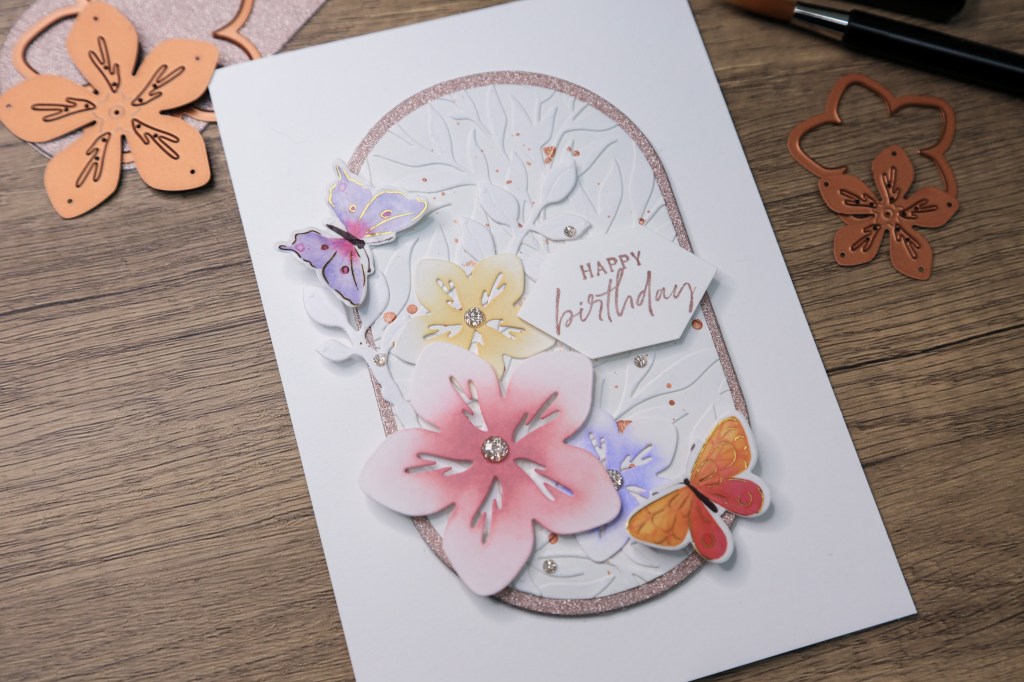
Supplies Needed:
- 5×7 Card Base – Use a sturdy base for a professional finish.
- 5×7 Card Stock Panel
- Nesting Oval Die Set – Used to cut several oval frames and the centre piece.
- Glitter Card stock – For the oval frame; Amazon has some great options. I used the Rose Gold from this pack.
- Embossing Folder – Look for a foliage or floral design.
- Metallic Watercolour – I used a rose gold shade for spattering.
- Water Brush or Paintbrush – To create the metallic spatters.
- Spray Bottle with Water – For lightly misting the cardstock before embossing.
- Mounting Tape/Foam Tape – To add dimension to the embossed panel.
- Die Cuts for Embellishments – Use pre-cut designs or create your own with Distress Oxide ink colours. I used flowers from the Essential Envelopes & Flowering Quince die sets
- Embossing Machine and Plates – I used Spellbinders Platinum 6
- Bearly Art Liquid Glue – For assembling the layers.
Step-by-Step Instructions
Step 1: Prepare the Card Base and Panel
- Start with a 5×7 card base.
- Using one of the largest oval dies, cut an oval from the 5×7 card panel and set it aside for embossing.
Step 2: Create the Glitter Mat
- Using a smaller oval die, cut another oval from glitter card stock.
- If you’d like to conserve as much of the glitter card stock as possible, use a smaller oval to cut out another piece from the centre which you can use in another project.
- You’ll be using just the glitter oval frame as a mat.
Step 3: Spatter Metallic Watercolour
- Dilute some Rose Gold water colour. I like to add a few squirts of water into the watercolour pan but you could do it in a palette as well.
- Use a paintbrush to spatter the rose gold watercolour onto the card stock oval.
- Let the paint dry naturally, or use a heat tool to speed up the process.
Step 4: Emboss the White Oval
- Lightly mist the card stock oval with a spray bottle (just a few spritzes) to prevent the paper from cracking during embossing.
- Place the oval in the embossing folder, ensuring it aligns with the design.
- Run it through your die-cutting and embossing machine with the necessary adapter plates.
- Remove the embossed panel from the folder—this creates a lovely, raised texture on the card stock.
Step 5: Assemble the Framed Oval
- Using liquid glue, adhere the embossed card stock oval to the glitter oval frame. The liquid glue allows a bit of flexibility for perfect positioning.
- Place magnets or heavy objects on the frame to help secure the adhesion as it dries.
- Apply foam tape generously on the back of the assembled oval frame for added dimension and stability.
- Carefully peel off the backing paper and position the panel on the centre of the 5×7 card base.
Step 7: Decorate with Die Cuts
- Select coordinating die cuts from your stash, or create your own.
- Arrange and adhere the die cuts around the oval for extra embellishment, creating a balanced and decorative frame around the central panel.
Step 8: Create the Sentiment
- Apply antistatic powder to the label and stamp your choice of sentiment using Scrapbook.com’s Rose Gold ink.
- Use clear embossing powder to coat the stamped sentiment and heat set it for a glossy finish.
- Use an appropriate size from the Essential Hexi-Gems etched dies to create a sentiment label.
- Apply foam tape behind the label and adhere to the card front.
- Embellish the card front with Pinkfresh Studio’s Gold Glitter Drops .
Your framed, embossed oval card is now complete! The mix of textures—from the glitter matting to the metallic splatters and embossed details—creates a stunning, layered effect. This design is versatile, and you can easily customize it with different colour schemes and embellishments.
Here are the supplies I used for this card:
https://linkdeli.com/widget.js?id=f5e8378456858c916708
Technique #6:
Emboss with Stencils
This creative technique will show you how to make a beautiful asymmetrical gatefold card using heavyweight vellum, a stencil, and a heat-embossed sentiment. This process walks you through adding colour and subtle texture to vellum while keeping it neat and professional. Let’s dive in!

Supplies Needed:
- 5 ½ x 8 ½ inches heavyweight vellum – I used Simon Says Stamp vellum for durability and a smooth finish.
- Stencil – I chose a design from A Colorful Life Designs, which offers a wide range of stencil patterns.
- Ink blending tools and inks – For adding colour through the stencil.
- Orange Peel card stock from Simon Says Stamp for the inside panel.
- Embossing Ink
- Antique Gold Embossing Powder
- Anti-Static Powder to prevent stray embossing powder.
- Electric Eraser (optional) for detailed cleanup.
- Embossing Machine and Plates – I used Spellbinders Platinum 6
Step-by-Step Instructions
Step 1: Prepare and Stencil the Vellum
- Start by scoring the long edge of the heavyweight vellum at 2 ½ inches and 6 ¾ inches and crease the folds well to create a gate fold card – one flap should be wider than the other one.
- Use your choice of inks on the stencil to create a pattern.
- Carefully lift the stencil to reveal the design, being cautious not to smudge the ink.
Step 2: Heat Emboss the Sentiment
- Rub the antistatic powder generously on the piece of Orange Peel card stock.
- Stamp your chosen sentiment using embossing ink.
- Sprinkle embossing powder over the inked area, tapping off any excess, then set it with a heat tool.
- After embossing, gently use a Swiffer cloth to remove any remaining antistatic powder residue.
- For tight spots where residue remains, lightly use a fine eraser. For extra control, an electric with a fine tip works best —just be careful not to touch the embossed areas to maintain their shine.
Step 3: Position and Secure the Vellum for Embossing
- Once the ink has dried, place your stencil on one side of the vellum, aligning it with the stencilled pattern.
- Secure the stencil and vellum on the machine’s surface with washi tape to avoid shifting.
- If embossing only a portion of the design, strategically place an adapter plate to partially cover the vellum focusing pressure on just the stencilled area without covering the entire surface.
- Add shims if needed to ensure a consistent embossed texture.
Step 4: Emboss the Vellum
- Run the vellum through the machine to create a subtle, textured look.
- If needed, adjust the shims and repeat the process on the opposite side for an even finish. Just be cautious when re-embossing to avoid flattening any previously embossed areas.
- Tie up the card with a piece of twine to complete the design.
After embossing, you’ll see a beautiful, delicate texture on your vellum that complements the stencilled image. This technique gives the card a delicate texture and an unexpected point of interest.
Here are the supplies I used for this card:
https://linkdeli.com/widget.js?id=f5e8378456858c916708
Happy crafting!


Leave a comment