Want to create clean and simple cards that look stunning but with minimal effort? You’re in the right place because in this tutorial, I’ll show you a mind-blowing five-minute card that’s unbelievably easy to put together. Plus, in the second card, I’ll reveal a clever way to stretch your BetterPress plates. And don’t worry if you don’t have press plates, because I have an easy alternative trick you can use instead.
Supplies Needed
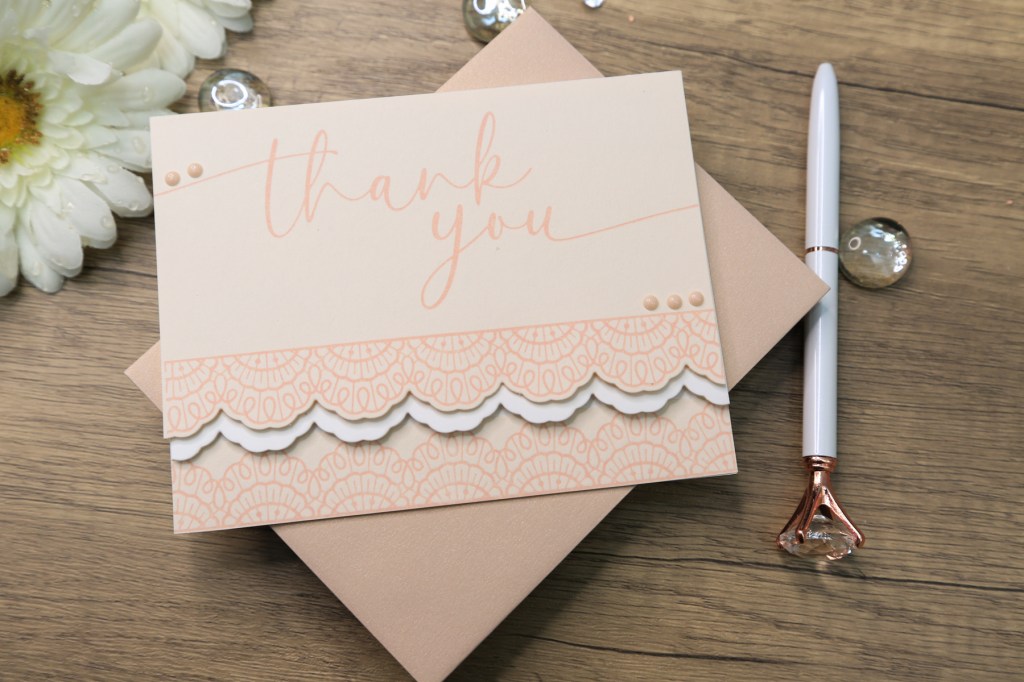
- White Card Base – Neenah Solar White Crest 110 lb – 8 ½ in. x 4 ½ in. scored at 4 ¼ in. on the long side
- Heavyweight Vellum
- Spellbinders Pink Sand Cardstock (Happy Day Pack)
- Hammermill White Cardstock – 4 ¼ in. x 5 ½ in.
- Spellbinders Pressed Lace Borders Press Plates
- Sweeping Script Sentiments Press Plate
- Spellbinders Vivid Blooms Die Set
- Sentiment Stamp
- Tattered Rose Distress Oxide Ink
- Peacock Feathers Distress Oxide In
- Clear Embossing Powder
- Foam Tape
- Liquid Glue
- Enamel Dots
Step-by-Step Instructions
- Cut the Border on the Card Base
Place the cutting die on the card base and tape it down firmly using washi tape. Secure it both to the cardstock and the cutting plate to prevent shifting. Run it through the Spellbinders Platinum 6 Machine. If the die isn’t centered perfectly, trim and adjust as needed. - Score and Fold the Card Base
Score the card panel at 4.25 inches, ensuring the back remains A2 size while the front becomes slightly shorter for an asymmetrical fold. Fold the card base and burnish the fold using the silicone grip of your scissors. - Resize the Card Panel
Position the front panel slightly above the lace border on the card base. Mark where trimming is needed with a pencil and cut accordingly. - Align and Ink the Press Plates
Arrange the BetterPress plates on the magnetic mat. Use washi tape to keep the layout intact. Once aligned, remove the tape and ink the plates with Victorian Velvet Distress Oxide Ink. - Press the Design
Load the press plates into the BetterPress system and position the card panel carefully. Apply light pressure to ensure the design transfers cleanly. Wipe off excess ink and run the panel through the die-cutting machine. - Die-Cut the Border Again
Align the die with the pressed design and tape it down securely. Cut the border for a clean, professional look. - Add Dimension with Foam Tape
To fix any alignment issues, use foam tape to add dimension, making minor imperfections less visible. Stick the panel onto the card base carefully. - Enhance the Card with an Extra Border
Take the trimmed strip from the card front and press it using the BetterPress system. Attach it to the inside of card base for added visual interest. - Reinforce the Card Base
Adhere an A2-sized panel inside the card for stability. Use liquid glue to secure it in place. - Final Touches
Finish the card by adding enamel dots for a subtle embellishment.
Here’s the list of supplies I used for this card:
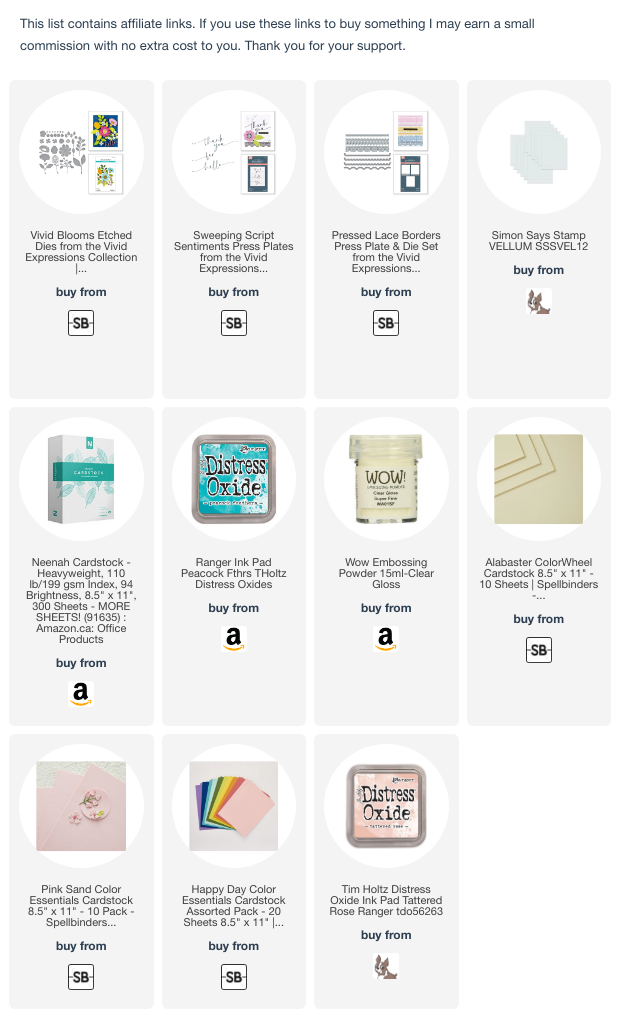
https://linkdeli.com/widget.js?id=f5e8378456858c916708
Bonus Card: BetterPress Stamping on Vellum

- Ink and Stamp on Vellum
Instead of using the BetterPress system, apply ink directly to the press plate and stamp onto vellum. Use Peacock Feathers Distress Oxide Ink for a soft, elegant look. - Heat Embossing
Apply clear embossing powder to the stamped design and heat set it with a heat gun. - Die-Cut the Lace Border
Use the coordinating cutting dies to create a lace-like effect. Trim any excess for a clean finish. - Adhere Vellum to Card Base
To avoid visible adhesive marks, dab liquid glue with a sponge and attach the vellum strip to a narrow piece of white cardstock before securing it to the card. - Add Floral Elements
Use the Vivid Blooms Die Set to cut flowers and foliage. Arrange them around the lace border for an elegant touch. - Stamp and Emboss the Sentiment
Stamp a sentiment from the Spellbinders Sentiment Stamp Set using Peacock Feathers Distress Oxide Ink. Heat emboss for a polished finish.
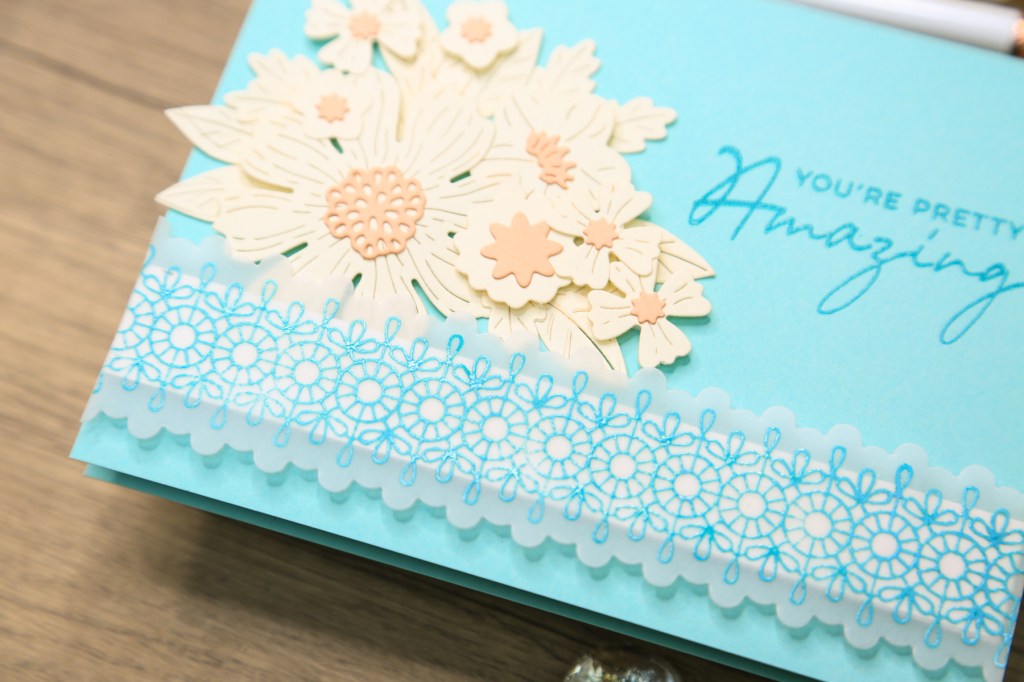
This method creates a stunning effect with minimal effort. If you don’t have a BetterPress system, try stamping a repetitive pattern with small stamps and heat embossing on a vellum belly band.
These cards are quick, simple, and elegant. With a few adjustments, you can achieve similar results even without specialized tools.
If you’re interested in more ways to use vellum, check out my video linked below for additional tips!
Here’s a list of my favourite crafting tools & supplies:


Leave a comment