Looking for fresh ways to use vellum in your cardmaking? Whether you love soft overlays or intricate textures, these vellum techniques will take your handmade cards to the next level. You can watch the detailed YouTube tutorial here. I’ve included a list of supplies for each technique, but a complete visual list of supplies is also included right below the video thumbnail for your convenience.
https://linkdeli.com/widget.js?id=f5e8378456858c916708
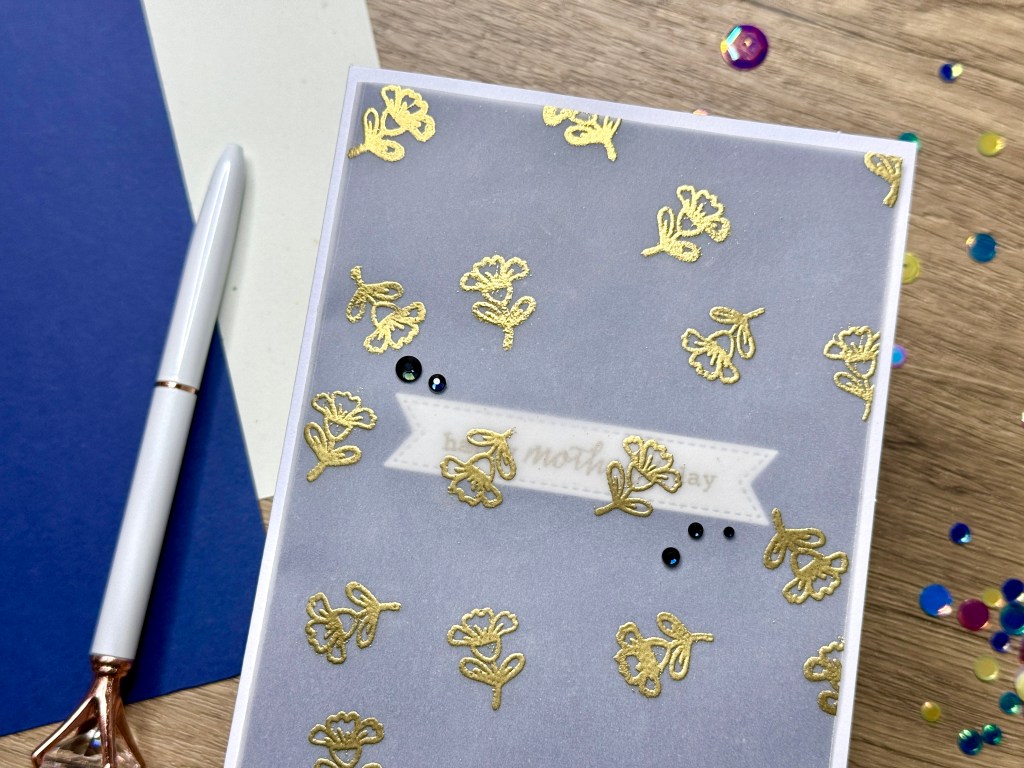
1. Ink Blending + Stencil Embossing
🎨 Add Colour and Texture with One Stencil
Combine ink blending and embossing with the same stencil to get a soft yet dimensional background on vellum.

Supplies:
- Heavyweight vellum – cut to A2 size
- A2 card base
- A2 white card stock frame
- Pierced Rectangles die
- Pinkfresh Cherry Blossom ink
- Pinkfresh Wisteria ink
- Gold sequins
- Gold pearls
- Gold embossing powder
- Sentiment stamp
- Embossing ink
- Antistatic powder
- Thin foam strips
- Sticky mat
- Magnetic mat
- DIY stencil
- Washi tape
- Damp shammy
- Die-cutting machine
- Rubber mat for embossing
- Adapter plate
- Paper shim
- Swiffer (optional)
How I finished the card:
- I cut out a pierced rectangle die and adhered it over the stencilled and embossed vellum panel with a thin foam strip.
- I placed gold sequins on the card base and adhered the frame with the vellum panel to it.
- I added a “Happy Mother’s Day” sentiment and a few tiny gold pearls to the card front to complete the card.
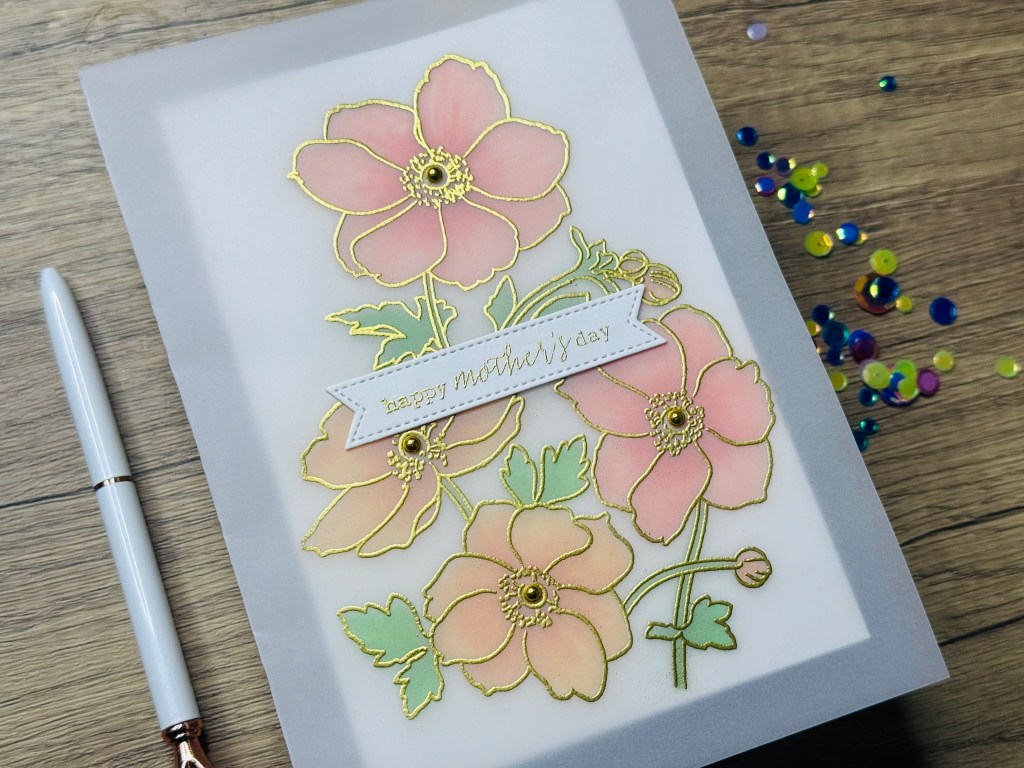
2. Vellum Overlay with Shadow Image
🌸 Layered Look with Heat Embossed Vellum and Colour
Create a stunning shadow effect by layering heat-embossed vellum over a coloured floral image.
Supplies:
- Heavyweight vellum – 7 in. x 10 in.
- A7 card base
- Altenew Japanese Anemone stamp (currently out of stock)
- Ranger Super Fine Gold Embossing Powder
- Karin Brushmarkers
- Heat tool
- 4×6 folded notecard
- Floral and leaf die-cuts
- Press’n Seal (optional)Sentiment stamp
- Embossing ink
- Antistatic powder
- Gold pearls
How I finished the card:
- I used my MISTI to position and stamp the Japanese Anemone image on the vellum card base and heat-embossed using gold embossing powder.
- I repeated the above step with the 4×6 notecard.
- I coloured the notecard image with Karin brush markers.
- Next, I aligned and glued the notecard inside the vellum card base.
- I finished off with gold pearls for the flower centres and a “Happy Mother’s Day” sentiment on top.
3. Vellum Lace Border with Layered Mats
💎 Use Vellum Like Ribbon for Delicate Detail
Add a vellum strip between layered cardstock panels for a lace-like detail that elevates any card layout.
Supplies:
- Heavyweight vellum – 2 in. x 4 in.
- Lightweight vellum scraps
- A2 card base
- Spellbinders A2 Matting Dies
- Spellbinders Journal Card dies
- Lawn Fawn Vanilla Malt cardstock – 4 ¼ in. x 5 ½ in.
- Spellbinders Cosmic Sky cardstock – 3 ¾ in. x 5 in.
- Liquid glue + foam tape
- Sentiment stamp
- Embossing ink
- Antistatic powder
- Clear gems
How I finished the card:
- I die-cut two mats and layered them on a pre-made card base.
- I cut out a lace border using the vellum strip and adhered it to a 1/4 in. strip of the Vanilla Malt card stock.
- I layered the lace border over the Cosmic Sky card front.
- Next, I added a die cut sentiment to the card front, slightly overlapping the lace border.
- I finished off with some florals, foliage and crystal gems.
4. Vellum + Patterned Background with Paste
🌈 Add Dimension with Patterned Paper and Glitter Paste
Layer paste-textured vellum over patterned paper for a bold yet dreamy finish.
Supplies:
- Heavyweight vellum
- Astro Paste – Clear Skies
- A2 card base
- Stencil
- Alcohol ink patterned paper
- Sentiment die-cut
- Foam squares or dots
- Clear gems
How I finished the card:
- I taped the vellum with low tack tape to my craft mat.
- I applied Astro Paste through the stencil on the vellum and let it air dry flat.
- I trimmed the patterned paper to A2 size and layered it on the card base.
- I added a sentiment die cut on top with the shadow cut from white cardstock.
- I added a second shadow die cut behind the vellum panel to lift if off the patterned paper card base and finished it off by adding crystal gems to the tiny flowers motifs.
5. Heat-Embossed Card Panel
Another beautiful way to use vellum—heat emboss it, wrap it around your card front, and tuck a sentiment inside for a little surprise.
Supplies:
- Heavyweight Vellum – 4 ¾ in. x 5 ½ in.
- Floral stamp (Simon Says Stamp Beautiful Blooms)
- A2 card base
- Spellbinders Cosmic Sky cardstock – 4 in. x 5 ¼ in.
- Craft mat
- Ranger Super Fine Gold embossing powder
- Fairy Dust embossing powder
- Small brush
- Magnets
- Heat tool
- Mono eraser
- Scoring tool
- Liquid glue
- Sentiment
- Denim blue jewels
How I finished the card:
- I used a tiny floral stamp from the stamp set and stamped the image several times on the vellum card front.
- I heat-embossed the vellum with Fairy Dust Embossing powder.
- I scored the vellum panel at ½ in. and folded it over onto the Cosmic Sky card panel.
- I adhered the sentiment behind the vellum and mounted the card panel over the pre-made card base.
- I finished it off with a few Denim gems.
6. Ink Blended and Embossed Card Panel
This is one of my favourite techniques for creating elegant and soft cards. Unfortunately, I had a bit of a mishap with this after I realized I’d embossed it incorrectly. You can check this video for details:
🧠 Final Tips for Vellum Success
- Always use heavyweight vellum for pastes and embossing.
- Tape panels while drying to prevent warping or curling.
- Hide glue under embellishments or solid designs.
- Use Press’n Seal to transfer floral arrangements easily.
Want to shop the supplies used? Check out the full list below:


Leave a comment