Got a card kit full of pattern paper and not sure what to do with it? In this video, I’m showing you how to turn those supplies into stunning but easy fun fold cards and you don’t need any fancy tools! These folds look impressive but are super easy to make, and I’ll walk you through each one step-by-step.
You can watch the detailed YouTube tutorial here. I’ve included a list of supplies for individual cards, but a complete visual list of supplies is also included in the next section for your convenience.
https://linkdeli.com/widget.js?id=f5e8378456858c916708
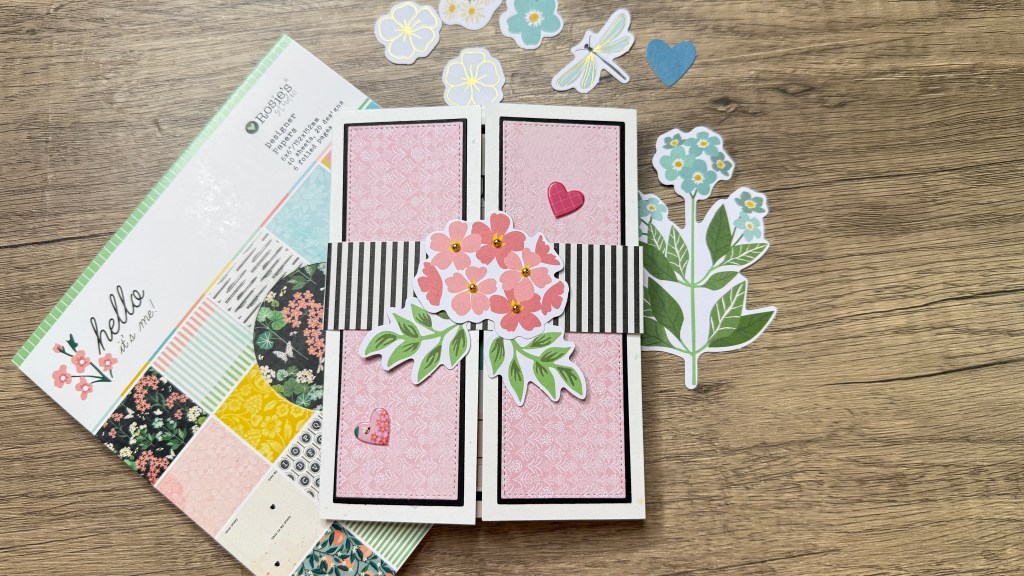
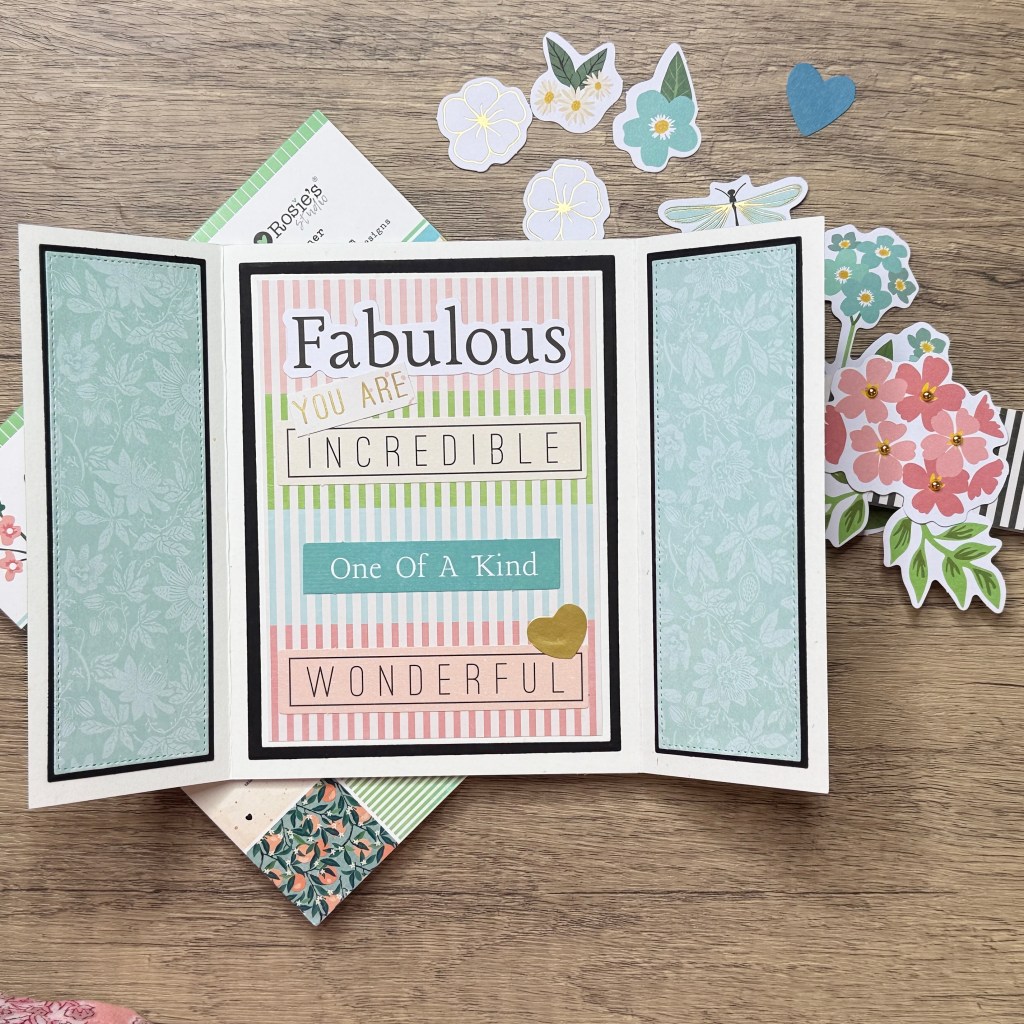
Card #1: Simple Gatefold
If you’ve never made a gatefold card before, you’re in for a treat! This design adds a fun interactive element and gives you lots of room to play with layers, textures, and embellishments. In this tutorial, I’ll walk you through how I made a gatefold card with a coordinating belly band using just a few basic supplies — plus a couple of handy tricks to keep everything looking crisp and clean.
Let’s get started!
✂️ Supplies You’ll Need:
- Rosie’s Studio Hello It’s Me paper pad – 2 patterns
- 2 panels measuring 1 ⅝ in. x 5 in. of pattern 1
- 2 panels measuring 1 ⅝ in. x 5 in. of pattern 2
- 2 sheets of the striped pattern with the black striped bands trimmed and reserved for the belly band
- One sheet of the striped pattern paper measuring 3 ½ in. x 5 ½ in.
- Cream card stock:
- Card base measuring 5 ½ in. x 8 ½ in.
- Matting layer measuring 3 11/16 in. x 5 ⅞ in. – I cut this using the second largest of the Spellbinders A2 Matting Basics dies
- Black card stock for matting layers:
- Central panel – 3 ⅞ in. x 5 ⅛ in.
- Strips measuring 1 ¾ in. x 5 ⅛ in. – 4
- Pre-made A2 note card
- Spellbinders A2 Matting Basics A dies
- Adhesive:
- Bearly Art Liquid Glue
- Altenew Glue Tape
- Paper trimmer
- Scoring board (or scoring tool)
- Die cutting machine – I used Spellbinders Platinum 6
- Embellishments
- Magnetic Glass Mat for easy assembly (check out my favourite list of tools at the end of the blog post)
🪄 Step-by-Step Instructions:
Step #1: Cut the Card Base
- Start with an 8 ½ x 11” sheet of cardstock.
- Cut it in half lengthwise at 5 ½ ” to create your base.
- Score the 8 ½ x 5 ½ ” panel at each end at 2 ⅛ ” to form the gatefold flaps.
- Fold both flaps inward so they meet in the middle.
Tip: Burnish the folds with a bone folder for a crisp finish.
Step #2: Prepare the Decorative Panels
- Use the narrower black card stock matting panels and adhere the patterned paper strips to them using a tape runner (great for thinner paper).
- Adhere the larger central panel to the inside of the gatefold card base.
Step #3: Attach the Front Panels
- Adhere the finished panels of one design to the front flaps of your gatefold card.
- Do the same for the insides of the front flaps with the second set of matted panels.
- For a cleaner look, make sure everything lines up evenly at the top and bottom edges.
Step #4: Create the Main Focal Panel
- Adhere the striped patterned paper panel to the cream mat.
- Adhere the mounted panel to the central black panel on the card base.
- Adhere the chosen sentiment strips and adhere them to the inside panel. Check the image above for inspiration.
Step #5: Add a Note Card on the Back
Since the inside of the gatefold doesn’t have space to write, add a note card to the back:
- You can cut a white or light-coloured panel behind the card base or use a side-folding or top-folding A2 note card.
- Adhere it to the back of the card for your handwritten message.
Tip: Add a generous amount of glue to the base, so you can align it more precisely.
Step #6: Make the Belly Band
- Use the two long black striped bands trimmed from the patterned paper.
- Place one across the front of the card base and score the sides where you’ll need to fold the paper.
- Make sure the band is straight and fold the paper strip at the score lines ensuring a proper fit.
- Wrap it gently around the card, leaving enough wiggle room for it to slide.
- Trim and glue the ends together on the back side of the band to hide the seam.
- Slide the card in and out to ensure it fits properly or resize the band immediately before the glue has a chance to dry.
Step #7: Decorate the Belly Band
- Use the die cuts from the ephemera pack to create a floral motif.
- Glue your focal point on top of the band.
- Add stickers, pearls, or hearts — whatever suits your card theme.
Step #8: Reinforce the Edges (Optional Hack!)
If you notice the belly band lifting the corners of your card, try this: Add a tiny bit of liquid glue to a corner of a thin piece of card stock. Slide the card stock underneath the loose end and corners on the panels to secure.
Once everything is dry, slide the belly band back on. It opens up beautifully, has space for a message on the back, and looks extra polished with the layered front and neat belly band.
💡 Why I Love This Design
This card layout is great for any occasion — birthdays, weddings, or just because. You can dress it up or down depending on the paper and embellishments you choose. Plus, using card kits or scrap paper makes it super affordable and a great stash-busting project!
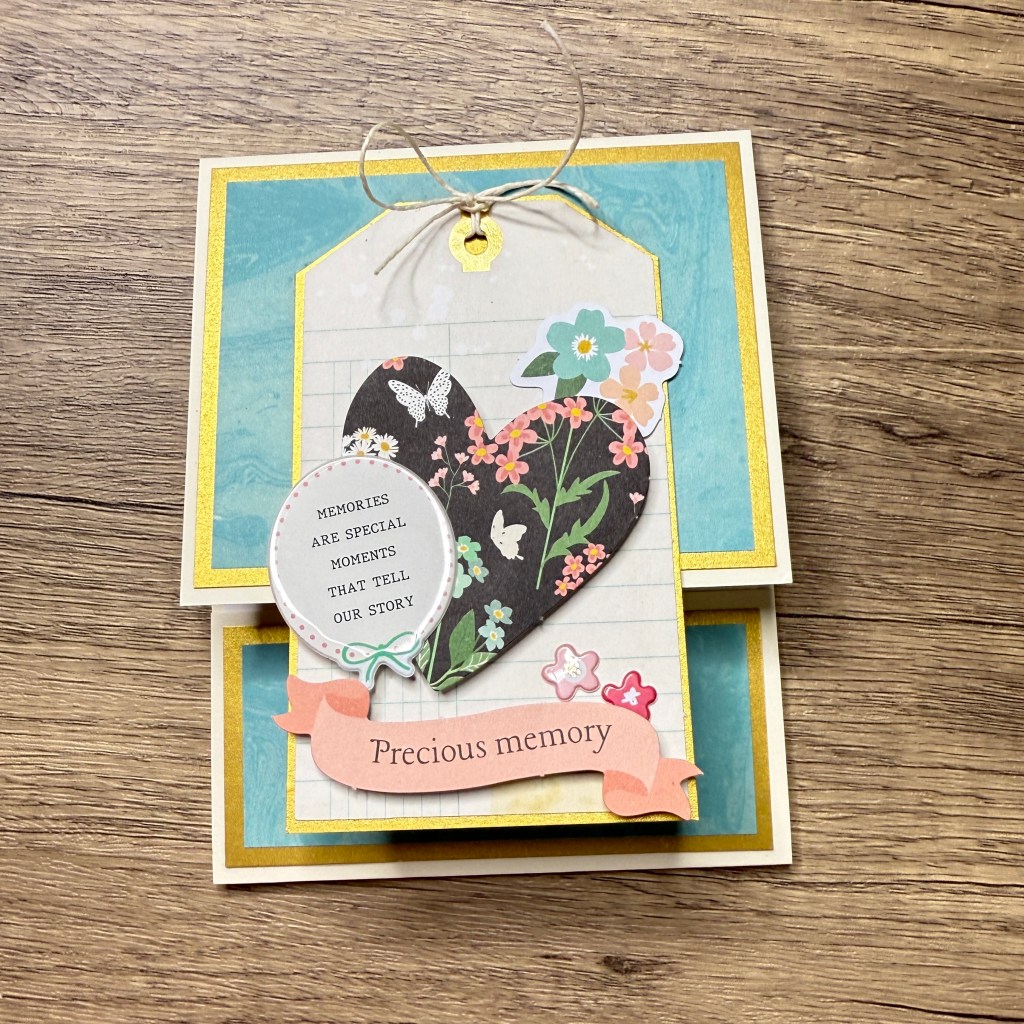
Card #2 Fun Fold Gift Card Holder
Create a beautiful anniversary card with an easy fun fold design, elegant gold matting, and a built-in pocket for a gift card.
✂️ Supplies Used
- Rosie’s Studio Hello It’s Me paper pad – Blue marbled pattern
- Panel measuring 3 in. x 3 ¾ in.
- Panel measuring 1 ½ in. x 3 ¾ in.
- Spellbinders BetterPress “Happy Anniversary” sentiment
- Coordinating BetterPress dies
- Brushed Gold card stock (matting)
- Panel measuring 3 ¼ in. by 4 in.
- Panel measuring 1 ¾ in. by 4 in.
- Spellbinders Alabaster card stock
- Panel measuring 4 ¼ inches by 11 in
- Embellishments
- Rosie’s Studio Hello It’s Me Die Cut Ephemera – Use the tag for the focal point
- Rosie’s Studio Hello It’s Me Puffy Stickers
- Rosie’s Studio Hello It’s Me! Cardstock Diecut Ephemera Sentiments – pick
- Spellbinders White Cord
- Adhesive:
- Bearly Art Liquid Glue
- Altenew Glue Tape
- Paper trimmer
- Scoring board (or scoring tool)
- Die cutting machine – I used Spellbinders Platinum 6
🪄 Step-by-Step Instructions:
Step #1: Card Base and Scoring
- Cut the card stock to 4 ¼” x 11”.
- Score at:
- 3 ½”
- 9” (If your scoreboard doesn’t go that far, flip the paper and score 2” from the opposite end.)
- Score both sides at each mark to make folding easier, especially with thick cardstock.
- Fold inward on both score lines. If needed, trim a slanted edge for a clean fold.
Step #2: Cutting the Mats and Panels
Gold Mat Layers:
- Front panel: 3 ¼” x 4”
- Side flap: 1 ¾” x 4”
Patterned Paper Layers:
- Front panel: 3” x 3 ¾”
- Side flap: 1 ½” x 3 ¾”
Step #3: Assembly Steps
- Glue the blue patterned paper onto gold matting layers using a tape runner.
- Attach the matted layers to the folded card base.
- Burnish the folds well so the card lays flat. You can use a small piece of washi tape rolled up and placed inside the card to temporarily hold the flaps down while working.
Step #4: Adding the Focal Point
- Tie a bow on the tag with some twine or ribbon.
- Only apply glue to the top half of the tag die cut and adhere it vertically to the larger flap on the card front – this keeps the fold functional. Check the photo above for guidance.
- Use one of the floral heart die cuts and attaching it to the tag die-cut at an angle — I used foam dots to add dimension.
- Use the Memories Are Special Moments puffy sticker from the Puffy Stickers pack and add it to the heart die-cut. Use a foam dot behind the overhanging part for stability.
- Add any additional die cuts or stickers as you like.
Step #5: Optional Gift Card Holder
- Use two glue dots behind the free corners of the smaller panel to create a pocket.
- This creates space to tuck in a gift card or a personal note.
Step #6: Final Touches
- Adhere the “Happy Anniversary” sentiment on the inside of the card.
- Ensure you’ve glued down any loose corners.
- Add extra glue where needed to secure everything.
- Optional: add a small butterfly or sticker, but I chose to keep mine clean and elegant.
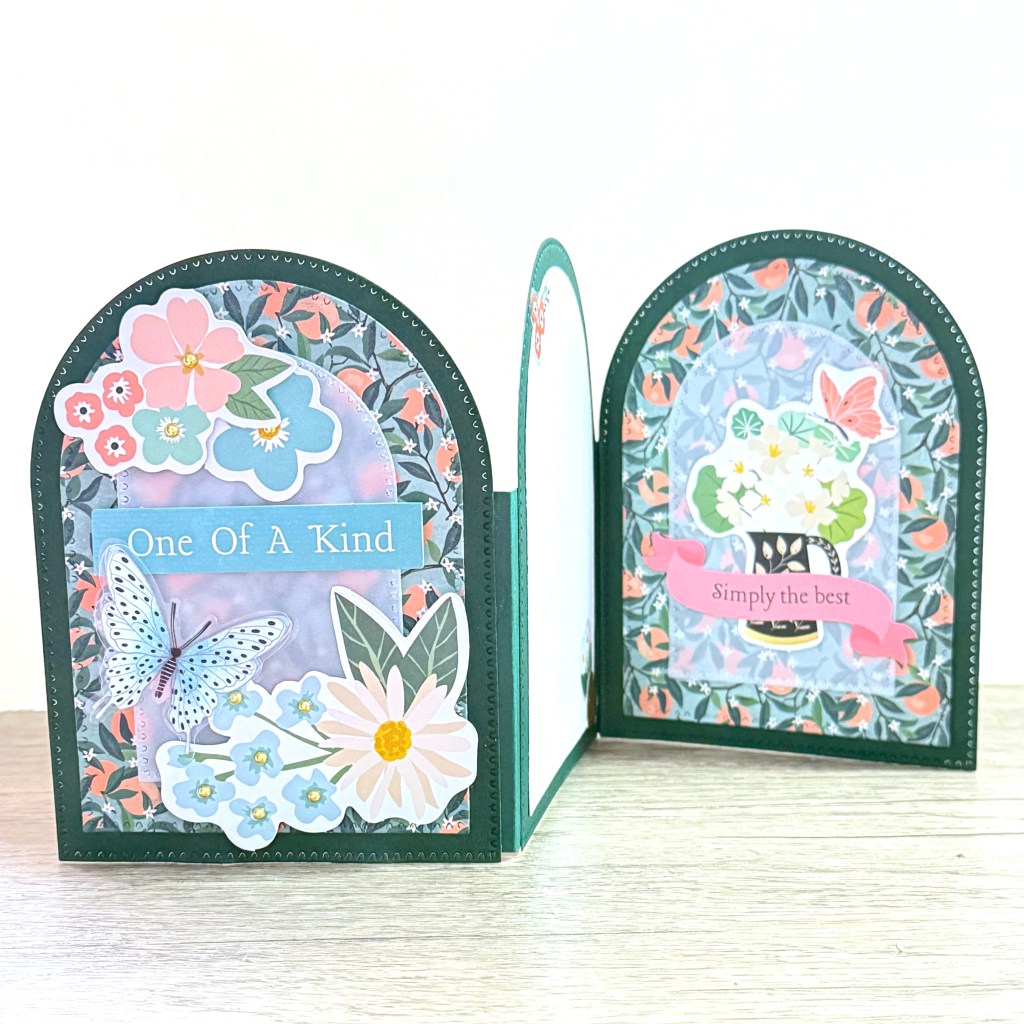
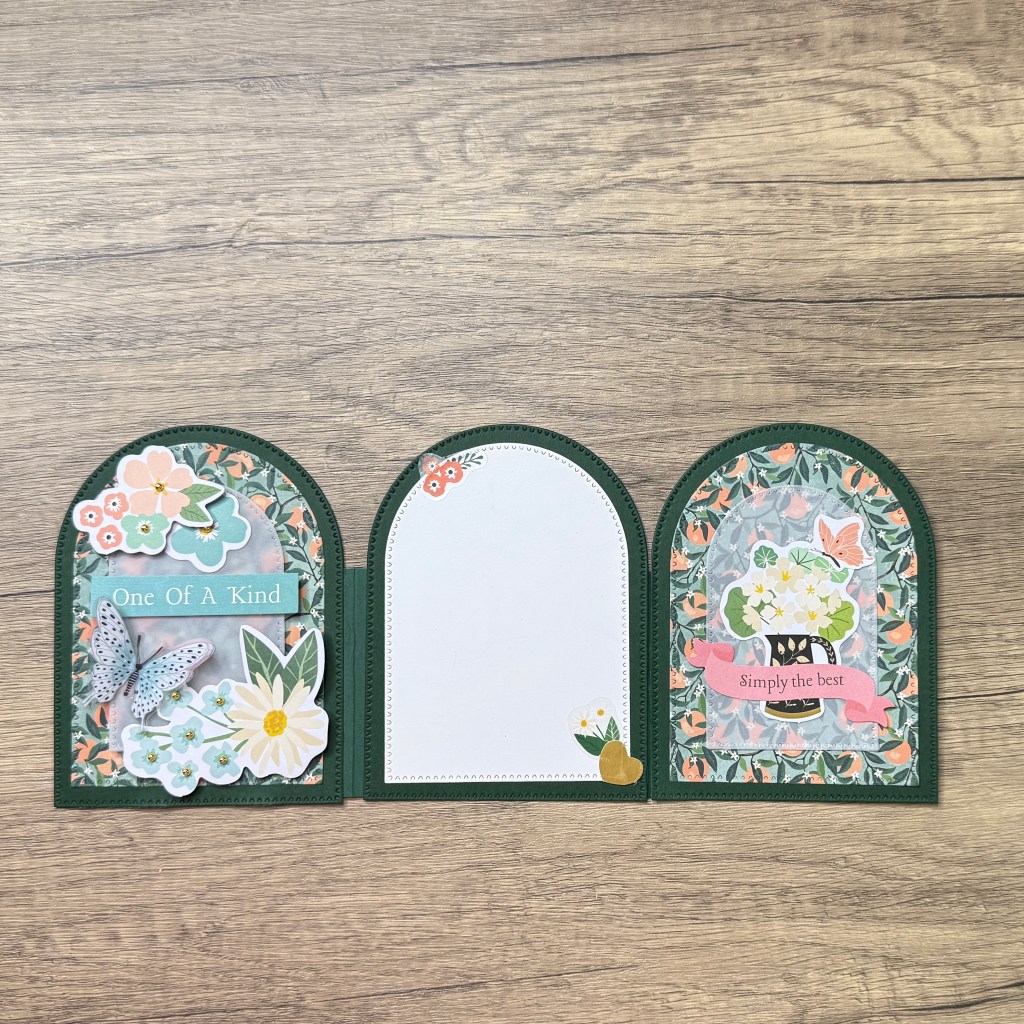
Card #3 – Fun Fold Arches with Vellum Panels
This elegant fun fold card features delicate vellum accents, layered arches, and a unique folding mechanism that makes it perfect for special occasions. It’s easy to make and looks absolutely stunning when displayed because it stands beautifully and features three unique panels. It folds flat to mail but opens up into a show-stopping design.
✂️ Supplies Used:
- Spellbinders Perfect Touch Arches Etched Dies
- Rosie’s Studio Hello It’s Me paper pad – 2 sheets of the same design
- Simon Says Stamp heavyweight vellum
- Spellbinders Blue Spruce card stock
- 3 arched panels
- Neenah Solar Crest card stock – 4 ¼ in. x 5 ½ in.
- Embellishments
- Adhesive:
- Bearly Art Liquid Glue
- Altenew Glue Tape
- Paper trimmer
- Scoring board (or scoring tool)
- Die cutting machine – I used Spellbinders Platinum 6
🪄 Step-by-Step Instructions:
Step 1: Die Cutting & Prep Work
- Use the Blue Spruce card stock to cut out three arches using the second largest die from the Spellbinders Perfect Touch Arches Etched Dies set.
- Use the patterned paper to cut out two patterned paper arches using the third largest die from the same set.
- Use the heavyweight vellum to cut two vellum arches using the third smallest die.
- Use the third largest die from the Spellbinders Perfect Touch Arches Etched Dies set to cut a third arch from the panel of Neenah Classic Crest card stock and reserve it for the middle arch.
- Cut a 3” x 11” strip of coordinating card stock for the folding mechanism.
- Score the 3” x 11” strip at 3½” from each end.
Step 2: Assemble the Panels
- Layer two patterned arches over two coloured arches and adhere them with the tape runner.
- For the the vellum arches that go on the front and back arches, do the following:
- Add the die cuts on the vellum layer.
- Add the sentiment you’re using with some dimensional foam tape (or create your own thin foam strips by gluing narrow strips of card stock together)
- Add glue or foam squares behind the design elements on the decorated vellum arches.
- Align and adhere the vellum layer over the patterned paper layer on both arches.
- Embellish further if you like.
- Layer two patterned arches over two coloured arches and adhere them with the tape runner.
- Layer the Neenah Classic Crest arch over the third coloured arch and adhere it with liquid glue.
- Embellish the white panel with a few stickers or other small die cuts.
Step 3: Glue the Panels to the Folded Strip
- Add tape runner (so the panels can be repositioned if required) to the centres of each of the panel sections of the 3”x11” strip and place the middle arch first.
- Repeat with the side panels, but leave a small gap from the score lines so the card folds easily.
Step 4: Final Touches
- Test the fold—if it doesn’t close smoothly, reposition the panel and adjust as needed.
- Make sure everything is secure, folds neatly, and stands up well for display.
- Embellish further with stickers, pearls or butterflies from the collection.
If you’re looking for a list of tools, here’s my list of favourites:

https://linkdeli.com/widget.js?id=f5e8378456858c916708
👉 If you enjoyed this tutorial, check out my other card-making hacks and techniques on YouTube — I’ve got two videos full of tips just like the edge-reinforcing trick I used here!
Happy Crafting!


Leave a comment