In this blog post, I’m showing you how to make a couple of adorable cockatoo card—complete with layered wings, tropical foliage, and a 3D background. I’ll share my favourite ink blending tricks, and assembly tips for tiny die-cut pieces. And in the second card, I’ll even show how to flip a die-cut to make a mirrored bird. Whether you’re a card making pro or just love cute designs and building 3D scenes, you won’t want to miss this one!
You can watch the detailed YouTube tutorial here. I’ve included a list of supplies for individual cards, but a complete visual list of supplies is also included at the end of the blog post for your convenience.
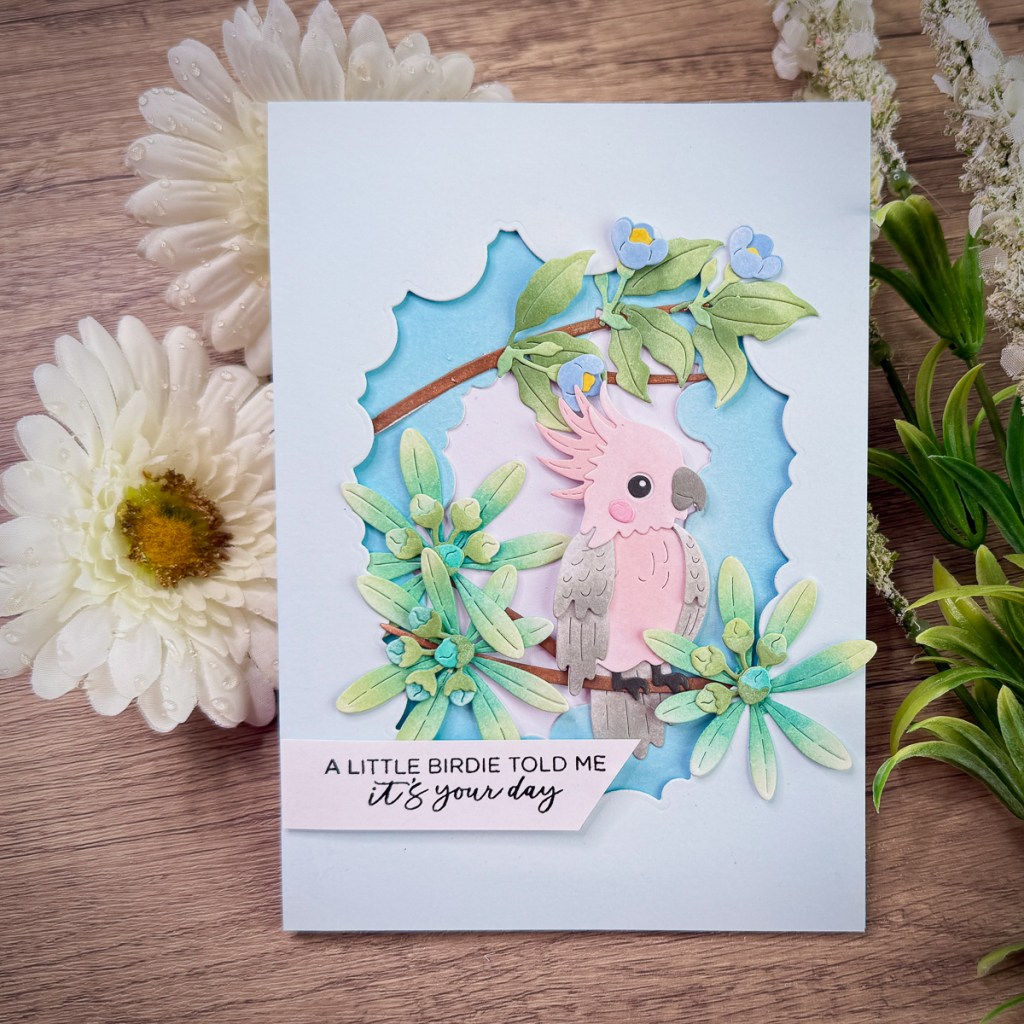
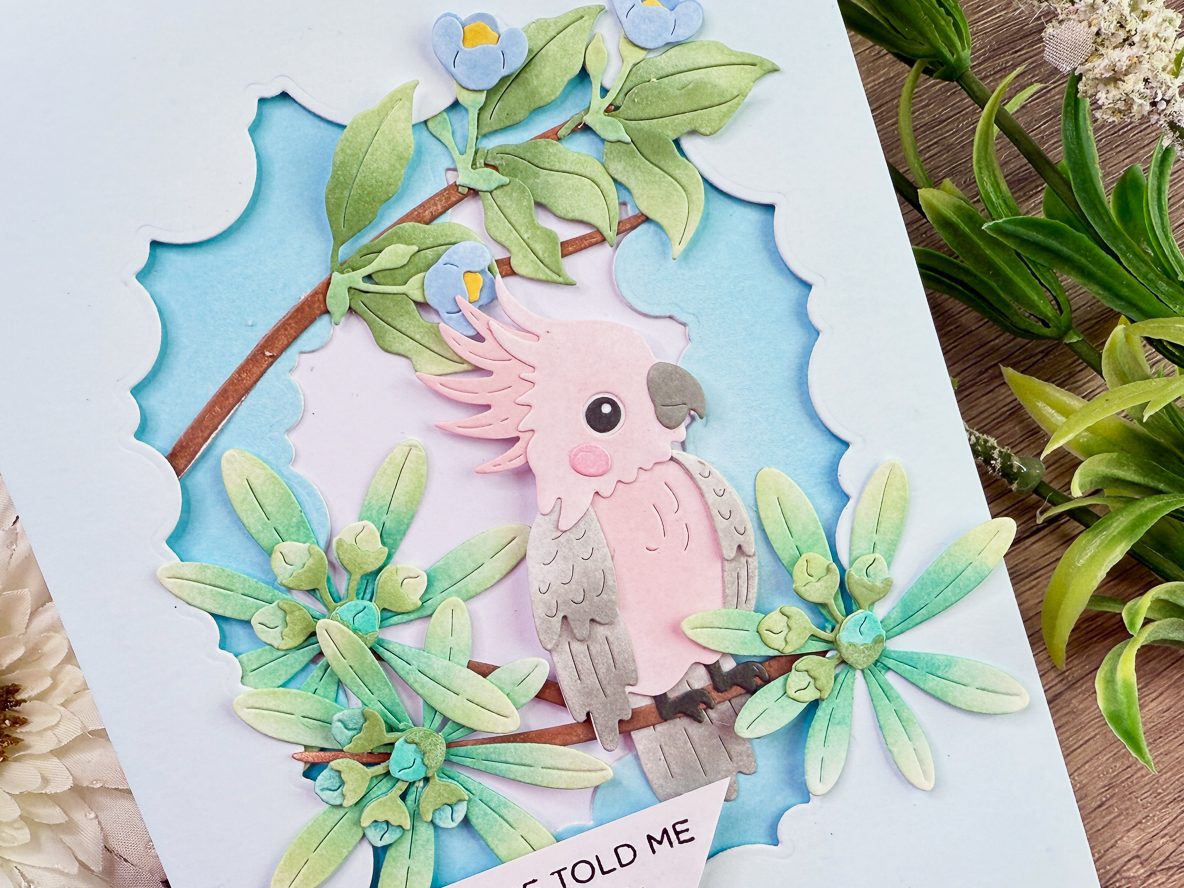
Card #1: Tropical Cockatoo Card
This card features a detailed cockatoo design with tropical foliage and a lovely sentiment, all brought to life with ink blending and layered die cuts.
Supplies Used:
- Dies Used from the Spellbinders Cheerful Chirps Collection
- Spellbinders Flying High Etched Dies
- Spellbinders Tunnel Clouds die set (for background)
- Spread Your Wings sentiment set
- Papers and Card Bases
- Hammermill White Lightweight Card stock (for die cutting)
- Strathmore Bristol Smooth paper – 5 in. x 7 in.
- 5” x 7” premade card base (Ohuhu)
- Inks
- Altnew:
- Paper Bag
- Grey Denim (maybe discontinued)
- Silver Lake (maybe discontinued)
- Warm Sunshine
- Frosty Pink (maybe discontinued)
- Frayed Leaf
- Teal Cave
- Pinkfresh Studio
- Distress Oxide:
- Versafine Clair:
- Altnew:
- Tools & Adhesives
- Spellbinders brushes
- MISTI (or a stamping tool of your choice)
- Bearly Art glue (liquid glue)
- Foam tape (for popping up background panel)
Step-by-Step Instructions:
Step 1: Die Cutting and Colouring
- Die Cut All Pieces:
- Begin by die cutting all the pieces from the Spellbinders Flying High Etched Dies out of white card stock. This includes the cockatoo, tropical foliage, flowers, and background panels. For the flowers, you’ll need three or more complete sets of petals. Be aware that you may need to die cut the petal piece multiple times to get enough for layering.
- Create the Background:
- For the background, ink blend a 5×7 panel of Bristol Paper with Tumbled Glass Distress Oxide using a light hand. Apply multiple layers of Tumbled Glass to the second 5×7 panel of Bristol Paper. Don’t worry about blending the centres completely, as these will be cut out using the large background dies, leaving only the outlines.
- Use the two largest dies from the Spellbinders Tunnel Clouds collection. Centre the largest die on the light coloured panel and die cut the panel. Next, do the same with the smaller die and the dark coloured panel. You now have two layers for the background.
- Colour the Cockatoo: Next, colour the die-cut pieces for the cockatoo using the following inks:
- Body – Ballet Slippers
- Crest – Cherry Blossom
- Wings – Ballet Slippers + Grey Denim
- Eyes – Black gel pen
- Feet – Grey Denim
- Colour Leaves: Die cut three sets each of the leaves, and stems, and calyx for the large foliage clusters. Colour them using Frayed Leaf and Teal Cave for each set.
- Colour Branches: Cut out two branches and use Altenew’s Paper Bag ink to colour them and add a few dabs of Grey Denim.
- Colour Flowers: Cut out several sets of the small flowers and colour the layers with Pinkfresh Studio’s Summer Shower and Sky Blue inks for a two-tone look. Use Warm Sunshine for the flower centres.
Part 2: Assembling the Cockatoo and Flowers
- Assemble Cockatoo Wings: Begin assembling the cockatoo. The die-cut pieces have etched guide lines to help you line them up. Leave the bottom part of the wings unstuck to add extra dimension and movement.
- Add Feet and Tail: Make sure to add the feet first, followed by the tail. You’ll also tuck a branch under the bird’s feet later.
- Add Cheek Blush: Add a tiny drop of glue and adhere the blush piece onto her cheek. Set the assembled cockatoo aside to dry.
- Assemble Flowers: Attach the layers of the tiny blue flowers, noting that etched lines on the flower centres help with alignment, with the broader end of the flower centre typically facing the bottom.
Part 3: Final Assembly of the Card
- Place Branches: Use non-stick paper (like release paper) under your branches to prevent them from sticking to your glass mat while you adhere the foliage to them. Vary the direction of the branches for visual interest.
- Add Flower Elements to Branches: Attach the small flower elements to the branches, allowing parts to hang loose for dimension.
- Prepare Card Base: Use a 5″ x 7″ card base. Glue the first background layer flat onto the card base51.
- Finalize Arrangement: Before adhering anything permanently, finalize the arrangement of your cockatoo, branches, and sentiment. Attach the cockatoo to a branch first to establish its position.
- Adhere Background Panel: Carefully set your arranged pieces aside. Apply foam tape to the back of the adhered background panel (not the assembled pieces) to avoid disturbing them. Ensure the foam strips aren’t visible through the die-cut centres. Add a bit of liquid glue on top of the foam tape to allow additional time for positioning. Carefully adhere the top background panel to the card base.
- Add Sentiment: Use the sentiment “A little birdie told me it’s your day” from the Spread Your Wings sentiment set. Stamp it using a MISTI for precision. For the inside, you can add “Hope your day soars with laughter and fun” from the same stamp set to stay on theme.
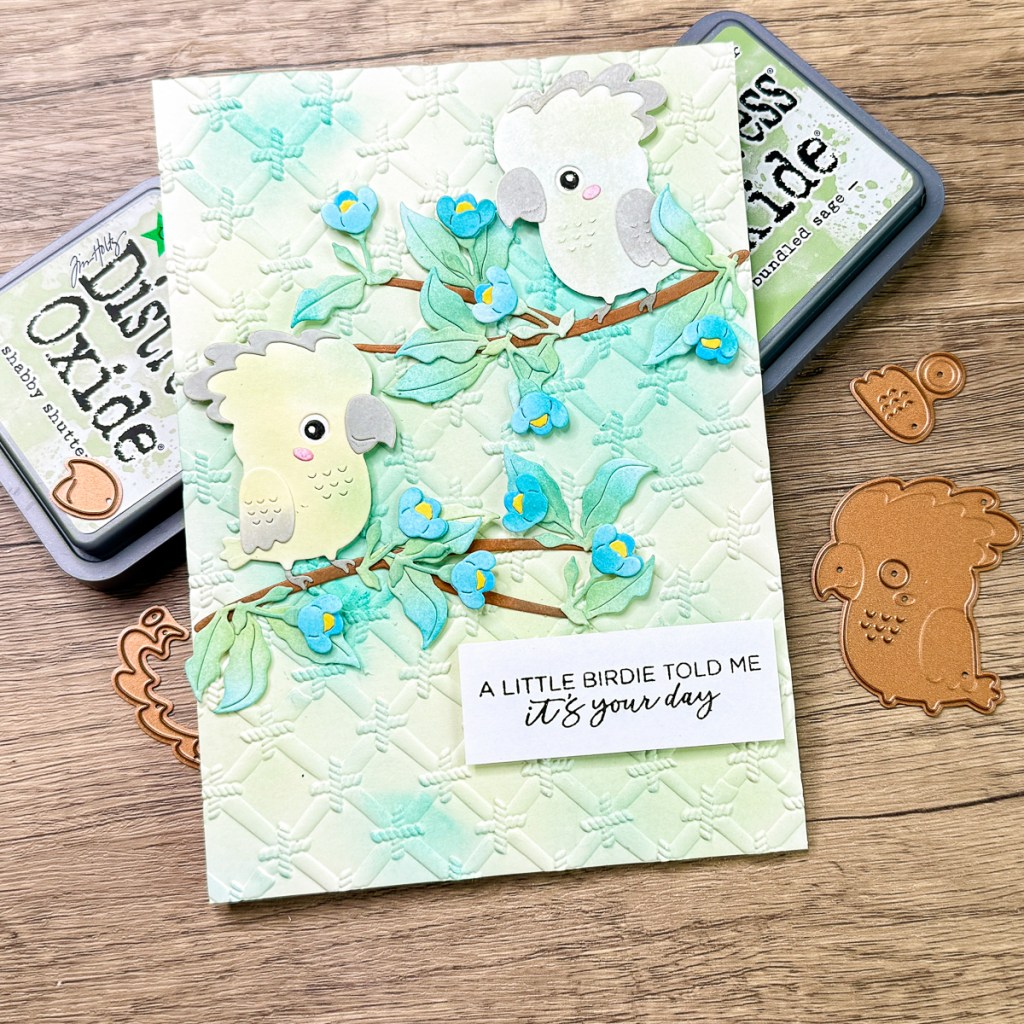
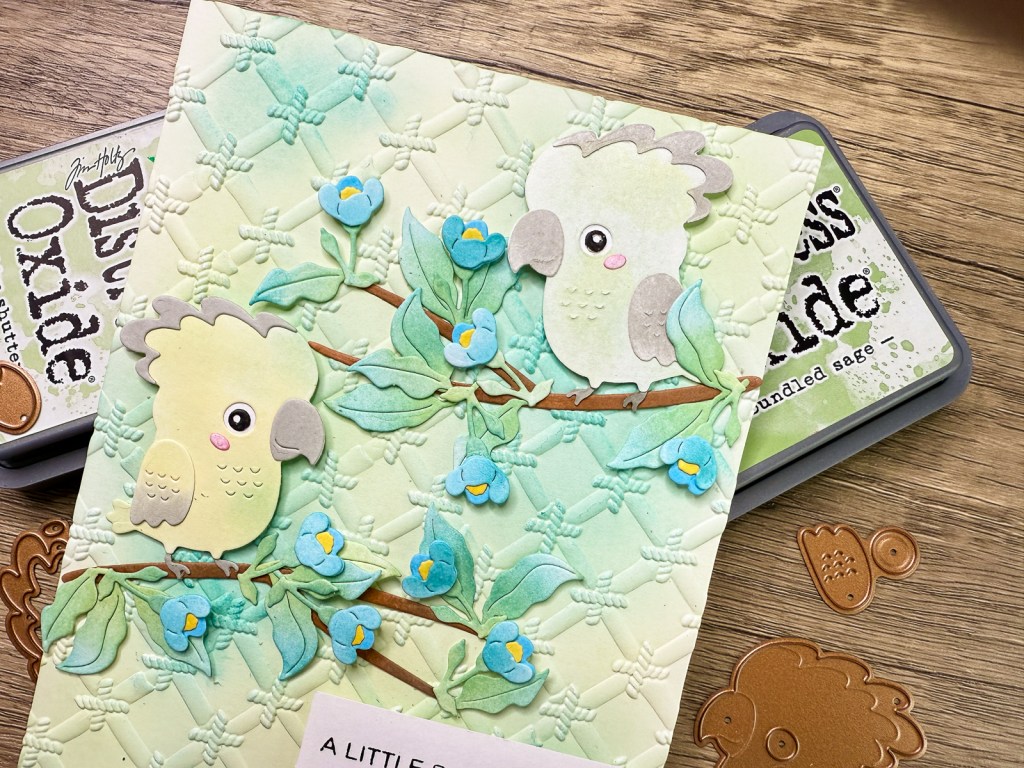
Card #2: Mirrored Die-Cut Cockatoos
This card focuses on creating realistic-looking facing cockatoos using die-cut techniques, by flipping a die to use the reverse side. It opens up opportunities for stretching your supplies and creating unique designs.
Supplies:
- Dies Used from theSpellbinders Cheerful Chirps Collection
- Papers and Card Bases
- Hammermill White Lightweight Card stock (for die cutting)
- Strathmore Bristol Smooth paper – 5 in. x 7 in. (x2)
- 5” x 7” premade card base (Ohuhu)
- Inks
- Altnew:
- Paper Bag
- Grey Denim (maybe discontinued)
- Silver Lake (maybe discontinued)
- Warm Sunshine
- Frosty Pink (maybe discontinued)
- Silver Sage
- Jade
- Buttercream
- Pinkfresh Studio
- Simon Says Stamp inks (for leaves): Cabbage and Dew
- Distress Oxide:
- Versafine Clair:
- Altnew:
- Tools & Adhesives
- Spellbinders brushes
- MISTI (or a stamping tool of your choice)
- Simon Says Stamp Place and Score Embellishment Wand
- Bearly Art glue (liquid glue)
- Foam tape (for popping up background panel)
- Bone Folder
- Black gel pen (for eyes)
- Grip mat
- Paper trimmer
Step-by-Step Instructions:
Step 1: Die Cutting, Edge Smoothing
- Die Cut All Pieces: Cut out all pieces of the Free Hugs Oscar Etched Dies twice (for facing birds) from white card stock. In addition, cut out the branches, small flower elements, including the leaves, and flower centres, from the Spellbinders Flying High Etched Dies set.
- Trim Sentiment: For the sentiment, you can use the same greeting (like “a little birdie told me it’s your day”) and, trim it down into a simple label.
- Soften Flipped Edges: When using a flipped die-cut (the reverse side), gently press down along the edges with a scoring tool on a firm surface to soften them and make them look more rounded. You’ll need to do this for all parts that go on the flipped bird (wing, feet, tail, etc.). Rubbing the back of the pieces with a stylus, or running the pieces though a die cutting machine without the dies can also help with the smoothing process. For delicate pieces like the feet, take extra care not to tear them while softening edges
- Add Feather Texture: Gently poke through the etchings that represent the feather to add an impression of dimension.
Step 2: Colouring
- Colour & Glue Eye: Colour in the tiny eye pieces with a regular black gel pen. You can also die cut it from black card stock. Centre the black eyeball piece over the small circular base and adhere it behind the eye socket to avoid losing the tiny pieces.
- Colour Main Body: Place the main body piece onto a sticky grip mat (for traction). Colour it in shades of green and grey using Altenew inks like Silver Sage and Jade.
- Colour Wings: Use Silver Lake ink for the wing.
- Assemble First Bird: Carefully align the parts, remembering that etched guides aren’t visible on the flipped side, therefore, following the contours of the base layer is the best way to assure correct placement. Attach the wing, beak and eyes with small dots of glue. Double-check eye placement ensuring the eyeball is centred.
- Add Contrast: Brush a tiny bit of Buttercream ink onto the first bird for contrast.
- Colour Second Bird: For the second bird, colour the beak, crest, and feet with Silver Lake and touches of Grey Denim for contrast. Add Buttercream ink to the base of the wing and Silver Lake to the wingtips. Apply Frosty Pink (or leftover brush colour) to the cheek piece for a pop of colour.
- Colour Branches: Use Altenew Paper Bag ink for the branches, then add a little Grey Denim for depth and contrast. Clean your grip mat and brushes as needed.
- Colour Flowers: Cut out several sets of the small flowers and colour the layers with Pinkfresh Studio’s Summer Shower and Sky Blue inks for a two-tone look. Use Warm Sunshine for the flower centres.
- Colour Leaves: Use Simon Says Stamp inks (Cabbage, Dew) for the leaves, adding colour variation.
Step 2: Creating the Background
- Prepare Background Panel: Use Strathmore Bristol Smooth Surface paper to create your 5 in. x 7 in. background panel.
- Ink Blend Background: Use Spellbinders brushes and Distress Oxides in Bundled Sage and Shabby Shutters to ink blend your background panel. Layer colours to deepen the effect.
- Emboss Background: Use the Spellbinders Bamboo Screen 3D Embossing Folder from the Cheerful Chirps Collection. Lightly mist the back of the ink blended Bristol card stock with water before embossing, for better detailed embossing.
- Add Final Touches to Background: Add touches of Dew ink to the background to make everything pop.
Step 3: Final Assembly
- Assemble on Card Base: Use a pre-made 5×7 card base, or create your own.
- Glue Small Pieces: To glue and assemble tiny pieces, use backing sheets from sticker paper or double-sided adhesives as disposable craft mats. This will prevent your die cuts from sticking to your work surface.
- Attach Flowers to Branches: Attach the flowers to the branches.
- Pop Up Background Panel: Use foam tape to pop up the background panel onto the card base to give it some dimension. Trim off any overhanging bits of the card panel before you start assembling the rest of the pieces.
- Arrange Birds and Foliage: Arrange the birds and foliage, adjusting their placement to make the birds pop, especially since the colours are in the same family. Add more blue to the background for contrast if needed.
- Add Sentiment: Decide on the placement for your sentiment and attach it to the card so you can position the other elements around it.
- Glue Down Elements: Glue down the birds with a small piece of foam tape behind their bodies, and add in the foliage to complete your card.
You’ve now created a beautiful and detailed card, even stretching your supplies by using the reverse side of a die-cut!
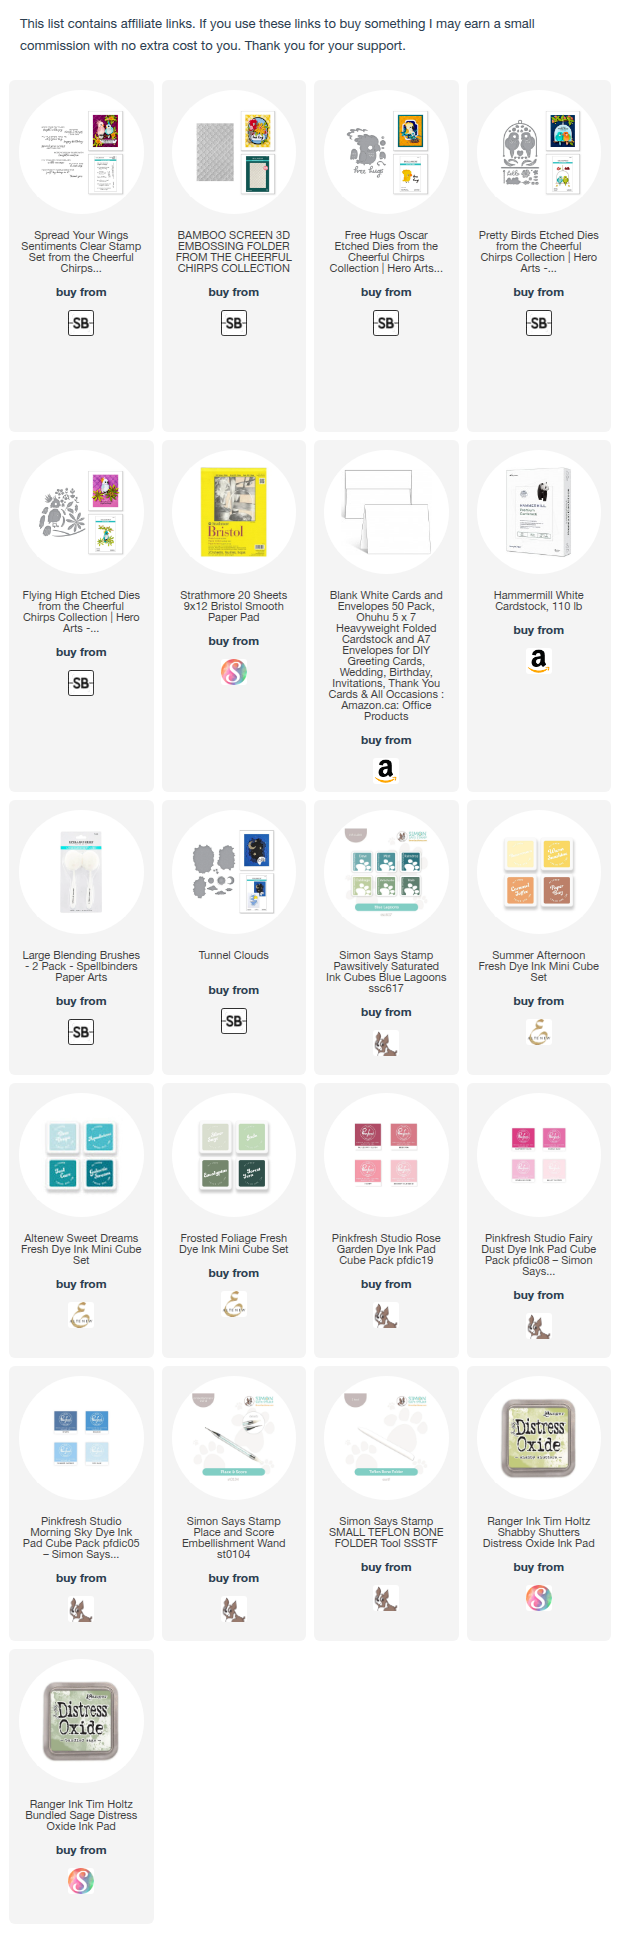
Here’s the detailed list of supplies I used for the card:


Leave a comment