If you love patterned paper as much as I do, and enjoy making the most of your paper scraps—you’re going to have so much fun with this set of patterned paper, or any other set from your stash! In this tutorial, you’ll learn how to make five handmade cards using patterned paper, acetate card bases, and clever layering techniques. You’ll also see how to embellish coordinating envelopes for that perfect finishing touch.
You can watch the detailed YouTube tutorial here. I’ve included a complete visual list of supplies at the end of the blog post for your convenience:
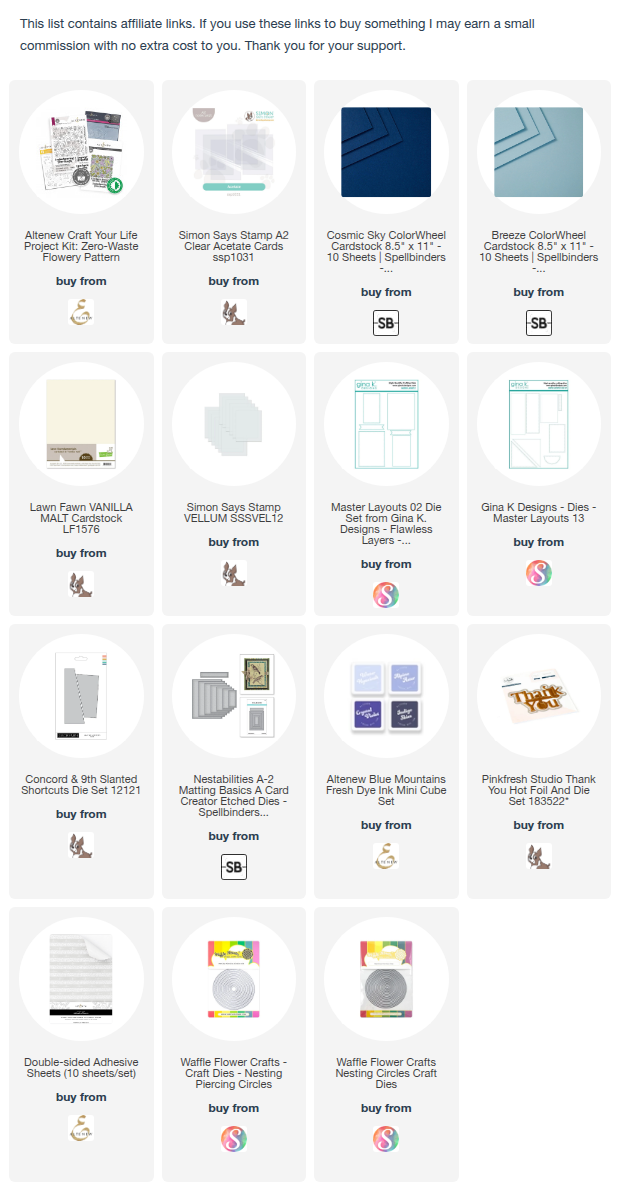
Supplies You’ll Need
Card Bases & Papers
- Patterned paper from the Denim Spring paper pad (Not 2 Shabby)
- Simon Says Stamp A2 Clear Acetate Cards (set of 6)
- Cosmic Sky Colorwheel Card Stock
- Lawn Fawn Vanilla Malt Card Stock
- White note cards (A2 size)
- Note card (3 ¾ in. x 5 in.)
- Ohuhu thick 12×12 cardstock (for creating square card bases)
Dies & Punches
- Happy Birthday die of your choice
- Circle punch (¾” size) or die of appropriate size
- Pinkfresh Studio Thank You Hot Foil and Die Set
- Master Layouts 13 by Gina K Designs
- Master Layouts 2 by Gina K Designs
- Concord & 9th Slanted Shortcuts die set
Inks & Embossing
- Altenew Indigo Skies ink
- Anti-static powder tool
- Ranger Clear Embossing powder
Embellishments
- Pinkfresh Studio – Ombre Glitter Drops – Enchanted Forest
- Pinkfresh Studio Gold Glitter Drops
- Simon Says Stamp Pawsitively Dazzling Gems Cool Tones
- Vellum heat-embossed and die-cut embellishments (created using Altenew’s Zero Waste Flowery Pattern stamp set and coordinating die)
- Sky Blue ribbon from Uniquely Creative
Adhesives
- Altenew double-sided adhesive sheets
- Foam tape
- Tape runner
- Bearly Art liquid glue
Step-by-Step Instructions
Card 1: Encouragement Card with Coordinating Envelope
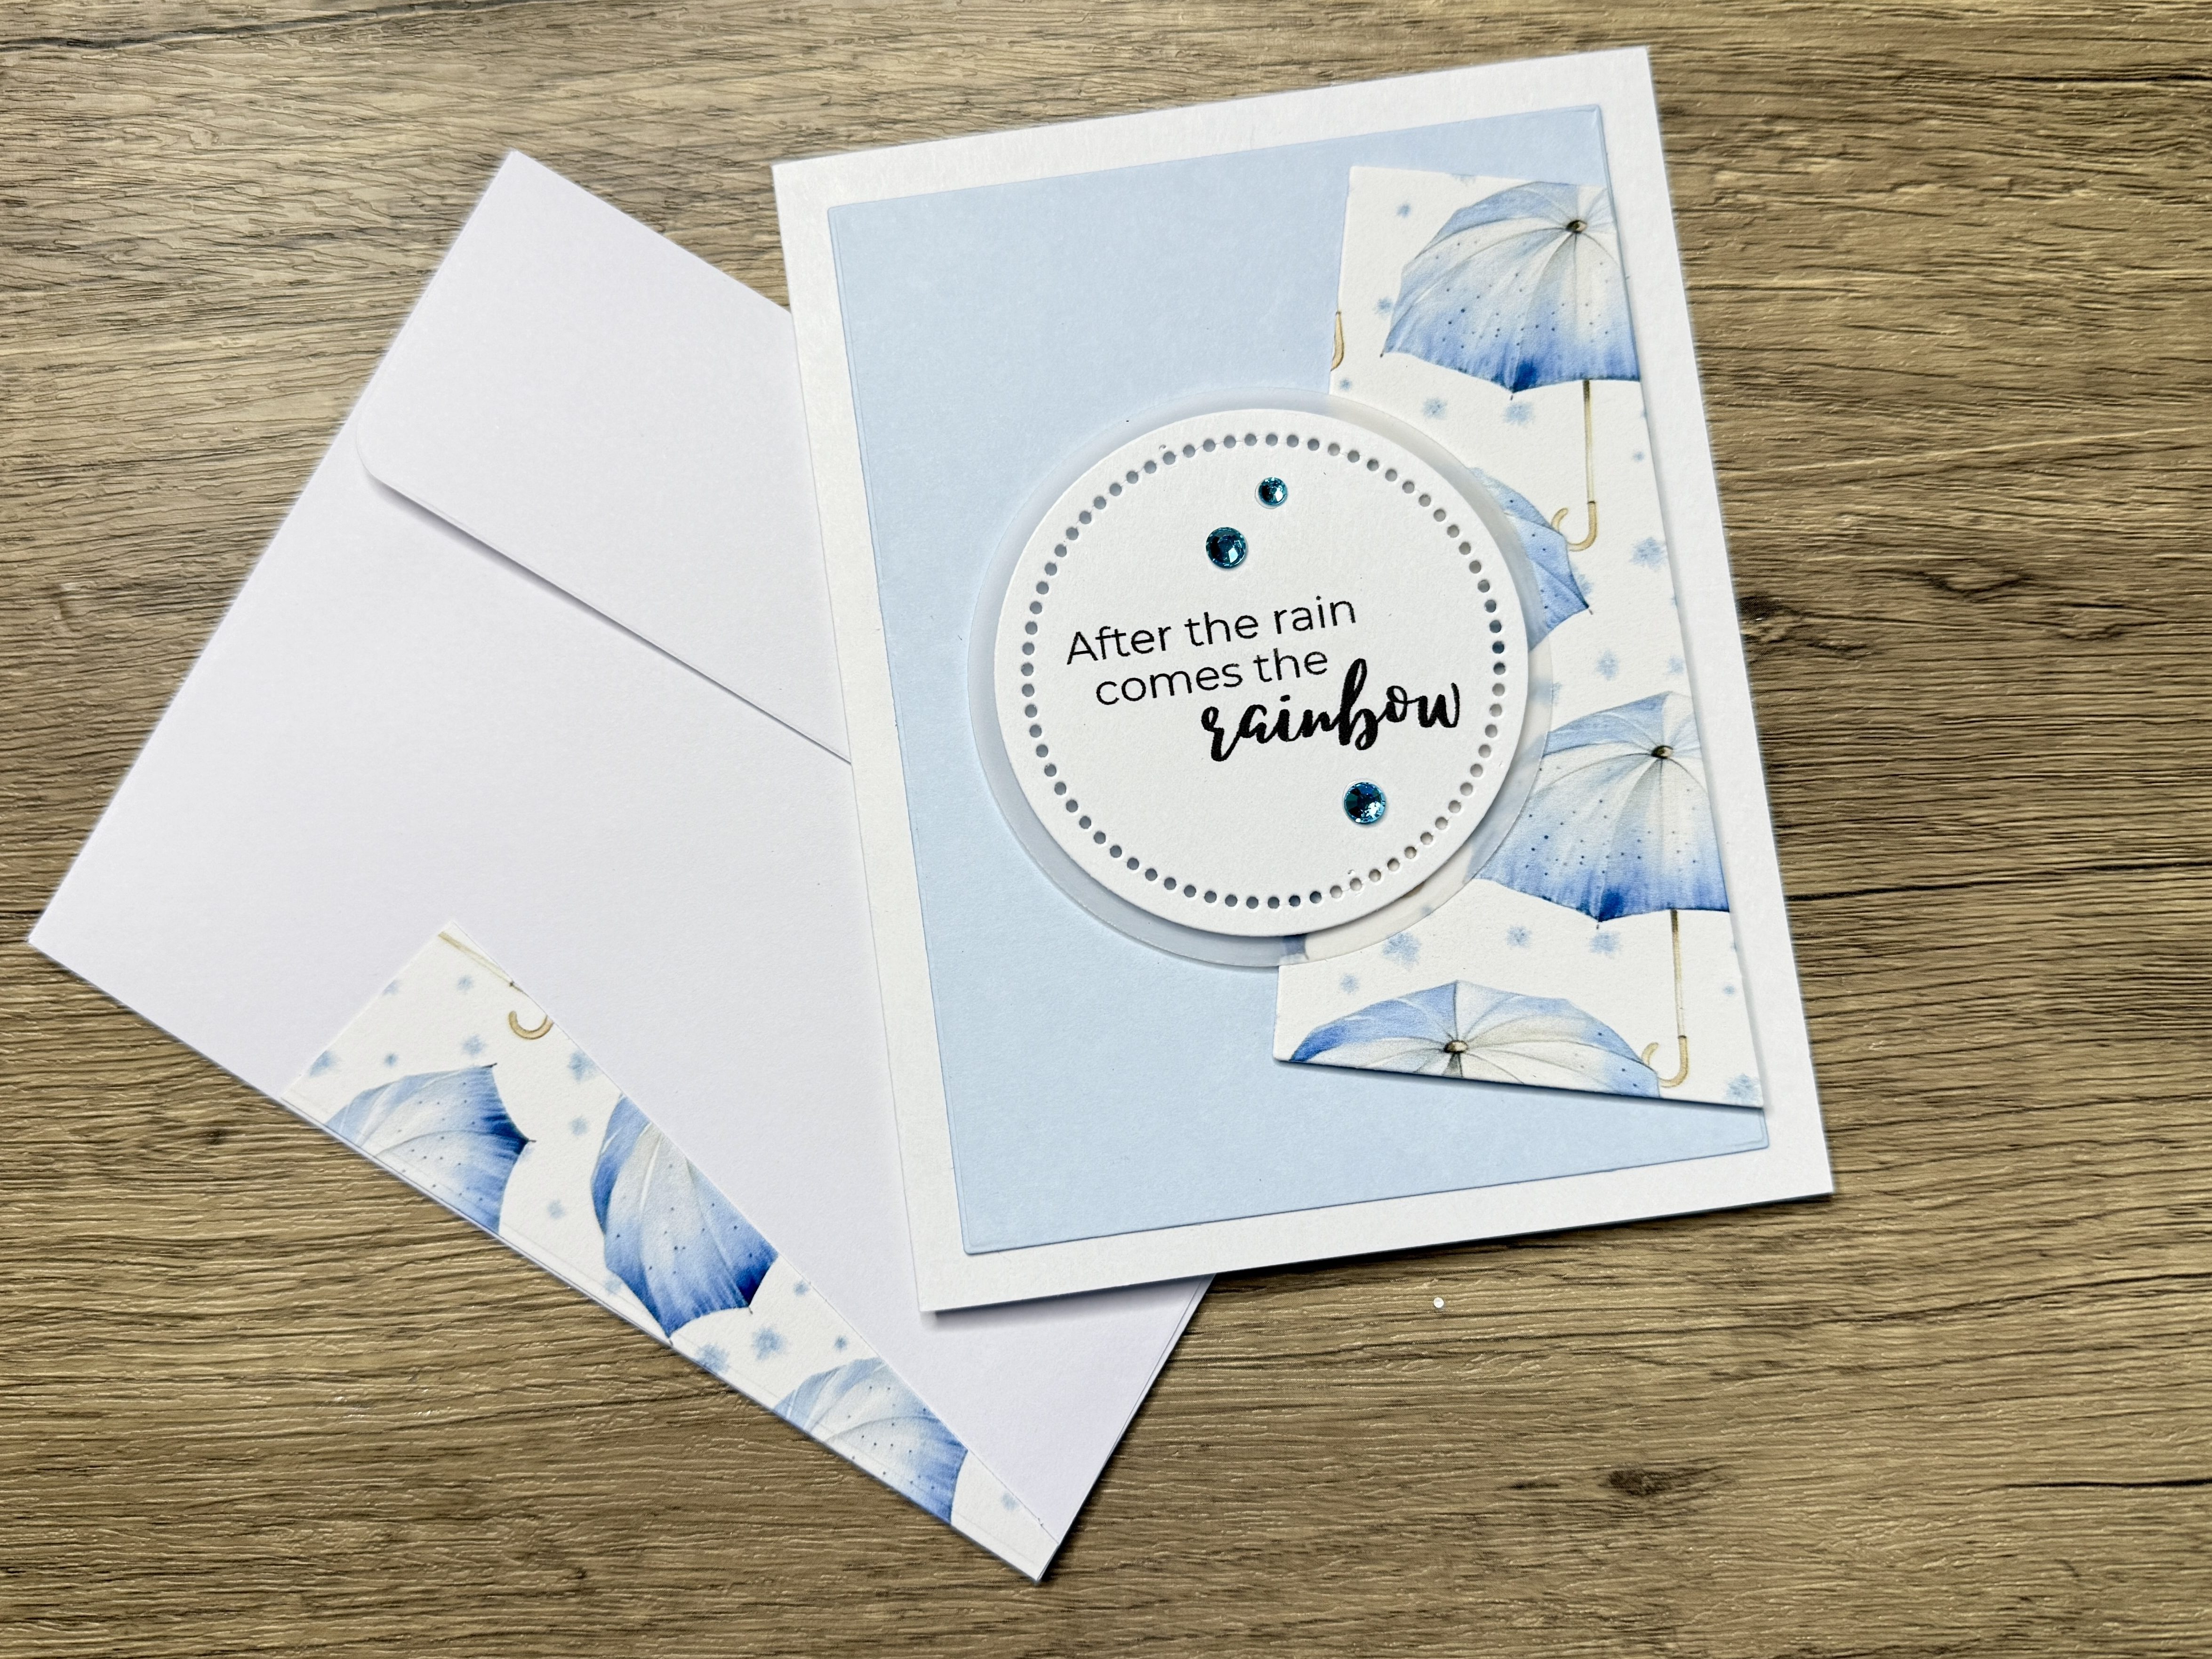
- Choose the Pattern: Select the umbrella pattern paper and cut it using the Concord & 9th Slanted Shortcuts die.
- Design Your Own Sentiments: If you don’t have an appropriate sentiment, you can create your own in Canva. You can also create a greeting for the inside of the card, continuing the theme of your sentiment on the front of the card.
- Cut Out Your Sentiments: Print the sentiment designs in black or coloured ink on lightweight card stock and cut them out using a shaped die or a paper trimmer. You can use a slightly larger die on a piece of vellum and layer it behind the sentiment label.
- Cut Your Layers: Use the smaller of the two layering dies from Master Layouts 2 by Gina K Designs for perfect matting layers.
- Assemble the Card: Use liquid glue to adhere the light blue panel to the card base. Use foam tape to pop up the patterned paper panel, aligning it with the right edge of the blue card panel at an angle.
- Embellish the Card Front: Add gems from the Simon Says Stamp Pawsitively Dazzling Gems Cool Tones for a finishing touch.
- Decorate the Envelopes: Use leftover slanted paper scraps to match the card design.
Card 2: Get Well Card with Custom Sentiment & Coordinating Envelope
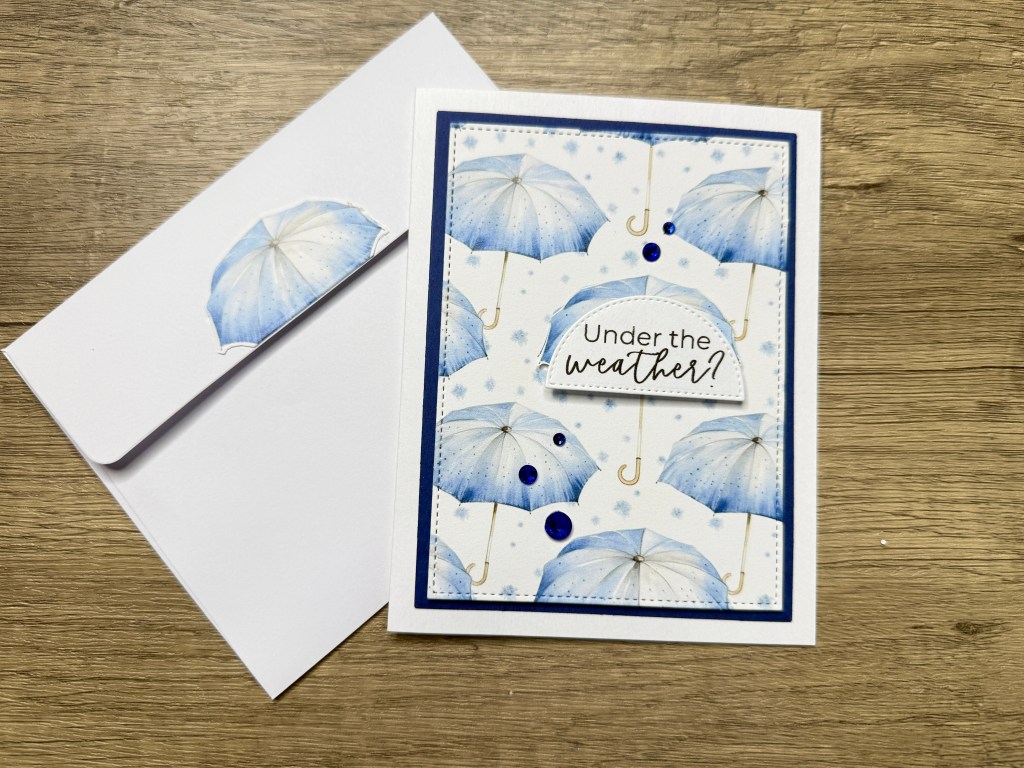
- Choose the Pattern: Select the umbrella pattern paper and cut it using the Concord & 9th Slanted Shortcuts die.
- Design Your Own Sentiments: If you don’t have an appropriate sentiment, you can create your own in Canva. You can also create a greeting for the inside of the card, continuing the theme of your sentiment on the front of the card.
- Cut Out Your Sentiments: Print the sentiment designs in black or coloured ink on lightweight card stock. Use the semicircle die from Master Layouts 13 by Gina K Designs or use a pair of scissors to cut out the sentiment.
- Cut Your Design Element: Fussy-cut the umbrella top from a scrap piece of the pattern paper to add dimension to the sentiment.
- Cut Your Layers: Use the two layering dies from Master Layouts 2 by Gina K Designs to cut perfect matting layers from the Cosmic Sky Colorwheel Card Stock and the patterned paper.
- Assemble the Card: Use liquid glue to adhere the dark blue panel to the card base. Use foam tape to pop up the patterned paper panel.
- Adhere the Sentiment: Use a tiny strip of foam tape to pop up the sentiment layer on the fussy cut umbrella piece. Add another piece of foam tape behind the layered sentiment, align it with the umbrella towards the centre of the panel and adhere it.
- Embellish the Card Front: Add gems from the Simon Says Stamp Pawsitively Dazzling Gems Cool Tones for a finishing touch.
- Decorate the Envelopes: Fussy-cut another umbrella from the leftover paper and add it to the back of the envelope.
Card 3 – Square Card with Vellum Embellishments
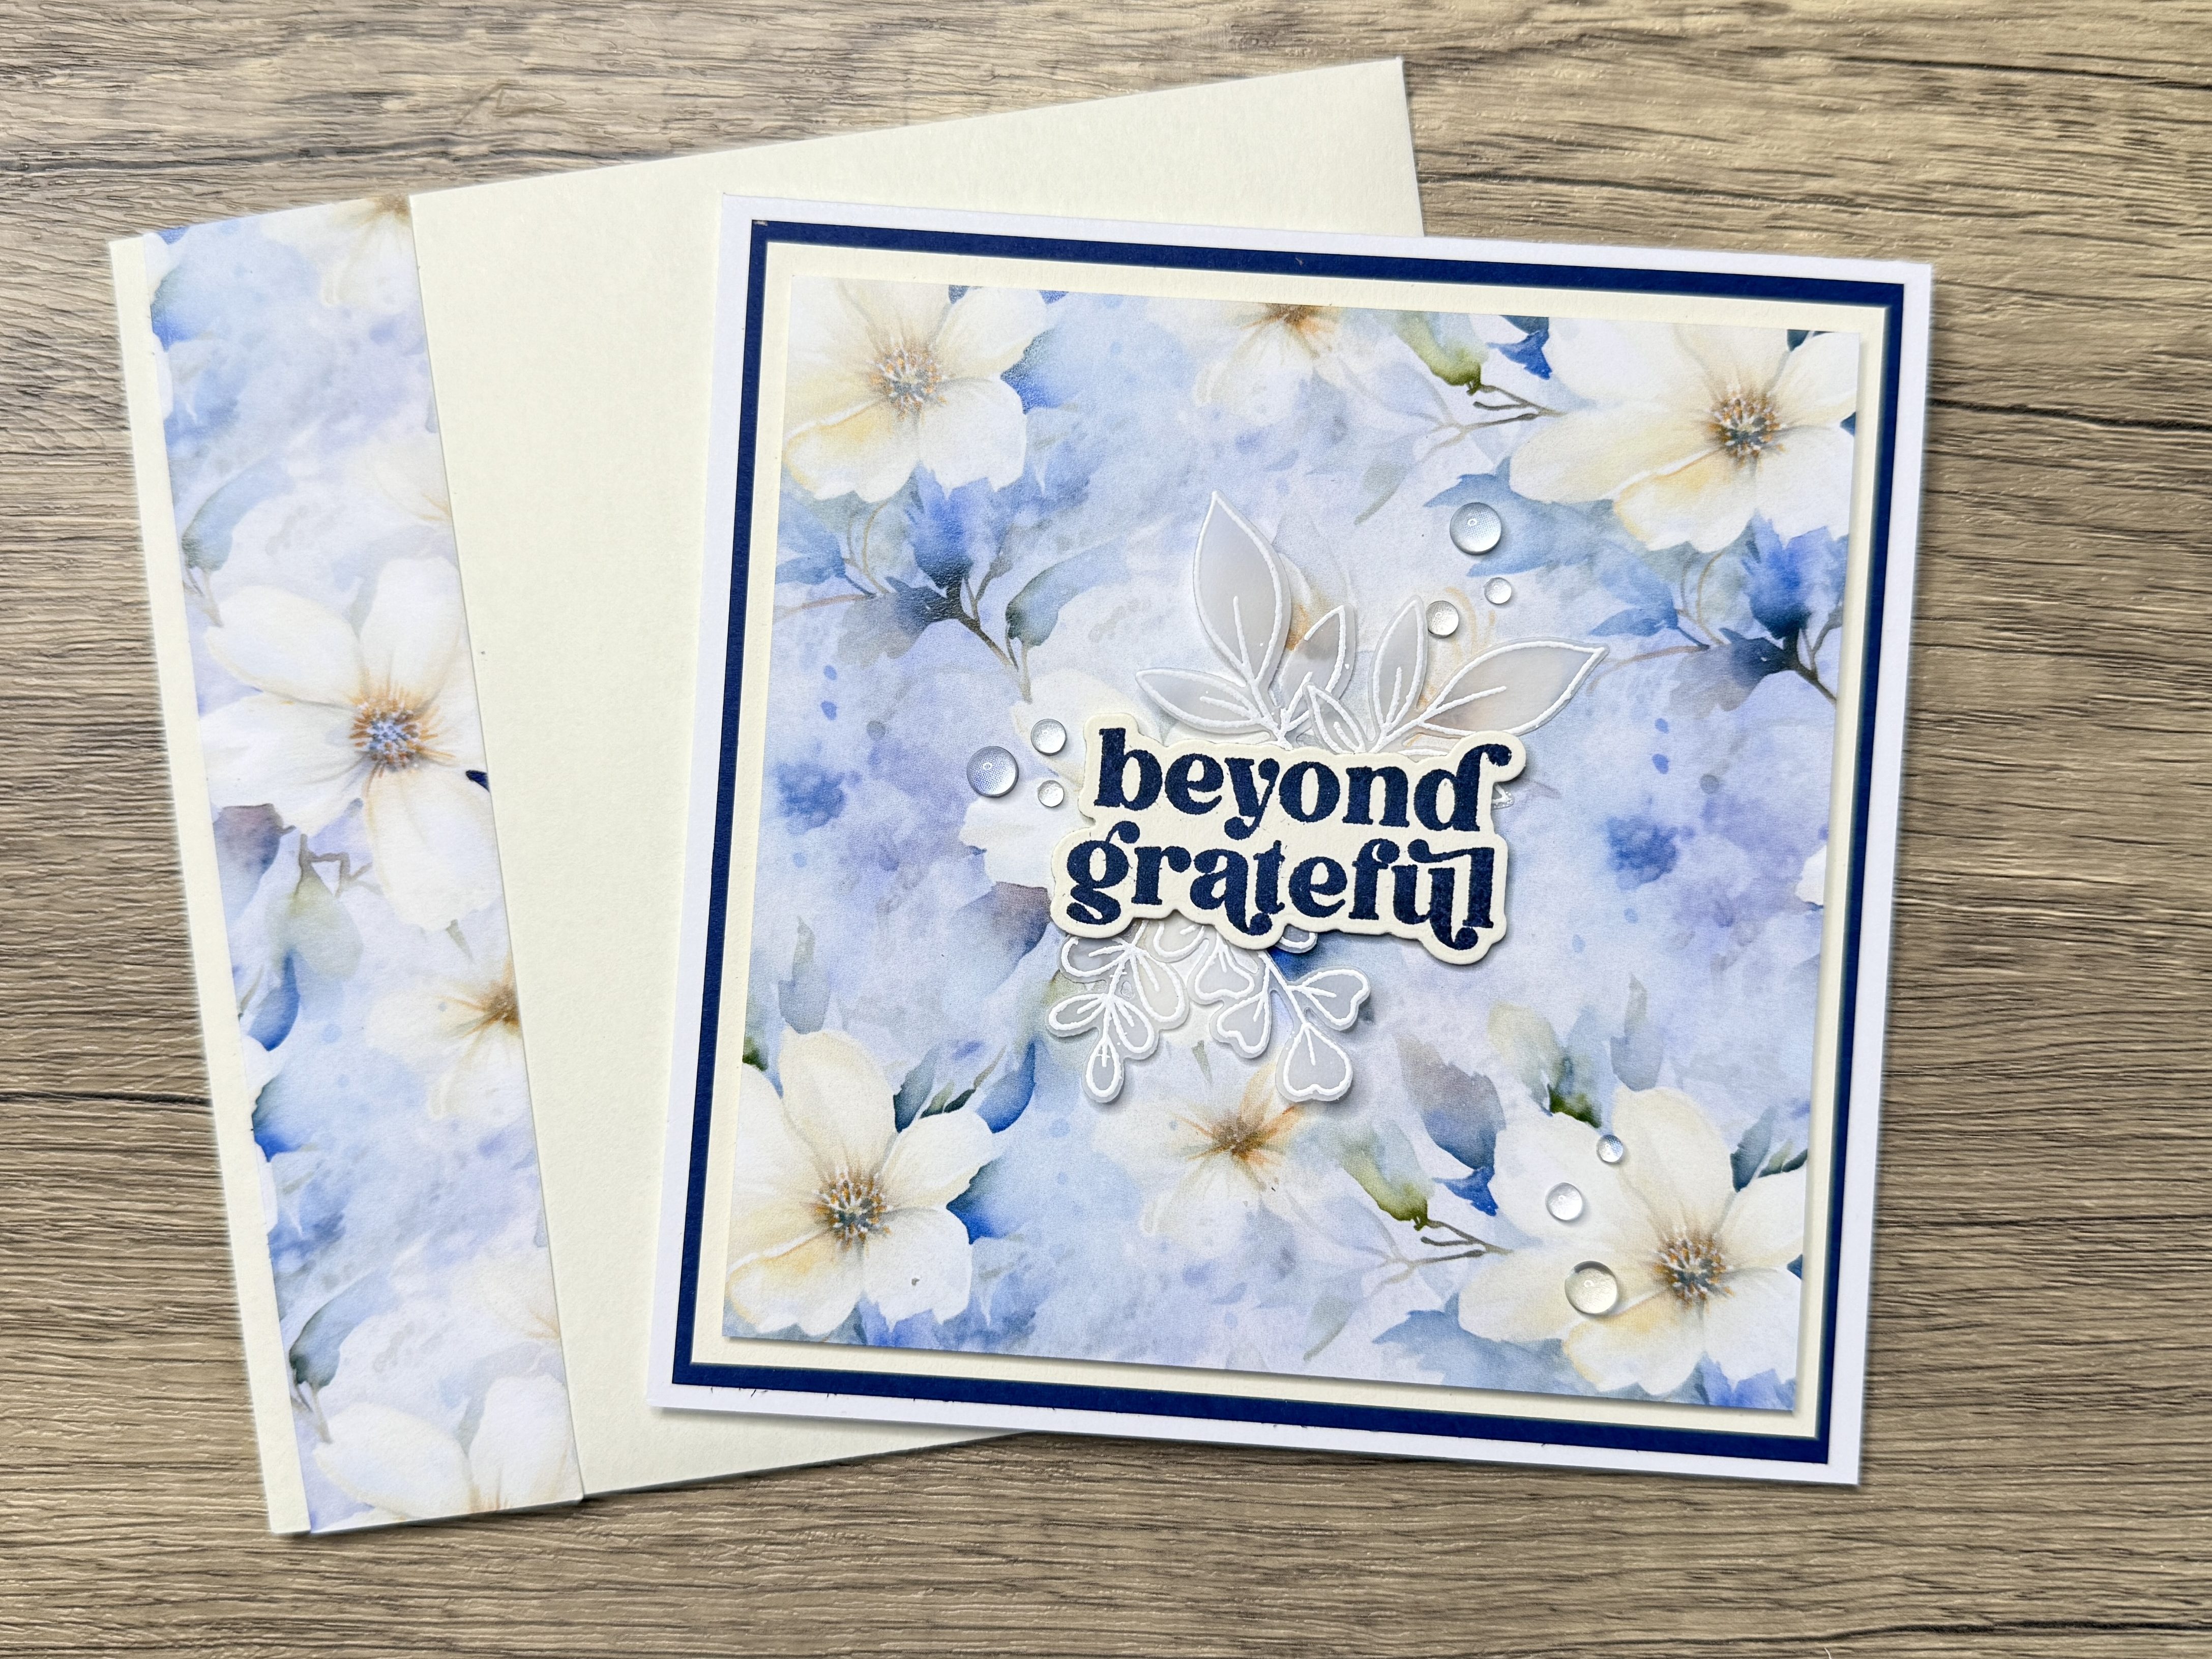
- Create the Base: Trim a 12×12 sheet of Ohuhu cardstock down to 11” x 5½”. Score and fold to create a 5½” square card.
- Trim Your Mats: Cut the following layers:
- 5″x5″ layer with Cosmic Sky Colorwheel Card Stock
- 4 ¾” x 4 ¾” with Lawn Fawn Vanilla Malt Card Stock
- 4 ½” x 4 ½” with the floral pattern paper. Keep the pattern paper scraps for the envelope.
- Heat Emboss the Sentiment: Stamp “Beyond Grateful” with Altenew’s Indigo Skies, use embossing powder, and heat set.
- Add Dimension: Pop the top layer with foam tape.
- Add Floral Die Cuts: Add heat-embossed and die-cut vellum florals and foliage created using Altenew’s Zero Waste Flowery Pattern stamp set and coordinating die.
- Embellish: Use PinkFresh Studio clear drops and gems for a subtle sparkle.
- Decorate the Envelope: Add a strip of the patterned paper along the left side of the envelope and another piece on the envelope flap.
Card 4 – Acetate Card with Floating Sentiment
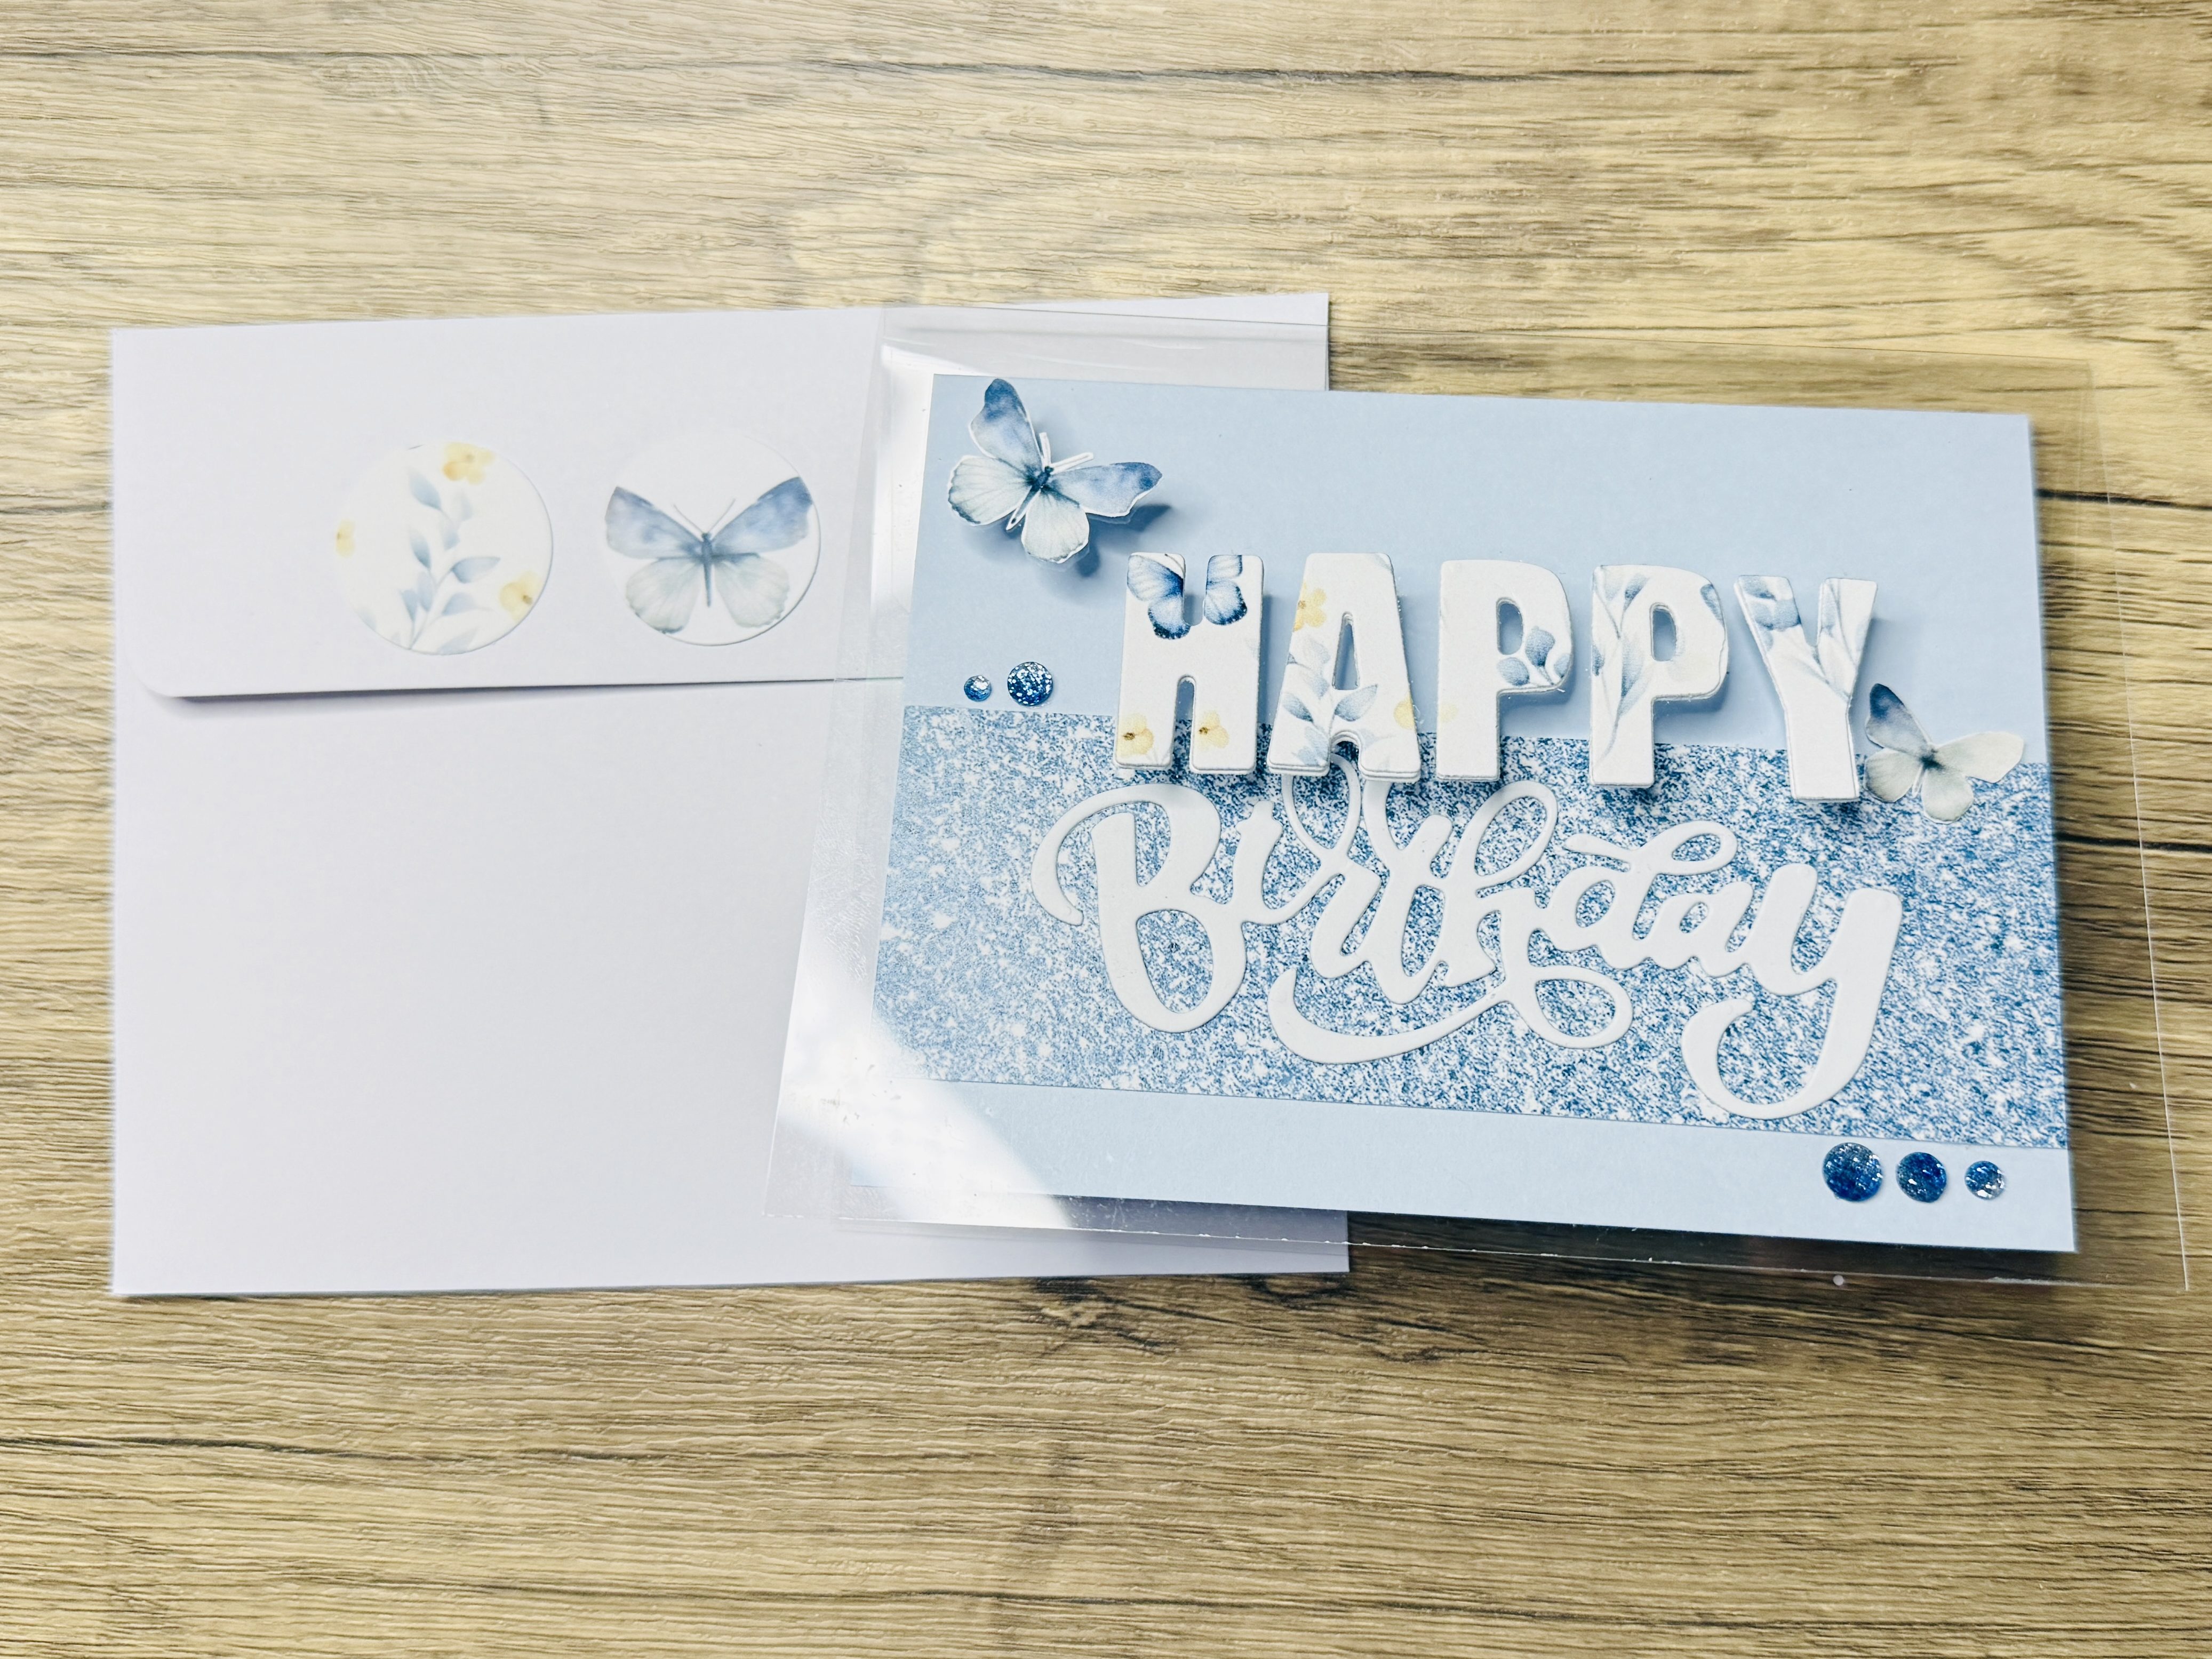
- Gather Scraps: Use leftover butterfly-themed paper. Punch out ¾” circles for journaling or decorating the envelope.
- Use an Acetate Base: Clean the acetate with alcohol spray and Swiffer to remove any dust or fibres from the surface. Use a piece of Altenew double-sided adhesive sheet to adhere a note card measuring 3 ¾ in. x 5 in. inside the Simon Says Stamp A2 Clear Acetate Cards.
- Die-Cut Sentiment: Use a layered “Happy Birthday” sentiment created using scraps of the patterned paper and white card stock. Use the negative die-cut piece to align the letters perfectly.
- Assemble Carefully: Adhere the word “Happy” to the front of the acetate card base to create the illusion of floating. Adhere the “birthday” on the note card inside the acetate. Use glue and tape runner sparingly to avoid visible adhesive on the acetate.
- Add Butterflies: Fussy cut two butterflies and adhere one inside and one outside for layered dimension.
- Finish with Gems: Add small sparkly gems from PinkFresh Studio to complete the card.
- Decorate the Envelope: Adhere punched-out designs from the patterned paper to the envelope flap to coordinate with the card.
Card 5 – Elegant Ribbon and Dry-Embossed Sentiment
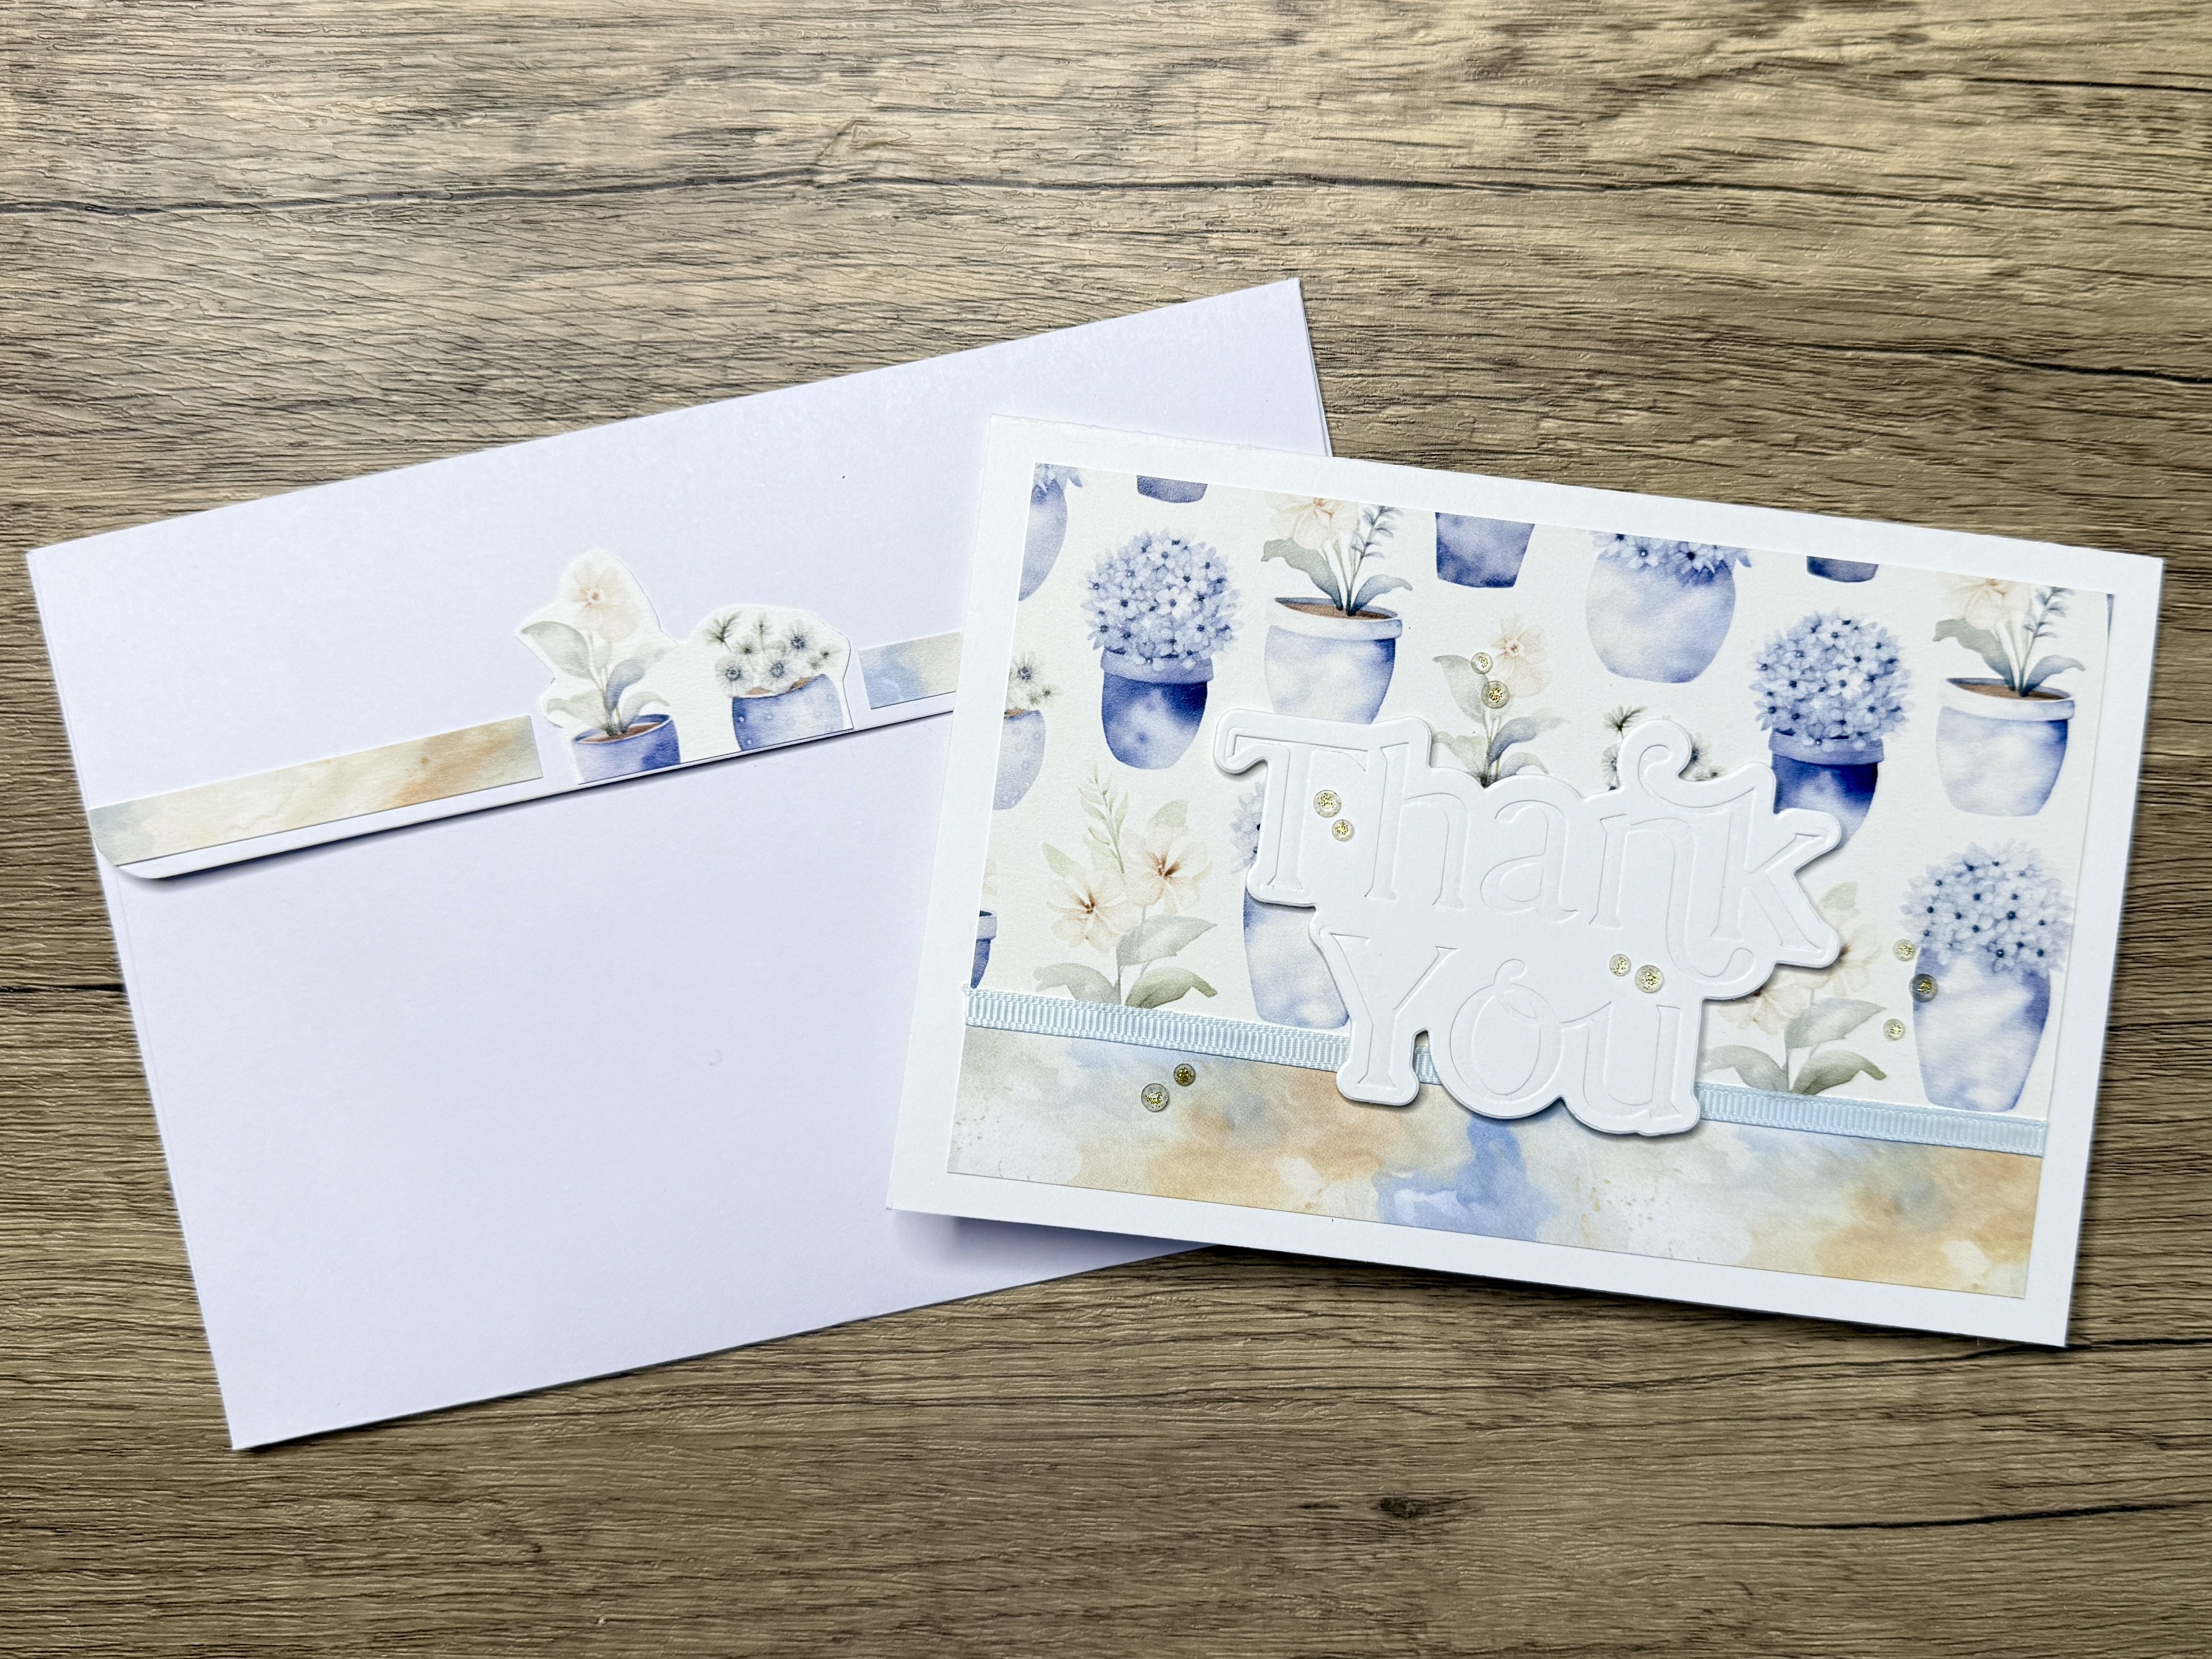
- Use a Full Panel: Create a 6½” x 4½” card base to use the full 6” width of the patterned paper.
- Add Ribbon: Add a piece of Sky Blue ribbon from Uniquely Creative to hide the seam between the two card panels.
- Dry Embossing Detail: Use the Pinkfresh Studio Thank You Hot Foil and Die Set (without foil) for subtle embossed texture on white card stock.
- Add Embellishments: Keep the card simple with Pinkfresh Studio Gold Glitter Drops and an airy design.
- Inside the Card: Add a surprise element by fussy-cutting a shape from the paper and adding a coordinating strip inside.
- Complete the Envelope: Decorate with leftover strips and elements for a cohesive look.
Final Thoughts
And that’s it—five beautiful cards, each with their own unique twist, plus matching envelopes! This project shows how much you can create using scraps, a little creativity, and just a few tools. Let me know in the comments which card was your favourite, and don’t forget to check out Not 2 Shabby—their paper pads are a dream to work with.

If you want to see more ways to use the other paper pads I hauled, drop me a comment below and I’ll happily make another batch of cards for you!
Here’s the detailed list of supplies I used for the card:
https://linkdeli.com/widget.js?id=f5e8378456858c916708
Here is a list of all the crafting tools I use on a regular basis to create my card projects:


Leave a comment