If you’ve ever felt like your embossing folders don’t get enough use, this tutorial is for you! Today, we’re taking a single embossing folder and transforming it into multiple high-impact card designs using simple add-ons like stencils, inks, pastes, and even patterned paper.
These techniques not only elevate your handmade cards, but they also help you stretch your supplies and save money—especially when embossing folders can be on the pricier side.
You can watch the detailed YouTube tutorial here. I’ve also included a complete visual list of the supplies that are currently available at the end of the blog post for your convenience:
Hack 1: Double Embossing with Soft Ink Blending
Double embossing is a great way to add subtle dimension and visual texture without needing a 3D folder. By embossing twice and lightly brushing ink over the surface, you can highlight the raised design in a soft, elegant way.
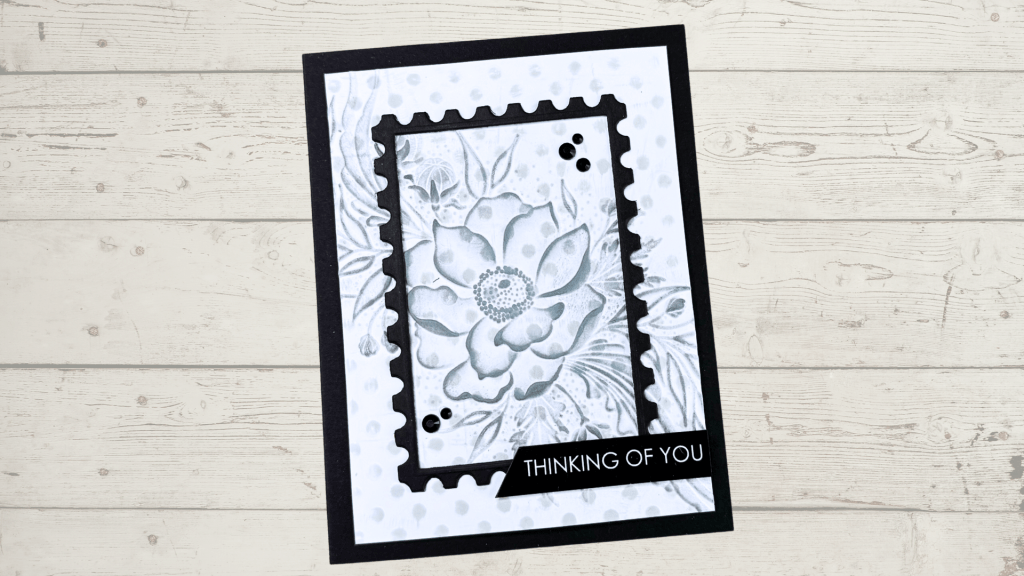
Supplies Used
- Embossing folder (any regular 2D design)
- Altenew Cheerful Bloom 3D embossing folder
- Heavyweight white card stock cut to 4 ¼ in. x 5 ½ in.
- Black A2 card base
- Black card stock for frame
- Nested Postage Labels & Tag Etched Dies
- Water spritzer
- Flat foam blender
- Light and dark grey dye inks (e.g., Pinkfresh Studio Misty Coast + Metropolis)
- Sentiment stamp or pre-made sentiment
- Adhesive and embellishments
Step-by-Step Instructions
- Lightly spritz the standard embossing folder with water.
- Place the white A2 heavyweight cardstock inside and run it through your die-cutting machine.
- Remove the panel and lightly swipe grey ink over the raised areas using a flat foam blender or use the ink pad directly on the panel.
- Place the panel into the 3D embossing folder and emboss again.
- Add more grey ink with a foam blender to bring out the details in the floral design.
- Create a small frame with the rectangle postage dies by stacking three frames.
- Adhere the frame around the main floral design.
- Finish the card with a simple sentiment and coordinating gems.
Hack 2: Stencilled Background + Embossing
This technique combines stencils with embossing to create a beautiful layered effect. The stencil adds colour and design, while the embossing enhances it with dimension.
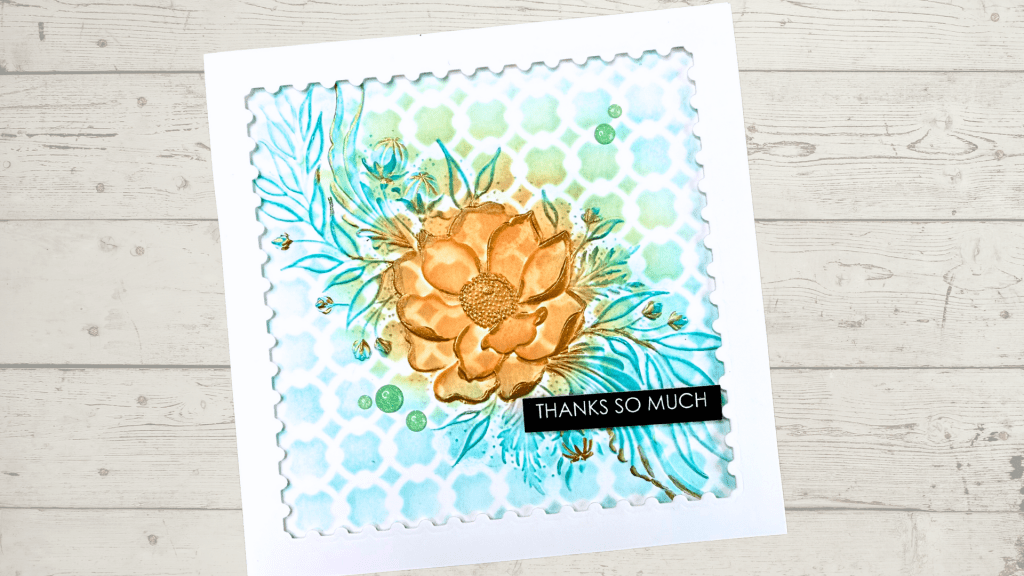
Supplies Used
- Altenew Cheerful Bloom 3D embossing folder
- White heavy weight 6” × 6” card base
- 6 in. x 6 in. heavy weight card panel – 2 panels
- Linked Spots & Dots Background Stencil
- Gina K inks:
- Flat foam blender
- Metallic watercolour or shimmer paint
- Postage Edge Squares Die
- Flat foam blender
- Water spritzer
- Narrow adhesive foam strips
- Sentiment stamp or pre-made sentiment
Step-by-Step Instructions
- Secure a 6” × 6” panel of heavyweight card stock under your stencil with low-tack tape.
- Blend ink through the stencil, starting with Peach Bellini where the floral centre will be.
- Add Ocean Mist around the edges, blending into the centre.
- Remove the stencil and lightly spritz the back of the embossing folder.
- Emboss the inked panel.
- Add a second layer of ink to the raised areas of the embossed design using darker shades (e.g., Sweet Mango and Turquoise Sea).
- Add metallic watercolour accents for shimmer.
- Run it through the machine again (dry) to redefine the embossed texture.
- Use the largest from the Postage Edge Squares Die set to cut out a frame from the second 6×6 panel of white card stock.
- Adhere to the front panel with narrow adhesive foam strips to elevate it from the background panel. Optionally, stack two or three of these frames together to create the final frame.
- Finish with a sentiment and gems.
Technique 3: Embossing on Patterned Paper
Using patterned paper gives your folder a totally new look—but the trick is choosing a soft, muted pattern so the embossed design isn’t lost.
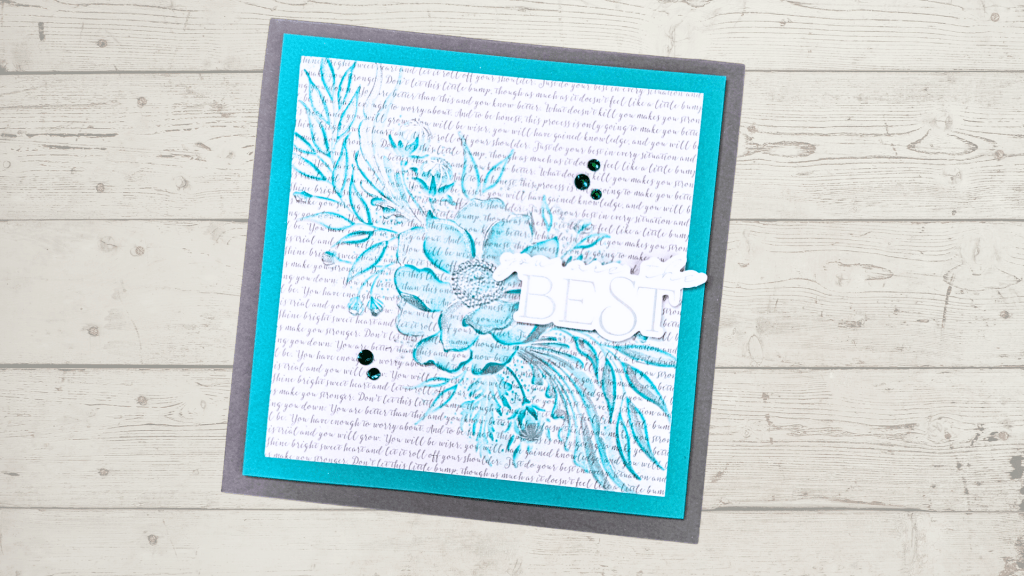
Supplies Used
- Altenew Cheerful Bloom 3D embossing folder
- Spellbinders Fog card stock 6 in. x 6 in. card base
- Spellbinders Teal Topaz card panel – 5 ½ in. x 5 ½ in.
- Patterned paper (muted designs work best) – 5 in. x 5 in.
- Gina K inks: Turquoise Sea
- Metallic watercolour or shimmer paint – Silver
- Flat foam blender
- Water spritzer
- Adhesive
- Gems or pearls
Step-by-Step Instructions
- Choose a 5 in. x 5 in. panel of patterned paper that isn’t too busy.
- Spritz a light mist of water into the Altenew Cheerful Bloom 3D embossing folder, then emboss the panel.
- Use a flat foam blender to apply Turquoise Sea ink over the raised areas to enhance definition.
- Add a touch of metallic paint (silver or gold) to highlight and accent the design.
- Mount the embossed panel onto the Teal Topaz card panel and add a sentiment.
- Add a few gems to embellish the card front.
Technique 4: Ink Resist Technique + Embossing Folder
This high-end technique creates a luxurious, damask-style finish with beautiful shine.
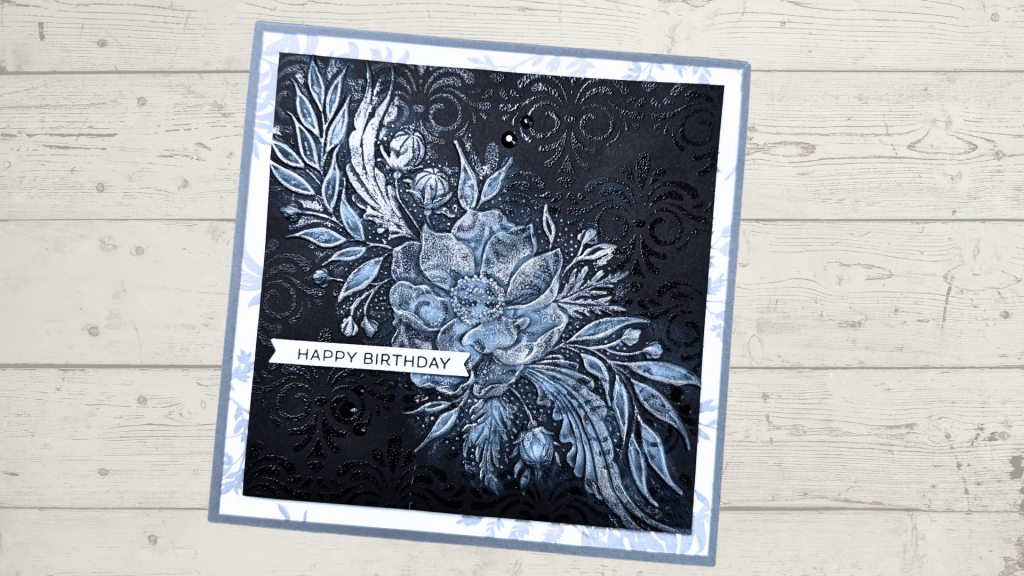
Supplies Used
- Altenew Cheerful Bloom 3D embossing folder
- Spellbinders Fog card stock 6 in. x 6 in. card base
- Black card stock – 5 in. x 5 in. panel
- 5 ½ in. x 5 ½ in. card panel
- Vintage Motifs Stencil
- White pigment ink
- Altenew Shimmer Relief Paste (Burnished Platinum)
- Wide washi tape for background panel (optional)
- Lightweight white card panel – 5 ½ in. x 5 ½ in.
- Embossing ink
- Clear embossing powder
- Flat foam blender
- Water spritzer
- Foam tape
Step-by-Step Instructions
- Secure the stencil to a sheet of cardstock using magnets or low-tack tape.
- Press clear embossing ink through the stencil using the pad directly (or a foam tool).
- Remove the stencil and pour clear embossing powder over the panel.
- Heat emboss until glossy.
- Lightly spritz the Altenew Cheerful Bloom 3D embossing folder with a light misting of water and run the panel through the machine.
- Add white ink to the main floral design to bring the design to life.
- Once the ink is dry, apply a second layer of white ink.
- Once dry, wipe the embossed areas with a rag to restore the shine of the heat embossing, then dry completely.
- Emboss the panel again (without water) to enhance the texture.
- Add a light coating of shimmer paste (like Burnished Platinum) with your finger to highlight the raised details.
- Apply washi tape to the lightweight card stock and create a matting layer measuring 5 ½ in. x 5 ½ in.
- Apply foam tape to the back of the embossed panel and adhere it to the washi tape panel.
- Mount the assembled card panel on the Fog card base.
- Add a sentiment and embellish with gems.
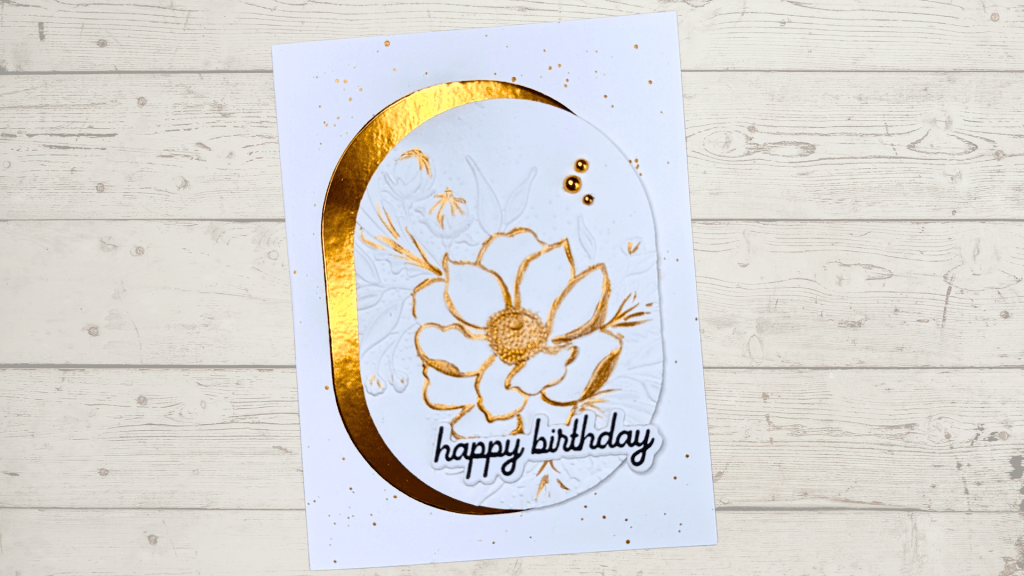
Hack #5: Simple Metallic Wash + Embossing
This clean and simple design produces stunning results with very little effort.
Supplies Used
- Altenew Cheerful Bloom 3D embossing folder
- A2 heavy weight side-folding card base
- Oval card panel (any other shape works fine)
- Foam or flat paintbrush
- Water spritzer
- Oval dies
- Sentiment
- Gold pearls or embellishments
- Foam tape
Steps
- Use the Altenew Cheerful Bloom 3D embossing folder to emboss an oval white card stock panel in an appropriate size to create the focal point.
- Brush metallic watercolour lightly across the raised areas for a soft glow.
- Use a paintbrush to spatter some metallic paint onto the card base.
- Cut an oval frame from gold foil and adhere it to the card base, aligning it with the left edge.
- Apply foam tape behind the embossed panel, adhere it to the gold matting layer, and offset it to the right of the gold panel.
- Add a sentiment and a few gold pearls to finish.
Finished Card Ideas
With these techniques, you can create a whole collection of cards from just one embossing folder. Try pairing your panels with:
- Washi tape backgrounds
- Postage-style frame dies
- Simple sentiments
- Coordinating card stock mats
- Gems or pearls for subtle sparkle
Each card has its own personality, but the unifying folder makes the process fast, budget-friendly, and creatively satisfying.
https://linkdeli.com/widget.js?id=f5e8378456858c916708
Here is a list of all the crafting tools I use regularly to create my card projects:


Leave a comment